
It was a warm Saturday afternoon back in the summer of 2018 when I suffered my greatest kitchen humiliation. I had volunteered to bring the appetizer for my sister-in-law's backyard housewarming party. Eager to impress her friends, I decided to make a massive tray of classic seven-layer taco dip. I did not think about the physics of food back then. I just threw together some hot refried beans, a tub of sour cream, a jar of watery store-bought salsa, some bagged shredded cheese, and chopped tomatoes.
By the time we arrived at the party and unpacked the cooler, disaster had struck. The warm beans had melted the sour cream into a warm, watery puddle. The salsa had wept its juices all over the shredded cheese, turning the top layer into a soggy, orange-and-white swamp. Guests tried to dip their chips, but the chips immediately snapped under the weight of the heavy, unanchored layers. I watched in horror as people politely took one bite, struggled with the soggy mess, and quietly moved on to the potato chips. I went home that night with almost the entire tray of lukewarm goop.
That embarrassing afternoon set me on a multi-year quest to understand the structural engineering and flavor balance of the perfect layered dip. I realized that a great taco dip is not just a random stack of Mexican-inspired ingredients. It is a carefully built tower of contrasting textures, temperatures, and moisture levels. Today, I want to share the exact blueprint I developed through years of trial and error so you can make a stunning, towering glass-bowl taco dip that stays fresh, holds its structure, and disappears within minutes at any gathering.
The Science of Layered Dip Engineering
Before we get to the ingredients, we need to talk about why most layered dips fail. The main enemy of any cold dip is water. Ingredients like tomatoes, lettuce, salsa, and sour cream are packed with moisture. When you stack them on top of each other, gravity pulls that moisture downward. If you do not create barriers and prepare your ingredients correctly, you end up with a puddle of liquid at the bottom of your serving dish.
To prevent the dreaded soggy swamp effect, we must treat each layer with a specific preparation method. We need to draw out excess moisture from our fresh vegetables, create a structurally sound creamy layer that will not liquefy, and arrange the layers in an order that keeps wet ingredients separated from dry ones.
Additionally, we need to consider how people actually eat the dip. If you build this in a deep glass trifle bowl, which looks incredibly beautiful and dramatic on a buffet table, guests have to dig deep to get every single flavor in one bite. If the layers are too thick or slippery, the dip will collapse, or the guest will only end up with a chip full of sour cream. The layers must be firm enough to hold their shape when a sturdy tortilla chip is plunged straight down to the bottom.
The Ultimate Ingredient List
To achieve the perfect balance of savory, creamy, tangy, and fresh, we use high-quality ingredients and make a few quick homemade mixtures rather than relying entirely on pre-packaged tubs. Here is everything you will need to build this show-stopping dip.
| Ingredient | Amount | Notes |
|---|---|---|
| Lean ground beef | 1 pound | 90/10 lean beef is best to minimize grease |
| Homemade taco seasoning | 3 tablespoons | Chili powder, cumin, garlic, onion, oregano, salt |
| Water | 0.25 cup | To help distribute the taco seasoning in the beef |
| Sour cream | 16 ounces | Full-fat sour cream provides the best structure |
| Cream cheese | 8 ounces | Softened to room temperature for structural stability |
| Fresh lime juice | 2 tablespoons | Squeezed from one large, juicy lime |
| Roma tomatoes | 4 medium | Roma tomatoes have less watery pulp than other varieties |
| Hass avocados | 3 ripe | Firm but yielding to gentle pressure |
| Sharp cheddar cheese | 2 cups | Grated fresh from a block, do not use pre-bagged |
| Romaine lettuce | 1 small head | Finely shredded and spun completely dry |
| Green onions | 4 stalks | Thinly sliced, using both green and white parts |
| Fresh cilantro | 0.5 cup | Finely chopped for the top garnish |
Step by Step Assembly Guide
Now that we have our ingredients ready, let us walk through the process of preparing and assembling each layer. This is where the magic happens. Do not rush this process. Taking a few extra minutes to prep each component will make the difference between a soggy mess and a masterpiece.
Step 1 Prepare the Savory Beef Layer
We start with the seasoned ground beef. Many traditional recipes use refried beans as the base, but I have found that a perfectly seasoned, cooled ground beef layer provides a much more satisfying, savory foundation.
Brown the ground beef in a skillet over medium-high heat, breaking it up into very fine crumbles as it cooks. You do not want large chunks of beef here because they will make it difficult to scoop the dip cleanly. Once the beef is fully cooked, drain every single drop of excess fat from the pan.
Add your taco seasoning and a quarter cup of water to the skillet. Stir well and let it simmer on low heat for about five minutes until the water has fully evaporated and the seasoning has coated every tiny crumble of beef.
Remove the pan from the heat and transfer the beef to a bowl. This next part is absolutely critical: let the beef cool completely to room temperature. If you put warm beef into your serving bowl and layer cold dairy directly on top of it, the heat will melt the fats in the sour cream and cream cheese, resulting in a separated, greasy disaster. I usually put the cooled beef in the refrigerator for about thirty minutes before I begin assembling the dip.
Step 2 Mix the Stabilized Creamy Layer
Plain sour cream is too runny to support the weight of cheese, avocados, and tomatoes in a deep bowl. To give our creamy layer some structural backbone, we are going to blend it with cream cheese.
In a medium mixing bowl, combine your softened cream cheese and sour cream. Use a hand mixer or a sturdy whisk to blend them together until completely smooth and free of lumps. Stir in the fresh lime juice and a tablespoon of your taco seasoning mix for an extra punch of flavor.
By blending these ingredients, you get all the tangy freshness of sour cream, but the cream cheese provides a thick, velvety structure that will hold its shape even when dug into with a heavy tortilla chip.
Step 3 Prep the Fresh Vegetables
While your beef is cooling and your cream mixture is chilling, it is time to prep your vegetables. This is where we prevent the water problem.
Start with the Roma tomatoes. Slice them in half lengthwise and use a small spoon to scoop out all of the watery seeds and pulp. You only want the firm, outer flesh of the tomato. Once seeded, dice the tomatoes into small, uniform pieces.
Place the diced tomatoes in a colander set over a bowl. Sprinkle them with a pinch of salt and let them sit for fifteen minutes. The salt will draw out the excess water from the tomatoes. You will be amazed at how much liquid drains out into the bowl. Pat the drained tomatoes dry with a paper towel before using them.
Next, chop your romaine lettuce. I prefer romaine over iceberg because it has more flavor and a better crunch, but the key here is to make sure it is completely dry. Wash the shredded lettuce and run it through a salad spinner. If you do not have a salad spinner, spread the lettuce out on a clean kitchen towel and pat it thoroughly with paper towels. Any moisture left on the lettuce will make your cheese soggy.
For the avocados, dice them into clean cubes. Toss the diced avocado with a teaspoon of fresh lime juice. The acid in the lime juice slows down the oxidation process, keeping your avocado layers a beautiful, vibrant green instead of a muddy brown.
Step 4 Grate the Cheese
Please, skip the pre-packaged bags of shredded cheese. I know it is convenient, but those bags are sprayed with anti-caking agents like cellulose to prevent the shreds from sticking together. This coating prevents the cheese from tasting fresh and gives it a dry, chalky texture.
Buy a block of high-quality sharp cheddar cheese and grate it yourself using the large holes of a box grater. It takes less than five minutes, and the flavor and texture are infinitely better.
Step 5 Assemble the Masterpiece
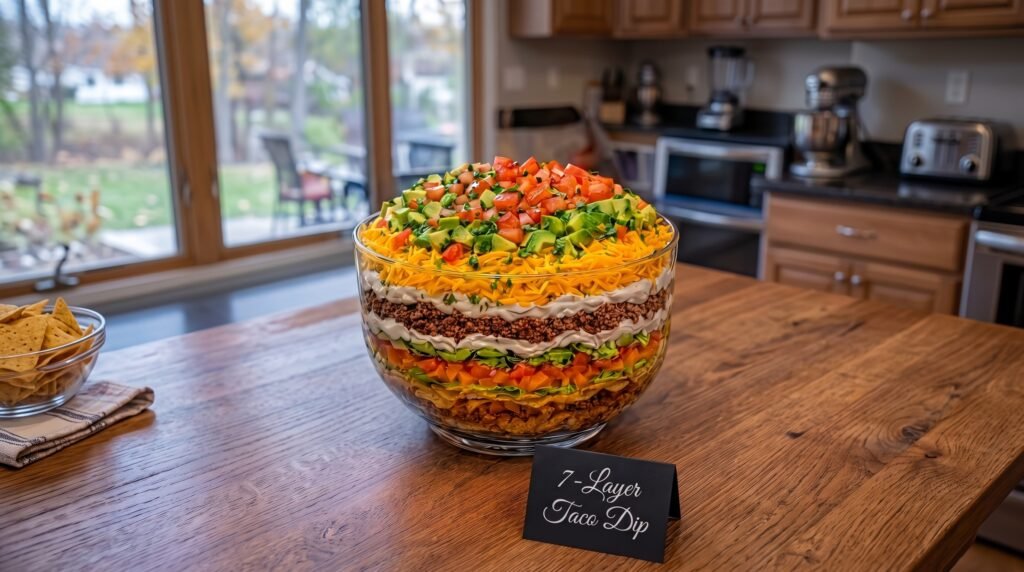
Now that all of our components are prepped, dried, cooled, and organized, we can begin building our layers in our clear glass bowl. This order is designed to keep wet ingredients separated and provide the best structural integrity.
Start by placing a thin layer of tortilla chips or a base of seasoned beef at the very bottom of the bowl. For our classic presentation, we will start with a layer of the seasoned and cooled ground beef. Press it down gently with the back of a spoon to create a flat, solid foundation.
Next, spread half of your stabilized sour cream and cream cheese mixture over the beef. Be gentle here so you do not mix the beef into the white cream. Use an offset spatula or the back of a spoon to smooth it out all the way to the edges of the glass. Seeing the distinct lines through the glass is what makes this dish look so spectacular.
On top of the cream layer, scatter your diced tomatoes and orange bell peppers if you are using them. This provides a beautiful pop of color right in the middle of the dip.
Follow the tomatoes with your shredded lettuce. The lettuce acts as a dry barrier between the wet tomatoes and the next layers.
Add another layer of your creamy sour cream mixture on top of the lettuce. This double-layer cream strategy ensures that every bite of the deep dip has plenty of moisture and tang to balance the savory beef.
Now, sprinkle your freshly grated cheddar cheese generously over the cream layer. Ensure it goes all the way to the edges of the bowl to create a beautiful, solid yellow band.
Finally, crown your creation with a vibrant mix of diced avocado, the remaining drained tomatoes, sliced green onions, and finely chopped fresh cilantro. The contrast of the green avocado and herbs against the bright red tomatoes and yellow cheese is stunning.
Common Mistakes to Avoid
Even with the best instructions, it is easy to make a small misstep that can affect the quality of your dip. Here are the most common mistakes I see people make and how to avoid them.
Using warm ingredients. I cannot stress this enough. Every single cooked element, especially the ground beef, must be completely cold before you start layering. If you are in a rush, spread the cooked beef onto a baking sheet and pop it in the freezer for ten minutes to cool it down quickly.
Skipping the tomato draining step. It is tempting to just chop the tomatoes and throw them in. But those juices will accumulate at the bottom of your bowl within an hour, creating an unappealing puddle of red water. Take the time to seed, salt, and drain them.
Choosing the wrong chips. A delicate, thin restaurant-style chip will snap immediately when faced with a deep, heavy dip like this. You need a sturdy, thick-cut yellow corn chip or scoop-style tortilla chips. When hosting a party, I always set out a couple of different options, but I make sure at least one bowl contains heavy-duty chips that can handle the weight of the layers.
Making the dip too far in advance. While you can prepare all of the individual components the night before, you should not assemble the entire dip more than a few hours before serving. The avocado will eventually brown, and the lettuce will lose its crispness if it sits in the bowl for too long. For the best results, assemble the dip two to three hours before your guests arrive and keep it chilled in the refrigerator.
Customizing Your Layers
One of the best things about this recipe is how adaptable it is. Once you master the basic physics of the layering process, you can swap out ingredients to suit your personal tastes or dietary needs.
If you want to make a vegetarian version, swap out the ground beef for seasoned black beans or pinto beans. To make the beans structurally sound, drain them thoroughly, rinse them, and toss them with your homemade taco seasoning and a squeeze of lime juice. You can also mash some of the beans to create a thicker paste that will hold up well at the bottom of the bowl.
If you love heat, add a layer of pickled or fresh sliced jalapeños right under the cheese layer. You can also mix some finely chopped chipotle peppers in adobo sauce into your sour cream mixture to give the entire dip a smoky, spicy kick.
For a Greek-inspired twist on the layered dip concept, swap out the Mexican ingredients for Mediterranean flavors. Use hummus as the base layer, followed by a mixture of Greek yogurt and feta cheese. Layer on diced cucumbers, cherry tomatoes, kalamata olives, roasted red peppers, and finish with a sprinkle of fresh dill and chopped parsley.
How to Handle Leftovers
If you happen to have leftovers, do not let them go to waste. Because we built this dip with dry, stabilized layers, it actually keeps quite well in the fridge for a day or two.
My absolute favorite way to use leftover taco dip is to turn it into a breakfast scramble. Heat a non-stick skillet over medium heat, scoop a couple of generous portions of the leftover dip directly into the pan, and let it warm up for a minute. The cheese will melt, and the sour cream will create a rich sauce. Whisk three or four eggs in a bowl, pour them directly into the skillet with the dip, and scramble everything together. Serve it inside warm flour tortillas for the most incredible, effortless breakfast burritos you have ever tasted.
You can also toss leftovers with some extra shredded romaine lettuce and a squeeze of lime juice to create a quick, flavorful taco salad for lunch the next day. The creamy layers act as a built-in dressing, and the seasoned beef and cheese provide plenty of protein and flavor.
The Joy of Sharing
There is something incredibly nostalgic and comforting about a seven-layer dip. It is the ultimate party food, evoking memories of game days, backyard barbecues, and holiday gatherings. When you present this towering, colorful glass bowl to your guests, you are not just serving an appetizer; you are creating a centerpiece that invites people to gather round, share stories, and enjoy a delicious meal together.
By focusing on high-quality ingredients, proper moisture control, and structural assembly, you can elevate this humble party classic into a gourmet experience that your friends and family will request for years to come. Grab your glass bowl, get your skillet hot, and enjoy the process of building your own perfect layered dip.