
I will never forget the first time I tried to host a fancy dinner party in my tiny, third-floor apartment. I had planned a massive, overly complicated menu featuring individual savory tarts with handmade puff pastry, caramelized onions, and roasted root vegetables. I was stressed, the kitchen was ninety degrees, and my puff pastry ended up looking more like a soggy, melted puddle of butter than a crisp, flaky masterpiece. My guests were arriving in twenty minutes, and I was on the verge of tears.
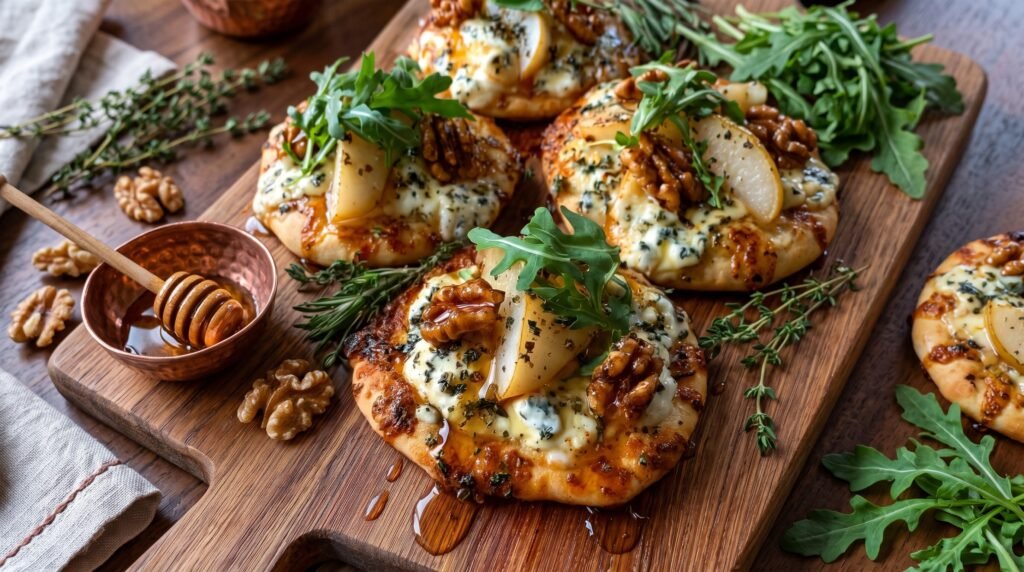
In a moment of pure panic, I scanned my fridge and pantry for a rescue plan. I found a package of store-bought naan bread, a couple of slightly firm pears sitting in a fruit bowl, a wedge of gorgonzola cheese left over from a charcuterie board, a handful of walnuts, and a jar of raw honey. I sliced the pears thin, scattered the cheese and nuts over the flatbreads, and threw them into a screaming hot oven. Right before serving, I scattered some fresh baby arugula on top and drizzled them with honey.
The reaction from my friends was absolute silence, followed by collective groans of delight. Nobody cared about the failed puff pastry. In fact, they thought these rustic, sweet-and-savory flatbreads were the planned star of the show. Since that chaotic night, this recipe has become my absolute go-to for effortless entertaining, cozy date nights, or even a quick weeknight dinner when I want to feel a little bit fancy without spending hours in the kitchen.
Through years of making these flatbreads, I have learned exactly what makes them tick, which mistakes will ruin them, and how to customize them for any crowd. Let me guide you through the process of making the ultimate pear and gorgonzola flatbread, step by step, with all the hard-earned kitchen secrets I have picked up along the way.
Why This Flavor Profile is Absolute Magic
If you have ever wondered why certain food combinations just work, this flatbread is a masterclass in flavor balancing. It hits almost every single taste receptor on your tongue: sweet, salty, bitter, savory, and even a little bit of sour if you play your cards right.
First, you have the gorgonzola cheese. Blue cheese can be incredibly divisive. Some people find it too funky, too sharp, or too aggressive. But something magical happens when you subject gorgonzola to intense heat. It melts into a rich, creamy, buttery base, and its sharp edge softens into a deeply savory, complex flavor. It provides the salty, earthy foundation of the dish.
Next come the pears. Pears offer a clean, crisp, juicy sweetness that cuts right through the richness of the cheese. They provide a structural contrast as well, giving you a tender bite that breaks up the gooey texture of the melted cheese.
Then we have the walnuts. Without them, the flatbread would be too soft. The toasted walnuts add a much-needed woody crunch and a pleasant, slightly bitter undertone that prevents the dish from tasting like dessert.
Finally, the fresh arugula and the honey drizzle tie everything together. The arugula brings a peppery, fresh bite that wakes up your palate, while the honey adds a sticky, floral sweetness that glazes over the salty cheese and toasted nuts. It is a perfect harmony of contrasts.
The Ingredient Checklist
Before we jump into the kitchen, let us talk about your ingredients. Because this recipe has very few components, the quality and state of each ingredient will make a massive difference in your final result.
| Ingredient | Amount | Notes |
|---|---|---|
| Flatbread bases | 4 mini naans or flatbreads | Can use store-bought naan, pita, or homemade dough |
| Shredded mozzarella | 1.5 cups | Provides a gooey, melting base to hold toppings |
| Gorgonzola cheese | 4 ounces | Use Gorgonzola Dolce for a milder, creamier flavor |
| Firm pears | 2 medium | Bosc or Anjou work best; avoid overripe, mushy pears |
| Walnuts | 1/2 cup | Raw halves or pieces, to be toasted before assembly |
| Fresh arugula | 2 cups | Packed baby arugula for a peppery finish |
| Raw honey | 3 tablespoons | For drizzling; can substitute with hot honey for kick |
| Fresh rosemary | 1 tablespoon | Finely chopped; adds a beautiful piney aroma |
| Olive oil | 2 tablespoons | For brushing the flatbread bases |
| Coarse sea salt | To taste | Flaky salt like Maldon is perfect here |
Let Us Talk About the Base: Store-Bought vs. Homemade
One of the best things about this recipe is its flexibility. You can make it as quick or as scratch-made as you want.
If you are in a rush or hosting a crowd, store-bought flatbreads are your best friend. I highly recommend using mini Greek naans or high-quality flatbreads. Naan is fantastic because it already has a lovely chew, some charred bubbles from the tandoor oven, and often a touch of ghee or garlic flavor that pairs beautifully with the toppings. Pita bread can work in a pinch, but it tends to dry out and become cracker-like rather than staying chewy.
If you want to go the homemade route but do not want to wait hours for yeast to rise, I have a secret weapon: the two-ingredient yogurt dough. It is a lifesaver that I use all the time when I want fresh, doughy flatbreads in minutes.
To make the two-ingredient dough, simply combine equal parts by volume of self-rising flour and plain, thick Greek yogurt. For four mini flatbreads, you would use one cup of self-rising flour and one cup of Greek yogurt. Mix them together in a bowl until a shaggy dough forms, then turn it out onto a floured surface and knead it for about three to five minutes until it becomes smooth and elastic. Divide it into four balls, roll them out into rustic oval shapes, and you have fresh, tangy, protein-rich flatbread bases ready to go.
Choosing and Preparing Your Pears
This is where many people go wrong on their first attempt. They grab whatever pears are sitting in their fruit bowl, often soft, ultra-sweet Bartletts that are dripping with juice. While those are delicious for eating over the sink, they are a disaster for flatbreads.
If your pear is too ripe and soft, it will release an incredible amount of water as soon as it hits the hot oven. This water will pool on top of your flatbread, mixing with the melting cheese and turning your crispy crust into a soggy, wet mess.
Instead, look for slightly underripe, firm pears. Bosc pears are my absolute favorite for baking. They have a gorgeous bronze skin, a elegant elongated neck, and a dense flesh that holds its shape beautifully under high heat. Anjou pears are another excellent choice.
When preparing your pears, do not peel them. The skin adds a beautiful rustic look and helps the slices hold together. Slice them as thin as humanly possible. I like to use a very sharp chef's knife or a mandoline slicer to get paper-thin wedges. Thin slices ensure that the pear cooks through and caramelizes slightly at the edges without releasing too much moisture.
The Cheese Strategy: Balance is Everything
I love blue cheese, but even I will admit that too much blue cheese can completely ruin a dish. If you cover your flatbread entirely in gorgonzola, it will be incredibly salty, greasy, and overpowering.
To solve this, I use a two-step cheese strategy.
First, I lay down a thin, even layer of shredded low-moisture mozzarella or fontina cheese. This serves two purposes: it acts as a glue to keep the toppings from sliding off, and it provides that classic, mild, stretchy cheese experience that we all crave from a flatbread.
Second, I dot the gorgonzola cheese over the top of the mozzarella. I crumble it into small, pea-sized pieces and scatter them evenly. This ensures that every bite has a pocket of rich, funky gorgonzola flavor without it taking over the entire experience.
If you are shopping and see different types of gorgonzola, look for Gorgonzola Dolce. Dolce means sweet in Italian, and this style is younger, creamier, and much milder than Gorgonzola Piccante, which is aged longer and has a much sharper, crumbly texture. Dolce is highly approachable and melts like absolute dream.
Toasting Your Walnuts: The Non-Negotiable Step
Please do not skip this step! Raw walnuts have a paper-like, bitter skin and a dense texture that can feel a bit heavy and flat. Toasting them completely transforms the nut. It coaxes out the natural oils, making them incredibly fragrant, buttery, and crispy.
To toast your walnuts, place a dry skillet over medium heat. Add the walnut pieces and toss them frequently. Keep a very close eye on them. Nuts can go from perfectly toasted to burnt and bitter in a matter of seconds. As soon as you start to smell a warm, nutty aroma and see the edges turn a light golden brown (usually about three to five minutes), transfer them out of the hot pan onto a plate immediately. If you leave them in the hot pan, even with the heat off, the residual heat will continue to cook them and potentially burn them.
Once they have cooled down slightly, give them a rough chop. You want some decent-sized chunks for texture, not a fine powder.
Step-by-Step Cooking Instructions
Now that we have prepped our ingredients and understood the science behind them, let us put everything together.
Step 1: Crank Up the Heat
Preheat your oven to 425 degrees Fahrenheit (220 degrees Celsius). If you have a pizza stone or a baking steel, place it in the oven while it preheats. High, dry heat is the secret to getting a crisp bottom crust and beautifully browned cheese. If you do not have a baking stone, a standard rimmed baking sheet flipped upside down works incredibly well.
Step 2: Prep the Bases
Place your flatbreads on a cutting board. Brush the tops lightly with olive oil. This prevents the bread from drying out and helps the cheese adhere. If you are using homemade two-ingredient dough, prick the rolled-out dough all over with a fork to prevent massive air bubbles from inflating during the bake.
Step 3: Layer the Cheeses
Scatter your shredded mozzarella or fontina evenly across the flatbreads, leaving about a half-inch border around the edges for a crust. Next, crumble your gorgonzola dolce over the mozzarella, distributing it evenly.
Step 4: Arrange the Pears and Herbs
Lay your paper-thin pear slices on top of the cheese. I like to arrange them in a beautiful, overlapping fan pattern, but a rustic scatter works just as well. Sprinkle the finely chopped fresh rosemary over the top of the pears. Rosemary and pear are an underrated herb-and-fruit pairing; the piney, earthy aroma of the herb cuts through the sweetness beautifully.
Step 5: The First Bake
Carefully transfer your flatbreads onto your preheated pizza stone or baking sheet. Bake for about eight to ten minutes. You are looking for the crust to turn a beautiful golden brown and the cheese to be bubbling and caramelized in spots.
Step 6: Add the Walnuts
About two minutes before the flatbreads are done cooking, open the oven and carefully scatter your toasted, chopped walnuts over the top of the melting cheese. This short stint in the oven helps the walnuts adhere to the melted cheese and warms them through without risk of burning them.
Step 7: The Fresh Finish
Remove the flatbreads from the oven and let them sit for two minutes. This brief rest allows the cheese to set slightly so your toppings do not slide off when you cut into it.
Just before serving, pile a generous handful of fresh baby arugula in the center of each flatbread. The residual heat from the bread will wilt the bottom of the greens just slightly, while keeping the top crisp and fresh.
Finally, take your jar of honey and, using a spoon or a honey dipper, drizzle a generous, glossy stream of honey all over the flatbreads, making sure to hit the cheese, pears, and greens. Sprinkle with a pinch of flaky sea salt and serve immediately.
Common Mistakes to Avoid
Even with a simple recipe like this, there are a few common pitfalls that can ruin your dinner. Here is what to watch out for:
The Soggy Bottom: This happens when you use too much cheese, too many wet pear slices, or if your oven is not hot enough. Always ensure your oven is fully preheated, keep your pear slices thin, and do not overload the flatbread with toppings.
Burnt Walnuts or Honey: Never drizzle the honey or put the walnuts on the flatbread at the beginning of a long bake. Honey contains a lot of sugar and will burn quickly, turning bitter and smoky. Keep the honey as a post-bake finish, and only add the walnuts in the last minute or two of baking.
Wilted, Slimy Greens: If you put the arugula on the flatbread and then put it in the oven, you will end up with a slimy, dark green mess that tastes like wet grass. Arugula should always be added fresh, cold, and raw immediately after the bake.
Ignoring the Salt: Because honey and pears are very sweet, you need a good amount of salt to balance the flavors. If your gorgonzola is mild, make sure to finish the flatbread with a generous pinch of flaky sea salt right at the end. It makes all the flavors pop.
Fun Variations to Try
Once you have mastered the classic pear and gorgonzola combination, you can start experimenting with different variations. Here are a few of my favorite twists:
The Meat Lover's Dream: Drape thin slices of prosciutto di Parma over the flatbread immediately after it comes out of the oven. The salty, savory ham melts into the warm cheese and pairs incredibly well with the sweet pear.
The Spicy Kick: Swap out the regular raw honey for hot honey (honey infused with chili peppers). The sweet heat adds an incredible dimension to the rich gorgonzola and sweet pear.
The Summer Alternative: When pears are out of season, swap them for fresh, ripe figs sliced in half. Fig, gorgonzola, and honey is another classic Italian flavor pairing that feels incredibly luxurious.
The Nut Swap: If you do not have walnuts, toasted pecans or sliced almonds make a fantastic alternative. Pecans offer a slightly sweeter, richer flavor, while almonds provide a clean, sharp crunch.
The Gluten-Free Option: Use your favorite gluten-free flatbread base or make the two-ingredient dough using a high-quality gluten-free self-rising flour blend.
How to Serve and Entertain with Flatbreads
These flatbreads are incredibly versatile when it comes to serving. They work beautifully as an elegant appetizer for a dinner party, cut into small, bite-sized triangles.
If you are hosting a gathering, you can prep almost everything in advance. Slice your pears ahead of time and toss them with a squeeze of fresh lemon juice to prevent them from turning brown. Toast your walnuts and chop your rosemary a day in advance. When your guests arrive, all you have to do is assemble and bake. Because they only take ten minutes to cook, you can serve them fresh and piping hot straight from the oven.
For a complete meal, I like to serve these flatbreads alongside a simple, bright salad. A crisp green salad tossed with a sharp, lemony vinaigrette is the perfect side dish because the acidity of the lemon cuts through the richness of the flatbread cheese.
When it comes to beverage pairings, you want something that can stand up to the funk of the gorgonzola without overwhelming the delicate pear.
For white wine lovers, a crisp, dry white wine with good acidity is ideal. Look for a Sauvignon Blanc, a Pinot Grigio, or even a dry Riesling. If you want to feel extra festive, a bottle of chilled Prosecco or Champagne is absolute perfection; the bubbles cleanse your palate between bites of rich, creamy cheese.
If you prefer red wine, go for something light-bodied and fruity with low tannins, such as a Pinot Noir or a Beaujolais. A heavy, highly tannic red wine like a Cabernet Sauvignon will clash with the blue cheese and make the whole experience taste metallic.
Final Thoughts on Simple, Beautiful Food
Cooking does not have to be stressful, complicated, or take hours of your time to be absolutely spectacular. Some of the best dishes in the world are born from simplicity, high-quality ingredients, and a willingness to let simple flavors shine.
This pear and gorgonzola flatbread is a testament to that philosophy. It is rustic, elegant, incredibly delicious, and guaranteed to impress anyone you serve it to. The next time you are looking for a quick meal that feels like a celebration, grab some flatbreads, some fresh pears, and a block of gorgonzola, and let the oven do the magic. Your kitchen will smell incredible, your guests will be happy, and you will have a new staple in your culinary repertoire. Happy cooking!