
We have all been there. You buy a pack of boneless, skinless chicken breasts with the grandest intentions of making a healthy, delicious dinner. Then, reality hits. You bake them, grill them, or pan-fry them, and they turn out about as exciting and dry as a piece of cardboard. For years, I struggled with chicken breasts. I tried marinating them for hours, brining them in salt water, and dousing them in store-bought sauces. Nothing seemed to consistently give me that juicy, flavor-packed bite I was craving.
That all changed the night I decided to stop treating the chicken breast as a solid block of meat and started treating it as a vessel.
I remember the exact evening clearly. I had some leftover fresh spinach that was on its last legs in the crisper drawer, half a jar of oil-packed sun-dried tomatoes, and a block of cream cheese that I needed to use up. I grabbed my sharpest knife, sliced a deep pocket into the side of those thick chicken breasts, stuffed them with a mixture of the cheese, spinach, and tomatoes, and seared them in a hot skillet.
The result was an absolute revelation. As the chicken cooked, the filling melted from the inside out, keeping the breast incredibly moist. The skillet juices combined with the sun-dried tomato oil to create a natural pan sauce that was out of this world. Since that night, this Tuscan stuffed chicken has become my signature dish. Whether I am hosting a fancy dinner party or just trying to survive a chaotic Tuesday night, this recipe always delivers.
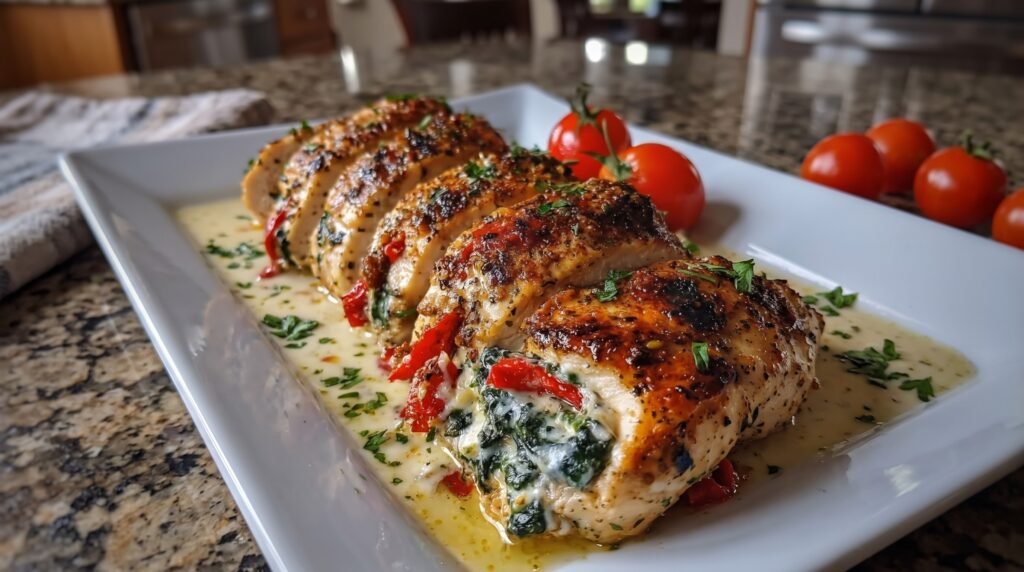
Today, I want to walk you through exactly how to make this dish in your own kitchen. I am going to share all the little secrets, the mistakes I made so you do not have to repeat them, and the step-by-step techniques that guarantee your stuffed chicken turns out absolutely perfect, just like the one in the photo.
The Secret to Choosing the Right Chicken Breasts
Before we even turn on the stove, we need to talk about the meat. Not all chicken breasts are created equal, and for this recipe, size and shape really matter.
When you go to the grocery store or your local butcher, look for chicken breasts that are thick and plump. You want breasts that weigh at least eight to ten ounces each. Avoid those thin, pre-sliced cutlets or the unevenly shaped pieces. We need a thick, meaty wall to cut our pocket into. If the breast is too thin, you will slice right through it, and all that glorious cheese filling will escape into the pan before the chicken is even halfway cooked.
Another thing to watch out for is woody breast. This is a condition in some modern, mass-produced chicken where the meat fiber is exceptionally hard and fibrous. When you touch the raw chicken through the plastic packaging, it should feel soft and pliable, not rock-hard. If you start with woody chicken, no amount of cheese stuffing will save the texture. Go for high-quality, air-chilled chicken if your budget allows. The flavor and texture difference is worth every single penny.
The Ingredient List
Here is everything you will need to get this masterclass dinner on the table. I like to keep my pantry stocked with these items because they are incredibly versatile, but when combined, they create absolute magic.
| Ingredient | Amount | Notes |
|---|---|---|
| Boneless skinless chicken breasts | 4 large | Thick-cut, about 8 to 10 ounces each |
| Cream cheese | 4 ounces | Softened to room temperature |
| Shredded mozzarella cheese | 1/2 cup | Low-moisture mozzarella works best |
| Grated parmesan cheese | 1/4 cup | Freshly grated for the best melting |
| Fresh baby spinach | 2 cups | Packed tight, or use thawed frozen spinach |
| Sun-dried tomatoes in oil | 1/2 cup | Drained and chopped finely |
| Garlic | 4 cloves | Minced, divided between filling and sauce |
| Olive oil | 2 tablespoons | For searing the chicken |
| Paprika | 1 teaspoon | Smoked or sweet, for color and flavor |
| Garlic powder | 1 teaspoon | For the seasoning rub |
| Onion powder | 1 teaspoon | For the seasoning rub |
| Dried oregano | 1/2 teaspoon | For the seasoning rub |
| Salt and black pepper | To taste | Be generous with the chicken exterior |
| Heavy cream | 1/2 cup | For the optional skillet pan sauce |
| Chicken broth | 1/3 cup | To deglaze the pan |
| Fresh parsley | 2 tablespoons | Chopped, for garnish |
Slicing the Perfect Pocket Without Ruining the Chicken
This is the step that intimidates most home cooks, but I promise you it is much easier than it looks. You do not need surgical precision, just a sharp knife and a bit of patience.
First, place a chicken breast flat on your cutting board. Place your non-dominant hand flat on top of the breast. This stabilizes the meat and lets you feel where the blade of your knife is going.
Hold a sharp utility knife or boning knife parallel to the cutting board. Insert the tip of the knife into the thickest side of the chicken breast. Slowly slice horizontally into the breast, creating a pocket.
Here is the most critical lesson I learned after ruining dozens of these: do not slice all the way through to the other side, and do not slice all the way through the ends. You want to leave a border of about a half-inch of uncut meat on three sides. Think of it like a pita pocket, not a butterfly cut. If you cut too far, your filling will spill out the back and sides, creating a smoky, burnt cheese mess in your skillet.
Take your time. Gently wiggle the knife inside the pocket to widen it slightly without cutting through the top or bottom walls of the breast. Once you have created your pocket, set the chicken aside on a clean plate and wash your hands.
Master the Filling: Squeezing Out the Moisture
Now let us talk about the filling. The combination of cream cheese, mozzarella, parmesan, spinach, and sun-dried tomatoes is classic for a reason. It is creamy, tangy, salty, and earthy all at once. But there is one major pitfall that can completely ruin your filling: water.
Spinach is mostly water. If you dump raw spinach into your cheese mixture, or worse, if you use frozen spinach without prepping it, all that water will release inside the chicken breast as it cooks. Your creamy cheese filling will curdle and turn into a watery, separated mess.
To prevent this, we must cook and squeeze the spinach. Heat a tiny splash of olive oil in a pan over medium heat. Add your fresh baby spinach and cook it just until it wilts, which should take about two minutes. Remove it from the heat and let it cool for a minute.
Once it is cool enough to handle, grab a clean kitchen towel or a few layers of heavy-duty paper towels. Place the wilted spinach in the center, wrap the towel around it, and squeeze with all your might over the sink. You will be shocked at how much green water comes out of such a small amount of spinach. Keep squeezing until the spinach feels like a dry, compacted ball.
Give the squeezed spinach a rough chop. In a medium mixing bowl, combine the softened cream cheese, mozzarella, parmesan, squeezed spinach, chopped sun-dried tomatoes, half of the minced garlic, and a pinch of salt and pepper. Use a fork to mash and mix everything together until it is completely uniform. Taste a tiny bit of the mixture and adjust the seasoning if needed. This filling should taste so good you could spread it on a cracker and call it a day.
Seasoning the Exterior for That Golden Crust
Look at the photo again. See that incredible, deeply caramelized, golden-brown crust on the chicken? That does not happen by accident. It comes from a combination of dry seasoning and a hot pan.
Before we stuff the chicken, we want to mix our spice rub. In a small bowl, stir together the paprika, garlic powder, onion powder, dried oregano, salt, and freshly cracked black pepper.
Pat the outside of your chicken breasts completely dry with paper towels. If the surface of the chicken is wet, it will steam in the pan instead of searing, and you will miss out on that gorgeous crust.
Gently open the pocket of each chicken breast and spoon a generous amount of the cheese stuffing inside. Do not overstuff them to the point where the seams are screaming, but do not be shy either.
Once stuffed, press the edges of the pocket together. To secure the pocket, insert two or three wooden toothpicks diagonally through the seams. This acts like a zipper, keeping the pocket closed while cooking. Just remember how many toothpicks you used so you can remove them before serving.
Now, sprinkle your spice rub generously over both sides of the chicken breasts. Use your hands to press the spices into the meat so they stick. Do not forget to season the sides of the chicken too.
The Cook: Searing to Perfection
To get that beautiful color without drying out the interior, we are going to use a two-stage cooking method: a quick sear on the stove followed by a gentle bake in the oven.
Preheat your oven to 375 degrees Fahrenheit.
For the stovetop portion, you want a heavy pan that can go from the stove straight into the oven. A well-seasoned cast-iron skillet or a heavy stainless steel oven-safe pan is absolutely perfect for this.
Place your skillet over medium-high heat and add the two tablespoons of olive oil. Let the pan get hot. You will know it is ready when the oil starts to shimmer and slide easily across the surface. If you put your chicken into a cold pan, it will stick and you will tear off that beautiful seasoned skin when you try to flip it.
Carefully lay the stuffed chicken breasts into the hot skillet. You should hear a loud, satisfying sizzle the moment they touch the pan. If you do not hear that sizzle, your pan was not hot enough.
Let the chicken sear undisturbed for about four to five minutes. Resist the temptation to move them around, peek underneath, or poke at them. Letting them sit undisturbed is what builds that deep, savory crust.
Carefully flip the chicken breasts over using a wide spatula or a pair of tongs. Be gentle so you do not dislodge the toothpicks or tear the pockets. Sear the second side for another three to four minutes.
Transitioning to the Oven
Once both sides have a beautiful golden crust, transfer the entire skillet directly into your preheated oven.
Baking the chicken allows the heat to surround the thick breasts evenly, cooking them all the way to the center without burning the exterior spice rub.
Let the chicken bake for about twelve to fifteen minutes. The exact time will depend on how thick your chicken breasts are.
The single best tool you can own as a home cook is an instant-read digital meat thermometer. Do not try to guess if the chicken is done by cutting into it. If you cut into it, you will lose all the juices and the cheese will run out. Instead, insert the probe of your thermometer into the thickest part of the chicken meat, making sure you are measuring the meat itself and not the hot cheese filling.
You want the thermometer to read 160 degrees Fahrenheit. While the USDA recommends 165 degrees, chicken continues to cook after you take it out of the heat. If you pull it at 160 degrees and let it rest, the carryover heat will bring it up to a safe 165 degrees while keeping the meat incredibly tender and juicy.
Once the chicken reaches temperature, carefully remove the skillet from the oven. Transfer the chicken breasts to a clean plate or cutting board, cover them loosely with foil, and let them rest for at least five minutes. Resting allows the muscle fibers in the chicken to relax and reabsorb all those delicious juices. It also lets the melted cheese firm up slightly so it does not completely run out when you slice it.
Crafting the Creamy Garlic Pan Sauce
While your chicken is resting, do not even think about washing that skillet. All those browned bits stuck to the bottom of the pan are culinary gold. We are going to use them to make a quick, decadent garlic cream sauce.
Place the skillet back on the stovetop over medium heat. Be extremely careful, as the handle of the skillet will still be incredibly hot from the oven. Always use a thick oven mitt.
Add the remaining minced garlic to the pan and cook for about thirty seconds, stirring constantly. You just want to release the aroma of the garlic without burning it. Burned garlic tastes bitter and will ruin your sauce.
Pour in the chicken broth. Use a wooden spoon to scrape up all those flavorful browned bits from the bottom of the skillet as the liquid bubbles. This is called deglazing, and it adds immense depth of flavor to your sauce. Let the broth simmer and reduce by half, which should take about two minutes.
Turn the heat down to low and pour in the heavy cream. Stir well to combine. Let the sauce simmer gently for a couple of minutes until it starts to thicken slightly.
Stir in a handful of chopped sun-dried tomatoes and any leftover spinach if you have some. Season the sauce with a tiny pinch of salt and pepper to taste.
Once the sauce is velvety and coats the back of a spoon, turn off the heat. Stir in the fresh chopped parsley.
Bringing It All Together for the Presentation
To serve this dish like a professional food blogger, slice the rested chicken breasts crosswise into thick slices, just like in the photo. This shows off that incredible spiral of green spinach, bright red sun-dried tomatoes, and melted white cheese.
Spoon a generous pool of the creamy garlic sauce onto the bottom of a serving platter. Carefully arrange the sliced chicken breasts on top of the sauce. Garnish with a few more fresh herbs and serve alongside some roasted cherry tomatoes on the vine for a beautiful pop of color and freshness.
Common Mistakes to Avoid
Even with the best intentions, things can sometimes go sideways in the kitchen. Here are the most common mistakes I have made over the years, and exactly how to avoid them.
The first mistake is using cold cream cheese. If your cream cheese is cold from the fridge, it will be incredibly difficult to mix with the other ingredients. You will end up with large, cold lumps of cream cheese throughout your filling instead of a smooth, uniform blend. Take the cream cheese out of the fridge at least an hour before you plan to start cooking. If you are in a rush, you can microwave it on low power for ten to fifteen seconds to soften it up.
The second mistake is skipping the toothpicks. I know it seems like an extra, fussy step, but trust me, it is essential. As the chicken cooks, the meat contracts, which naturally opens up the pocket. Without toothpicks holding the pocket shut, the melting cheese will find the path of least resistance and flow straight out into your pan, leaving your chicken hollow and dry.
The third mistake is overcooking the chicken. Because we are stuffing the chicken, people often worry that the interior won't cook through, so they leave it in the oven for way too long. This is how you get dry, chalky chicken. Buy a meat thermometer. It takes all the guesswork out of cooking and will change your kitchen life forever.
The fourth mistake is using pre-shredded parmesan cheese from a green canister. That powder contains anti-caking agents that prevent it from melting smoothly. Instead, buy a small block of real Parmigiano-Reggiano and grate it yourself using a microplane. The flavor and melting ability are vastly superior.
Variations on the Tuscan Theme
Once you have mastered the basic recipe, you can start experimenting with different flavor profiles. That is the beauty of stuffed chicken; it is a blank canvas. Here are some of my favorite variations.
If you do not like sun-dried tomatoes, you can easily swap them out for roasted red peppers. You can buy them in a jar, chop them up, and mix them with the spinach and cheese. They provide a similar sweet, smoky contrast without the distinct chew of sun-dried tomatoes.
For a Greek-inspired twist, swap the cream cheese and mozzarella for crumbled feta cheese and a splash of lemon juice. Add some chopped Kalamata olives and dried dill to the spinach mixture. This creates a bright, salty, tangy filling that pairs wonderfully with the chicken.
If you want an extra layer of luxury, wrap the stuffed chicken breasts in slices of prosciutto or bacon before searing them. The salty cured meat crisps up beautifully in the pan, locking in even more moisture and adding an incredible smoky flavor to the dish.
For a lighter version, you can skip the heavy cream sauce and simply serve the stuffed chicken with a squeeze of fresh lemon juice and a drizzle of high-quality extra virgin olive oil over the top. The filling itself is rich enough that a heavy sauce is not strictly necessary, though it is certainly delicious.
What to Serve with Stuffed Chicken
Because this dish is quite rich and savory, you want side dishes that can either cut through that richness with brightness or soak up all that incredible garlic cream sauce.
A simple, zesty lemon-herb rice is one of my absolute favorite accompaniments. The acidity of the lemon cuts through the creaminess of the sauce beautifully, and the rice acts like a sponge for any leftover sauce on your plate.
If you want to keep things low-carb, serve the chicken over a bed of garlic parsnip puree or cauliflower mash. It gives you that comforting, mashed-potato vibe without the heavy carbs.
For vegetables, I love roasted asparagus or broiled green beans. Toss them in olive oil, salt, and pepper, and roast them in the oven on a baking sheet alongside the chicken. The charred, crispy tips of the asparagus contrast wonderfully with the tender chicken and creamy sauce.
And of course, you can never go wrong with a thick slice of warm, crusty sourdough bread. It is practically mandatory for wiping your plate clean of every single drop of that garlic cream sauce.
Meal Prep, Storage, and Reheating
This recipe is fantastic for meal prep because the stuffed chicken actually stays quite moist, even after reheating.
To store leftovers, let the chicken cool completely to room temperature. Place the chicken and any remaining sauce in an airtight container and store it in the refrigerator for up to three to four days.
When it comes to reheating, you want to avoid the microwave if possible. Microwaves heat unevenly and can make chicken rubbery while causing the cheese filling to separate and turn oily.
Instead, place the chicken and sauce in a small baking dish. Splash a tablespoon of water or chicken broth over the top to keep things moist. Cover the dish tightly with aluminum foil and heat in a 350-degree oven for about fifteen minutes, or until the chicken is warmed through to the center.
If you must use a microwave, heat the chicken on fifty percent power in thirty-second intervals, checking frequently to ensure it does not overcook.
I do not recommend freezing this dish after it has been cooked. The cream cheese and heavy cream sauce do not freeze and thaw well; they tend to separate and develop a grainy texture once reheated. However, you can prep the raw stuffed chicken breasts, wrap them tightly in plastic wrap, and freeze them for up to a month. When you are ready to cook, let them thaw completely in the refrigerator overnight before searing and baking.
Enjoying the Fruits of Your Labor
Cooking should be an enjoyable, sensory experience. The smell of the garlic sizzling in the pan, the sight of the golden-brown crust forming on the chicken, and the satisfying pop of the cherry tomatoes as they roast are all part of the joy of making a home-cooked meal.
Do not worry if your first attempt isn't absolutely picture-perfect. Even if a little cheese leaks out or your pocket isn't perfectly symmetrical, I promise you it will still taste incredible. The combination of flavors is forgiving, and the love and care you put into prepping the ingredients will shine through in every single bite.
So pour yourself a glass of crisp white wine, turn on some music, and have fun in the kitchen. You are about to make a dinner that will have everyone at your table asking for seconds.