
If you have ever sat at a high-end sushi bar and watched the chef pull a sizzling, caramelized, bubbling roll out from under a commercial broiler, you know the exact sensory experience I am talking about. The aroma of sweet cooked seafood, toasted sesame, and spicy charred mayonnaise hits you before the plate even lands on the counter. You pick up a piece with your chopsticks, and it is warm, creamy, succulent, and slightly smoky.
For the longest time, I thought this kind of sushi was best left to the professional kitchens. I assumed it required some secret trade knowledge, special industrial ovens, or ingredients that I could not find at my local grocery store. My first attempt at making these at home was, to put it gently, a complete disaster.
I bought the wrong kind of rice, which turned into a wet paste. I did not know how to butterfly the shrimp, so they rolled right off the top of the sushi like sad, slippery pink tubes. I used standard American mayonnaise, which broke under the heat of my oven broiler and turned into a greasy puddle of oil that soaked the seaweed until it was tough and chewy. It was a discouraging, expensive mess.
But I was obsessed with getting it right. I spent weeks researching, chatting with local sushi cooks who took pity on my culinary failures, and testing different techniques in my own kitchen. I discovered that you do not need a commercial kitchen to make incredible baked sushi. You just need to understand a few basic principles about rice starch, shrimp anatomy, and sauce chemistry.
Today, I am sharing everything I learned during those kitchen trials so you can skip the mistakes and go straight to making the most gorgeous, flavorful baked shrimp dynamite rolls you have ever tasted. Let us dive into the details.
Understanding the Anatomy of a Baked Sushi Roll
Before we start cooking, let us break down what makes this specific roll so special. Unlike a traditional raw sushi roll, a baked roll relies on warm temperatures, rich sauces, and texture contrasts.
The base is seasoned sushi rice, which provides a clean, sweet, and tangy foundation. Inside the roll, we keep things fresh and crisp with cucumber and creamy avocado. This coolness inside provides a beautiful contrast to the warm, rich topping.
The star of the show is the blanket of raw, butterflied shrimp laid over the top of the roll. We coat these shrimp in a generous layer of spicy, rich dynamite sauce. When subjected to intense heat under a broiler, the shrimp cook quickly in their own juices while the sauce bubbles, caramelizes, and forms a gorgeous golden-brown crust.
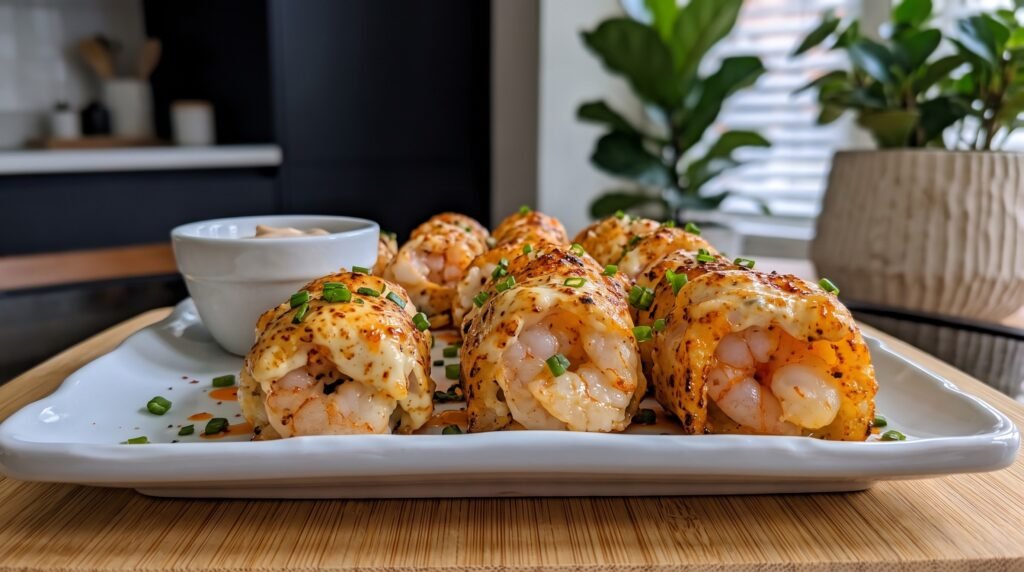
To finish it off, we garnish the warm rolls with fresh, crunchy green onions and a drizzle of spicy chili oil, just like you see in the reference photo. The result is a perfect balance of sweet, savory, creamy, spicy, and fresh in every single bite.
The Master Ingredient List
To get restaurant-quality results, you must use the right ingredients. Do not try to substitute long-grain white rice or regular mayonnaise here. Those small changes will completely alter the texture and flavor of the dish.
| Ingredient | Amount | Notes |
|---|---|---|
| Sushi Rice | 2 cups | Must be short-grain Japanese rice |
| Rice Vinegar | 1/4 cup | Unseasoned is best so you can control the sweetness |
| White Sugar | 2 tablespoons | To balance the acidity of the vinegar |
| Fine Sea Salt | 1 teaspoon | Elevates the overall flavor of the rice |
| Raw Shrimp | 16 to 20 pieces | Size 21/25, peeled, deveined, and tail-off |
| Kewpie Mayonnaise | 1/2 cup | Japanese egg-yolk-only mayo for rich caramelization |
| Sriracha Sauce | 2 tablespoons | Adjust this amount to control the heat level |
| Garlic Powder | 1/2 teaspoon | Adds a savory depth to the dynamite sauce |
| Toasted Sesame Oil | 1/2 teaspoon | Gives the sauce a classic nutty aroma |
| Nori Sheets | 3 to 4 sheets | High-quality roasted seaweed sheets |
| Avocado | 1 medium | Ripe but firm, sliced into thin strips |
| English Cucumber | 1 small | Julienne cut, with the watery seeds removed |
| Green Onions | 3 stalks | Finely chopped for a fresh, sharp garnish |
| Chili Oil | 1 tablespoon | For that beautiful, spicy drizzle on the plate |
Essential Kitchen Tools
You do not need a lot of specialized equipment to make sushi at home, but having these few tools on hand will make the process infinitely easier and more successful.
First, you need a bamboo sushi rolling mat, also known as a makisu. This is what allows you to apply even pressure and form a tight, neat cylinder.
Second, grab a roll of plastic wrap. This is a non-negotiable secret weapon. We use it to wrap the bamboo mat so the sticky rice does not cling to the wooden slats, and we use it to help press the shrimp onto the roll.
Third, you need an incredibly sharp chef's knife. Slicing sushi with a dull knife is the fastest way to squash your beautiful rolls, squeezing the filling out of the ends and ruining all your hard work.
Finally, a baking sheet lined with aluminum foil or parchment paper is necessary for the baking step. If you happen to have a culinary blowtorch, that is a fantastic bonus tool for adding a final touch of smoky char, but your oven's broiler will do the job perfectly on its own.
Step One: Mastering the Sushi Rice
If your rice is not right, your sushi will not be right. This is the foundation of the entire dish. Short-grain Japanese rice is unique because it contains a high amount of amylopectin, a type of starch that makes the rice sticky enough to hold its shape when rolled, yet individual grains should still remain distinct and fluffy.
Start by measuring your two cups of dry rice into a large bowl. Pour cold water over the rice and use your hands to gently swirl the grains around. The water will immediately turn a cloudy, milky white. This is excess surface starch, and if you leave it on the rice, your finished product will be gummy and paste-like.
Strain the water out, using your hand or a fine-mesh strainer to keep the rice in the bowl. Repeat this rinsing process five or six times. You will notice the water becoming clearer with each rinse. Once the water is almost completely transparent, drain the rice thoroughly.
Cook the rice using your preferred method. A rice cooker is the most foolproof option, using a one-to-one ratio of rice to water. If you are cooking on the stovetop, combine the washed rice and two cups of water in a medium saucepan. Bring it to a boil over medium-high heat, then immediately cover the pot with a tight-fitting lid, reduce the heat to low, and let it simmer undisturbed for fifteen minutes. Do not peek under the lid! After fifteen minutes, turn off the heat and let the pot sit, still covered, for another ten minutes to steam.
While the rice is cooking, prepare your seasoning liquid. In a small microwave-safe bowl, combine the rice vinegar, sugar, and salt. Heat it for about twenty seconds, then stir until the sugar and salt are completely dissolved.
Transfer your hot, freshly cooked rice into a large wooden or plastic bowl. Avoid using metal bowls, as the acid in the vinegar can react with the metal and impart a strange, metallic taste to your rice. Gently pour the seasoned vinegar mixture over the hot rice.
Using a wooden rice paddle or a rubber spatula, incorporate the vinegar using a gentle cutting and folding motion. Do not stir or mash the rice, as this will break the grains and make them mushy. Slice through the rice vertically, then fold it over from the bottom.
While you are folding, use a small hand fan or a piece of cardboard to fan the rice. This cools the rice quickly, which helps give the grains a beautiful, glossy sheen and prevents them from overcooking. Let the rice cool to room temperature before you begin rolling. Never use hot or warm rice for rolling, as it will wilt your nori sheets and make them tough and chewy.
Step Two: Preparing the Shrimp
The key to getting that stunning, professional look you see in the reference photo is how you prep your shrimp. If you simply place whole, round shrimp on top of a sushi roll, they will roll off, cook unevenly, and make the sushi impossible to slice. We need to butterfly them so they lay perfectly flat over the top of the roll.
Start with raw, peeled, and deveined shrimp. Make sure the tails are completely removed. Place a shrimp flat on your cutting board, with the curved back facing away from you.
Hold the shrimp flat with your non-dominant hand. Using a very sharp utility knife, make a shallow slice along the inner curve of the shrimp (the side opposite the dark vein line). Cut about three-quarters of the way through the shrimp, being careful not to cut all the way through.
Open the shrimp up like a book. It should now be a flat, heart-shaped piece of seafood. If there are any remaining bits of the digestive tract, rinse them away under cold running water. Pat the butterflied shrimp completely dry with paper towels. If they are wet, they will slide off the sushi roll during assembly. Repeat this process for all your shrimp.
Step Three: Crafting the Dynamite Sauce
The dynamite sauce is what elevates this dish from a standard shrimp roll to something truly decadent. It is spicy, rich, savory, and caramelizes beautifully under intense heat.
To make the sauce, combine the Kewpie mayonnaise, sriracha, garlic powder, and toasted sesame oil in a small bowl. Whisk the ingredients together until they are completely smooth and uniform in color.
I cannot stress enough how important it is to use Kewpie mayonnaise for this recipe. Traditional Western mayonnaise is made with whole eggs and contains a higher ratio of water and vinegar. Under the intense heat of a broiler, Western mayo tends to split, separating into a yellow pool of oil and a curdled white mass.
Kewpie mayo, on the other hand, is made using only egg yolks and a unique blend of apple and red wine vinegars. This gives it a much richer, custard-like consistency that stands up beautifully to high heat, puffing up slightly and developing those gorgeous, caramelized brown spots without turning greasy.
Taste the sauce after mixing. If you love spicy food, feel free to add another splash of sriracha. If you prefer a bit of sweetness to balance the heat, you can stir in a teaspoon of honey or sweetened condensed milk, which is a secret trick many sushi chefs use to get that addictive, sweet-and-savory flavor profile.
Step Four: Rolling and Assembling the Sushi
Now that all your components are prepared, it is time to assemble. This is the part that intimidates most home cooks, but with a systematic approach, it is incredibly satisfying.
First, prepare your workspace. Lay down your bamboo rolling mat and wrap it tightly in plastic wrap, covering both sides. This prevents the rice from sticking to the wood and makes cleanup incredibly fast. Set up a small bowl of water mixed with a splash of rice vinegar next to your cutting board. This is your hand-dipping water, which prevents the sticky rice from sticking to your fingers.
Take a sheet of nori. If you look closely, you will see that nori sheets have a shiny side and a rough side. Place the nori on your wrapped bamboo mat with the rough side facing up and the shiny side facing down.
Dip your fingers into the vinegar water, shaking off the excess. Grab a handful of your cooled sushi rice (about one cup) and place it in the center of the nori. Using your fingertips, gently spread the rice outward in a thin, even layer, covering the entire surface of the nori. Do not press down hard or mash the rice grains; you want a light, airy layer that goes all the way to the edges.
Once the rice is evenly spread, carefully flip the entire sheet over so the rice is now facing down against the plastic-wrapped mat, and the clean nori side is facing up. This will create an inside-out roll, which is ideal for this recipe because it allows the shrimp to sit directly on the rice, absorbing all those delicious juices.
Next, lay your fillings horizontally across the center of the nori sheet. Place a few thin strips of cucumber and a few slices of creamy avocado side-by-side. Do not overstuff the roll! It is incredibly tempting to add heaps of filling, but an overstuffed roll is difficult to close, will fall apart when sliced, and is impossible to eat in one bite.
Now, we roll. Lift the edge of the bamboo mat closest to you using your thumbs, while using your other fingers to gently hold the fillings in place. Roll the mat forward, tucking the edge of the nori tightly over the fillings.
Continue rolling forward, applying gentle, even pressure along the length of the mat to shape the roll into a neat, tight cylinder. Once you reach the end, give the mat one final, firm squeeze. Unwrap the mat, and you should be left with a perfect, tight sushi roll with the rice on the outside.
Next, we apply our shrimp blanket. Take your prepared butterflied shrimp and lay them flat across the top of the roll, overlapping them slightly like shingles on a roof. It usually takes about five to six shrimp to cover one standard-length roll.
Once the shrimp are positioned, drape a piece of plastic wrap over the top of the roll. Place your bamboo mat back over the plastic-wrapped roll and squeeze gently but firmly. This presses the raw shrimp into the sticky rice, ensuring they adhere tightly and do not shift when we slice and cook them. Remove the bamboo mat, but leave the plastic wrap on the roll for the slicing step.
Step Five: The Slicing Secret
Here is a critical mistake that almost every beginner makes: trying to slice the roll after it has been baked and covered in hot, melted sauce. If you do this, the hot sauce will smear everywhere, the warm shrimp will slide off, and you will end up with a messy, unappealing plate.
The secret is to slice the roll while the shrimp are still raw and firmly pressed onto the rice under the plastic wrap. The plastic wrap holds everything in place, acting like a structural shield against the blade of your knife.
Make sure your chef's knife is incredibly sharp. Dip the tip of the blade into your vinegar water, then hold the knife upright so the water runs down the edge of the blade. This creates a thin barrier of moisture that prevents the sticky rice from clinging to the metal.
Position your knife in the exact center of the plastic-wrapped roll. Slice straight down using a smooth, single slicing motion, pulling the knife back toward you. Do not saw back and forth, as this will tear the nori and crush the ingredients.
Once you have cut the roll in half, slice each half in half again, and then each quarter in half again. You should end up with eight clean, perfectly sized pieces of sushi.
After every single cut, wipe the blade of your knife clean with a damp paper towel and re-wet it. It sounds tedious, but this is the difference between messy, amateur-looking sushi and clean, beautiful, restaurant-style pieces. Once the roll is fully sliced, gently peel away the plastic wrap.
Step Six: Baking to Caramelized Perfection
Preheat your oven's broiler to its high setting. If your broiler has an adjustable rack, position it so the baking tray will sit about six inches away from the heating element.
Line a baking sheet with aluminum foil or parchment paper. Carefully transfer your sliced sushi pieces to the baking sheet using a spatula. Arrange the pieces so they are sitting upright, packed snugly against one another in a row. Keeping them close together helps them retain their shape and prevents the sides of the rice from drying out under the intense heat.
Using a spoon or a squeeze bottle, apply a generous dollop of your prepared dynamite sauce directly onto the top of each shrimp-covered piece. You want enough sauce to completely coat the shrimp, which protects them from drying out while they cook and creates that beautiful, bubbly layer.
Slide the baking sheet into the oven under the preheated broiler. Now, do not walk away! This process happens incredibly quickly, usually taking between three to five minutes.
Watch through the oven window. You will see the shrimp quickly turn from translucent gray to a beautiful, opaque pink. At the same time, the dynamite sauce will begin to puff up, bubble vigorously, and develop deep golden-brown, charred spots.
Once the top is beautifully caramelized and the shrimp are just cooked through, carefully remove the baking sheet from the oven. Overcooking the shrimp will make them rubbery and tough, so pull them out the moment you see that gorgeous color.
Step Seven: Plating and Garnishing
Presentation is a huge part of the sushi experience, and replicates the gorgeous look of the rolls in our reference photo.
Carefully slide a long spatula under your baked roll pieces and transfer them onto a clean, white serving platter. The contrast of the bright white plate makes the golden-brown, caramelized tops of the rolls pop beautifully.
Drizzle a clean, sharp line of spicy chili oil along the base of the plate, allowing the bright red-orange oil to pool slightly around the bottom of the rolls. This not only looks professional but adds a wonderful layer of clean heat to the dish.
Sprinkle a generous handful of finely chopped green onions over the top of the warm rolls. The bright green color provides a stunning contrast to the warm, rich tones of the caramelized sauce, and the sharp, fresh bite of the raw onions cuts through the richness of the mayonnaise beautifully.
If you like, you can also sprinkle a few toasted black and white sesame seeds over the top for an extra layer of visual texture and a subtle, nutty crunch. Serve the rolls immediately while they are still warm, creamy, and sizzling.
Common Mistakes to Avoid
Even with detailed instructions, things can go wrong in the kitchen. Here are the most common pitfalls I encountered during my trials, and how you can easily avoid them.
Using cold, unseasoned rice is a major mistake. If you do not season your rice with the vinegar mixture while it is hot, the grains will not absorb the flavor, and your sushi will taste bland. Furthermore, if you try to roll sushi with refrigerator-cold rice, it will be hard, dry, and will not stick to the nori properly. Always use room-temperature, freshly seasoned rice.
Another trap is skipping the plastic wrap on your bamboo mat. If you do this, the sticky rice will wedge itself into the tiny crevices of the bamboo slats. It is incredibly frustrating to clean, and it will tear your sushi rolls apart as you try to lift them off the mat. Spend the thirty seconds to wrap your mat in plastic.
Do not use pre-cooked shrimp. It is tempting to buy those bags of frozen, pre-cooked cocktail shrimp to save a step, but double-cooking them under the broiler will turn them into rubbery, flavorless little hockey pucks. Raw shrimp cook incredibly quickly under a broiler, remaining sweet, plump, and juicy.
Finally, resist the urge to use too much sauce inside the roll. Keep the sauce on the outside. If you add heavy, wet sauces inside the roll along with your avocado and cucumber, the moisture will seep into the nori sheet, making it soggy and causing the entire roll to collapse when you attempt to slice it.
Creative Variations to Try
Once you have mastered this classic baked shrimp dynamite roll, you can use the same techniques to experiment with all kinds of delicious variations.
For a decadent twist, you can mix some chopped, real or imitation crab meat (surimi) with a spoonful of Kewpie mayo and sriracha, and use that as the filling inside the roll, keeping the butterflied shrimp on top. This is often called a Volcano Roll in sushi restaurants.
If you love a sweet-and-savory contrast, drizzle a generous amount of unagi sauce (sweet eel sauce) over the baked rolls right before serving, in addition to the chili oil. Eel sauce is made from reduced soy sauce, mirin, and sugar, and it adds an incredible, glossy depth of flavor that pairs beautifully with the spicy mayo.
For a low-carb version, you can skip the rice and nori altogether. Arrange your sliced avocado and cucumber in a small, greased baking dish. Lay the butterflied raw shrimp in an even layer over the top, smother them in the dynamite sauce, and bake until bubbly. This makes a spectacular hot dip that you can scoop up with crispy wonton chips or cucumber slices.
Parting Thoughts
Making baked sushi at home is an incredibly rewarding culinary project. It turns dinner into an interactive, creative experience, and there is nothing quite like the feeling of pulling a tray of bubbling, caramelized rolls out of your own oven that look and taste exactly like they came from a high-end restaurant.
The key is simply to respect the ingredients: wash your rice thoroughly, butterfly your shrimp with care, use authentic Japanese Kewpie mayo, and slice your rolls before they hit the heat. Once you get the hang of the rolling motion and the slicing technique, you will find yourself making these for every dinner party, date night, and weekend craving. Grab your bamboo mat, preheat your broiler, and enjoy the process of creating something beautiful and delicious in your own kitchen!