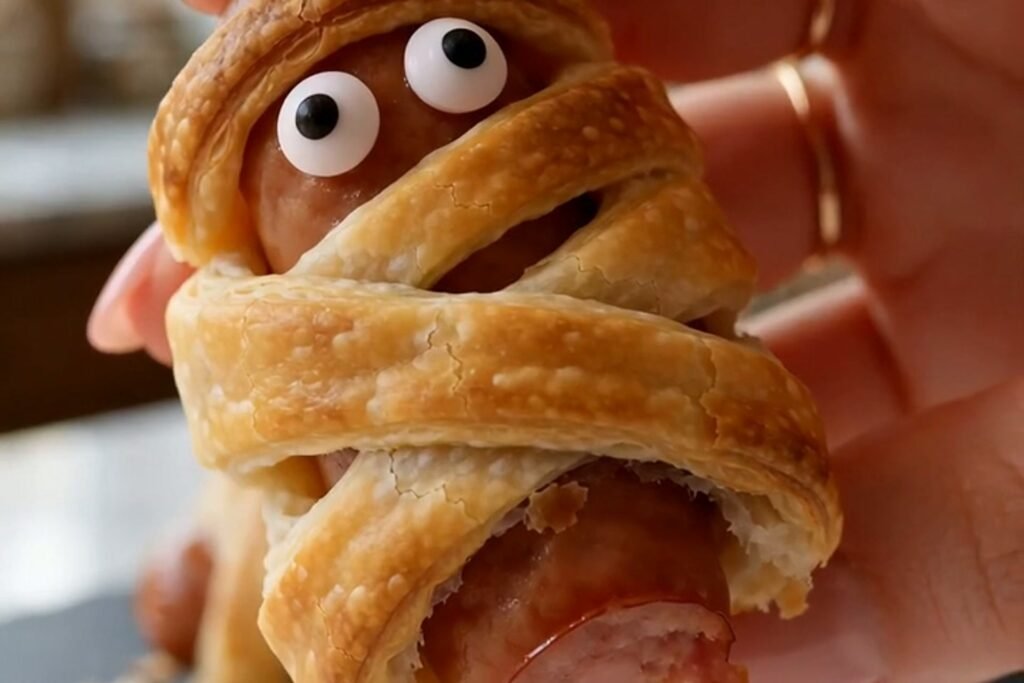

The Halloween Snack That Stole the Party
Last October, I brought a tray of these to my neighbour’s Halloween party, and they caused more excitement than the costume contest. I set them down next to a fancy charcuterie board someone had clearly spent an hour on, and within twenty minutes the charcuterie was untouched while my little mummies had vanished — three adults asked for the recipe, and one kid asked if I could make them for his birthday instead of cake.
Pigs in a blanket have been a party staple forever, but the mummy twist turns a classic into something genuinely delightful. The crescent dough wraps around each little frank in ragged strips that look exactly like bandages, and two candy eyes peek out from the wrapping. They’re spooky, they’re silly, and they’re completely irresistible — the kind of snack that makes toddlers and grown-ups grin alike.
What I love most is how easy they are. No decorating skills, no piping bags, no fiddly details. If you can wrap a strip of dough around a sausage, you can make these. And they bake up golden, flaky, and buttery in under fifteen minutes — you can throw together a batch while the trick-or-treaters are still ringing the doorbell.
Why You’ll Love This Recipe
- Adorably spooky. Ragged dough bandages and candy eyes make each one look like a tiny mummy.
- Ready in 25 minutes. From fridge to table in under half an hour — perfect for last-minute party prep.
- Kid-friendly to make. Little hands love wrapping the “bandages”; it’s a fun pre-party activity.
- Only 4 ingredients. Cocktail franks, crescent dough, candy eyes, and mustard — that’s the whole list.
- Universal crowd-pleaser. Sweet, salty, buttery, flaky — there’s nothing not to love.
Ingredients
Makes 24 mummies
- 24 cocktail franks (about 340 g), patted dry
- 2 cans (230 g each) refrigerated crescent roll dough
- 48 small candy eyes
- Yellow mustard, for attaching the eyes and serving
Instructions
Step 1 — Heat the oven. Preheat to 190°C (375°F) and line two baking trays with parchment. Unroll the crescent dough and press the perforations together into two solid sheets — you want continuous dough, not triangles.
Step 2 — Cut the bandages. Using a pizza cutter or sharp knife, cut each sheet into thin strips about 1 cm (just under 1/2 inch) wide. Uneven, ragged strips look better here — real mummy bandages aren’t neat, so don’t stress about perfection.
Step 3 — Wrap the mummies. Wrap 2-3 dough strips around each frank, leaving a small gap near the top for the face. Overlap the strips slightly and let a few ends stick out for that tattered look. The dough is forgiving — if a strip tears, just press it back on. Place each mummy on the prepared tray.
Step 4 — Bake until golden. Bake 12-14 minutes until puffed and deep golden. The franks will sizzle a little at the ends, which is exactly right. Cool on the tray for 3-4 minutes — the dough firms up as it cools and they’re easier to handle.
Step 5 — Add the eyes. Dab two tiny dots of yellow mustard onto the exposed face of each mummy and press two candy eyes into place. The mustard acts as glue. If an eye pops off, add a fresh dab. Stand back and admire your army of tiny mummies.
Step 6 — Serve with mustard. Pile the mummies onto a platter with small bowls of yellow mustard (and ketchup for the traditionalists) for dipping. Serve warm — they’re at their flakiest straight from the oven.
Tips for the Best Mummy Pigs in a Blanket
Pat the franks dry. Moisture makes the dough slip and soggy. A quick pat with paper towels makes all the difference.
Leave a face gap. Wrap the bandages everywhere except a small window near the top — that’s where the eyes go, and it sells the mummy look.
Embrace the ragged edges. Neat wrapping looks like a hot dog, not a mummy. Overlap strips at angles and let ends poke out.
Don’t add eyes before baking. Candy eyes melt in the oven. Attach them after baking, once the mummies have cooled slightly.
Double the batch for a crowd. These disappear shockingly fast. One batch serves about 8 as an appetiser; for a party of 15 or more, make two.
Serving & Storage
Arrange the mummies on a dark platter — black or deep orange makes the golden dough pop and fits the Halloween theme. Surround them with little bowls of mustard, ketchup, and maybe a spicy brown mustard for the adults. They pair brilliantly with other finger foods: popcorn, cheese cubes, and you’ve got a party spread. The kids will go for the mummies first, every time.
Leftovers (if you have any) keep airtight in the fridge for up to 3 days. Reheat at 175°C (350°F) for 5-8 minutes to re-crisp the dough — the microwave makes them soft and sad. You can also wrap the mummies unbaked, cover tightly, and refrigerate overnight; bake straight from the fridge, adding a minute or two. Add the candy eyes fresh after baking.
Frequently Asked Questions
Where do I find candy eyes?
They’re in the cake decorating aisle of most supermarkets, especially around Halloween. If you can’t find them, two tiny dots of mustard or a dab of cream cheese with a mini chocolate chip pressed in work just as well — less cute, equally tasty.
Can I use full-size hot dogs instead?
Yes, but the wrapping takes longer and the proportions change. Cut standard hot dogs into thirds to make cocktail-sized pieces — you get the same cute result with an easier wrap. Adjust the dough strips to match the smaller pieces.
My dough keeps springing back when I wrap. Help?
Chilled dough is elastic. Let the crescent dough sit at room temperature for 5-10 minutes before cutting, and press each strip gently as you wrap so it adheres to itself. The strips will relax and stay put.
Can I make these ahead of time?
Partially. You can wrap the mummies up to 24 hours ahead, keep them covered in the fridge, and bake just before serving. Bake them fresh for the best flaky texture, then add the eyes. Fully baked mummies are best eaten the same day.