
We have all been there. You are sitting at a cozy Italian restaurant, twirling a forkful of silky, rich, perfectly emulsified fettuccine pasta topped with juicy, golden-brown chicken. You take a bite and think, why on earth does my pasta at home never taste like this?
For years, my home-cooked creamy pasta dishes were a complete gamble. Sometimes the sauce would turn into a greasy, separated puddle of oil at the bottom of the plate. Other times, the chicken would be so dry and chalky that it felt like chewing on cardboard. And don’t even get me started on the phase of my life where I thought jarred Alfredo sauce was acceptable. It always had this weird, metallic, glue-like texture that left me feeling heavy and disappointed.
After countless kitchen disasters, split sauces, and rubbery chicken breasts, I finally figured out the secrets to making restaurant-quality creamy garlic parmesan chicken fettuccine right in my own kitchen. Today, I am sharing everything I learned along the way, from the science of a perfect cream sauce to the exact technique for getting that gorgeous, golden crust on your chicken without drying it out. Grab an apron, put a large pot of water on to boil, and let us dive into the ultimate comfort food journey.
The Secret to Juicy Chicken with a Perfect Crust
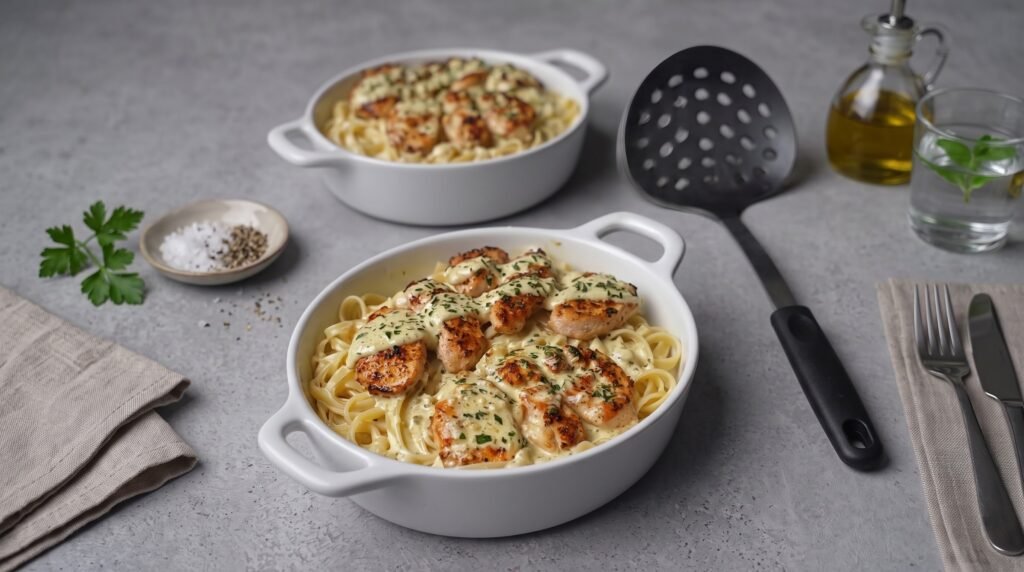
If you look closely at the picture of this dish, you will notice that the chicken pieces have a beautifully browned, slightly textured exterior. This is not just for looks; that brown crust is where a massive amount of the dish's flavor lives. In the culinary world, this browning is called the Maillard reaction. It is a chemical reaction between amino acids and reducing sugars that gives browned food its desirable flavor.
To achieve this at home, you have to avoid one of the most common mistakes in home cooking: crowded pans and wet meat.
First, let us talk about moisture. If your chicken breasts are straight out of the package and go directly into the pan, they are covered in surface moisture. As soon as that moisture hits the hot oil, it turns to steam. Steam is the absolute enemy of a good sear. Instead of browning, your chicken will boil in its own juices, turning a sad, rubbery gray color. To prevent this, always pat your chicken breasts completely dry with paper towels before seasoning them.
Second, you need to cut your chicken properly. Whole chicken breasts are often uneven in thickness, with one end being very thick and the other tapering down to a thin point. If you cook them whole, the thin end will dry out long before the thick end is cooked through. To solve this, I highly recommend slicing your chicken breasts horizontally into even cutlets, or cutting them into thick, uniform tenderloin-sized strips. This ensures they all cook at the exactly same rate.
Finally, give your chicken space. If you crowd too many pieces of chicken into your skillet at once, the temperature of the pan will drop dramatically. The chicken will release its juices, and again, you will end up steaming instead of searing. Cook the chicken in batches if your skillet is not large enough.
The Chemistry of a Split-Free Cream Sauce
Have you ever made a cream sauce only to have it break, leaving you with a watery layer and a greasy layer? It is incredibly frustrating, but it is entirely preventable once you understand how cream sauces work.
A classic creamy garlic parmesan sauce is an emulsion. An emulsion is a mixture of two liquids that would normally not mix, like fat and water. Heavy cream is an amazing ingredient because it naturally contains proteins and fats that help keep the emulsion stable. This is why we use heavy whipping cream instead of milk or half-and-half.
Milk has a much higher water content and lower fat content. If you try to heat milk with cheese and acid, the proteins will clump together, and the sauce will curdle. Heavy cream, with its high fat content, is much more forgiving and creates a naturally thick, velvety texture without needing a flour-based roux.
The second key to a perfect emulsion is your cheese. I cannot stress this enough: do not use the pre-shredded cheese that comes in a plastic bag or a green shaker bottle. Pre-shredded cheeses are coated with anti-caking agents like potato starch or powdered cellulose. These compounds prevent the cheese from sticking together in the bag, but they also prevent the cheese from melting smoothly into your sauce. The result is a gritty, clumpy mess.
Instead, buy a block of real Parmigiano-Reggiano or high-quality Parmesan and grate it yourself using a microplane or the fine side of a box grater. It melts like an absolute dream and brings a rich, nutty flavor that pre-packaged cheese simply cannot match.
Ingredients for the Perfect Plate
Before we start cooking, let us lay out exactly what we need. This recipe uses simple, high-quality ingredients that work together to create something truly magical.
| Ingredient | Amount | Notes |
|---|---|---|
| Chicken Breasts | 1.5 pounds | Boneless, skinless, sliced into even cutlets or strips |
| Fettuccine Pasta | 1 pound | Dry or fresh high-quality pasta |
| Heavy Whipping Cream | 1.5 cups | Do not substitute with milk or half-and-half |
| Parmigiano-Reggiano | 1 cup | Freshly grated from a block |
| Unsalted Butter | 4 tablespoons | Divided into two portions |
| Garlic | 6 cloves | Freshly minced, do not use the jarred kind |
| Olive Oil | 1 tablespoon | For searing the chicken |
| Italian Seasoning | 1 teaspoon | Dried herb blend for seasoning the chicken |
| Garlic Powder | 1 teaspoon | Part of the dry chicken rub |
| Onion Powder | 1 teaspoon | Part of the dry chicken rub |
| Smoked Paprika | 0.5 teaspoon | For color and a touch of warmth on the chicken |
| Salt and Black Pepper | To taste | Kosher salt and freshly cracked black pepper |
| Fresh Parsley | 0.25 cup | Finely chopped for a bright, fresh finish |
| Pasta Water | 1 cup | Reserved just before draining the pasta |
Step-by-Step Cooking Guide
Now that we have our ingredients prepped and we understand the techniques, let us walk through the process of bringing this dish together step-by-step.
Step 1: Prep and Season the Chicken
Start by patting your chicken breasts dry with a paper towel. Slice them horizontally to create even-sized cutlets, or cut them into thick strips like you see in the photo.
In a small bowl, mix together your dry seasonings: the garlic powder, onion powder, smoked paprika, Italian seasoning, one teaspoon of kosher salt, and half a teaspoon of black pepper.
Drizzle the chicken with half a tablespoon of olive oil, then rub the seasoning blend evenly all over the chicken. Make sure every nook and cranny is coated. The oil helps the spices stick and assists in creating that beautiful sear in the pan.
Step 2: Sear the Chicken
Place a large, heavy-bottomed skillet over medium-high heat. Add the remaining olive oil and two tablespoons of the butter. Let the butter melt and foam up.
Once the pan is hot (you should hear a gentle sizzle if you test it with a tiny piece of chicken), lay your seasoned chicken pieces in the pan. Leave at least an inch of space between the pieces.
Let the chicken cook undisturbed for about four to five minutes. Do not move it around or peek! This undisturbed contact with the hot pan is what creates that stunning golden crust. If you try to flip it and it sticks to the pan, it is telling you it is not ready yet. When it has formed a proper crust, it will naturally release from the pan.
Flip the chicken and cook for another three to four minutes on the other side, or until the internal temperature reaches 165 degrees Fahrenheit. Remove the chicken from the skillet and place it on a clean plate or cutting board. Tent it loosely with foil to keep it warm. Let the chicken rest while you build the sauce; this allows the delicious juices to redistribute throughout the meat instead of spilling out onto your cutting board.
Step 3: Boil the Pasta
Bring a large pot of water to a rolling boil. Once it is boiling, add a generous handful of kosher salt. The water should taste like the ocean. This is your only chance to season the pasta itself from the inside out.
Drop your fettuccine pasta into the boiling water and stir immediately to prevent the strands from sticking together. Cook the pasta according to the package instructions, but stop cooking about one to two minutes before it reaches perfect al dente. The pasta will finish cooking in our hot cream sauce later, where it will absorb all those incredible flavors.
Before you drain the pasta, grab a mug or a heat-safe measuring cup and scoop out at least one cup of the cloudy, starchy pasta water. This is your insurance policy for the sauce. The starch in this water is a powerful emulsifier that will help tie your cream, butter, and cheese together into a cohesive, velvety glaze. Once you have saved your pasta water, drain the rest of the pasta.
Step 4: Build the Pan Sauce
Turn the heat on your skillet down to medium-low. You will notice a lot of browned bits stuck to the bottom of the pan where you cooked the chicken. Do not wipe these out! This is called fond, and it is concentrated chicken flavor.
Add the remaining two tablespoons of butter to the pan. Once melted, throw in your finely minced fresh garlic. Cook the garlic for about one minute, stirring constantly. You want it to become incredibly fragrant, but do not let it turn brown or burn. Burnt garlic tastes bitter and will ruin your entire sauce.
Now, pour in the heavy whipping cream. Use a wooden spoon or a whisk to gently scrape up all those delicious browned bits from the bottom of the skillet as the cream heats up. Bring the cream to a gentle simmer over medium-low heat. Let it simmer for about three to four minutes until it starts to thicken slightly.
Step 5: Incorporate the Cheese and Emulsify
Remove the skillet entirely from the heat source. This is a crucial step! If you add cheese to a bubbling, boiling sauce, the high heat will cause the proteins in the cheese to tighten up and separate from the fat, leaving you with a grainy, separated sauce.
With the pan off the heat, add your freshly grated Parmigiano-Reggiano cheese in small handfuls, whisking constantly until the cheese is completely melted and incorporated.
Now, whisk in about a quarter cup of your reserved warm pasta water. You will see the sauce instantly transform into a glossy, smooth, cohesive glaze that clings to the back of a spoon.
Step 6: Bring It All Together
Add your drained, slightly undercooked fettuccine directly into the skillet with the warm cream sauce. Toss the pasta gently to coat every single strand in that glorious garlic parmesan sauce.
If the sauce feels a bit too thick, splash in another tablespoon or two of your reserved pasta water. If it feels too thin, let it sit for a minute off the heat; it will naturally thicken up as it cools slightly.
Slice your rested chicken into bite-sized pieces or leave them as beautiful whole cutlets. Lay the chicken right on top of the bed of creamy pasta. Garnish the entire dish with a generous shower of freshly chopped parsley and an extra sprinkle of grated parmesan. Serve immediately while it is piping hot.
Common Mistakes to Avoid
Even with a simple recipe, things can go sideways if you do not pay attention to the details. Here are the most common pitfalls I encountered over the years, and how you can avoid them.
- Using cold chicken: If you throw ice-cold chicken straight from the fridge into a hot pan, it will cause the pan temperature to plummet, and the chicken will cook unevenly. Take your chicken out of the fridge about ten to fifteen minutes before you plan to cook it to take the chill off.
- Skipping the fresh garlic: Garlic powder has its place in dry rubs, but for the sauce itself, nothing compares to the sweet, pungent flavor of real, freshly minced garlic. Avoid the pre-minced garlic that comes in jars of water, too. It has a dull, almost sour taste.
- Leaving the pan on high heat: Once your heavy cream is in the pan, keep the heat low. Heavy cream can easily scorch on the bottom of the pan if the heat is too high, giving your sauce a burnt taste.
- Draining the pasta completely: I cannot tell you how many times I accidentally dumped all my pasta water down the sink out of habit. Put a reminder, like a clean mug sitting inside your colander in the sink, to force yourself to save that liquid gold before you drain.
- Over-salting the sauce too early: Parmesan cheese is naturally very salty. Always taste your sauce after the cheese has completely melted before adding any additional salt. You will find that between the seasoned chicken, the salted pasta water, and the parmesan, you rarely need to add extra salt to the sauce itself.
Delicious Variations to Try
Once you have mastered this baseline recipe, you can start experimenting with different flavor profiles and ingredients to make it your own. Here are some of our favorite twists on this classic dish:
- Creamy Tuscan Style: Stir in half a cup of chopped sun-dried tomatoes and two cups of fresh baby spinach right before you add the pasta to the sauce. The spinach will wilt in the warm cream, and the sun-dried tomatoes add a beautiful tanginess that cuts through the rich sauce.
- Cajun Chicken Fettuccine: Swap out the Italian seasoning, garlic powder, and onion powder on the chicken for your favorite Cajun spice blend. This gives the chicken a bold, smoky, spicy kick that contrasts beautifully with the cooling, creamy garlic sauce.
- Mushroom and Thyme: Sauté sliced cremini or button mushrooms in the pan with a pinch of fresh thyme right after you cook the chicken. Remove the mushrooms, set them aside with the chicken, and proceed with the sauce. Fold the mushrooms back in at the end for an earthy, savory depth of flavor.
- Bacon and Pea Alfredo: Crisp up some chopped bacon in the skillet before cooking the chicken. Set the bacon aside, cook the chicken in the bacon grease for unbelievable flavor, and toss in a cup of sweet green peas at the very end.
How to Properly Reheat Creamy Pasta
If you have ever tried to reheat leftover creamy pasta in the microwave, you know the disappointment of opening the door to find a dry clump of noodles swimming in a pool of yellow oil.
When a cream-and-cheese-based sauce is heated too quickly and at too high a temperature, the emulsion completely breaks. To reheat your leftovers so they taste almost as good as they did on night one, you need to use a gentle touch.
The best method is on the stovetop. Place your leftovers in a small saucepan over low heat. Add a splash of milk, heavy cream, or even a tablespoon of water to help loosen the sauce. Stir constantly and gently as the pasta warms up. The low heat and the added liquid will allow the sauce to reform its emulsion, becoming creamy and smooth once again.
If you must use the microwave, do it at fifty percent power. Add a tiny splash of milk to the bowl, cover it with a damp paper towel to trap the steam, and heat it in thirty-second intervals, stirring thoroughly between each burst until it is just warmed through.
There is something incredibly satisfying about bringing a plate of food like this to the table. It is warm, comforting, and packed with layers of rich, savory flavor. By paying attention to the small details, drying your chicken, grating your own cheese, and saving that precious pasta water, you will create a meal that rivals any Italian restaurant in town. Give this recipe a try this week, and watch your kitchen transform into your favorite new dinner spot.