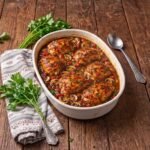
We have all been there. It is six o clock on a Tuesday, everyone is starving, and you are staring into the fridge hoping a magical, restaurant-quality meal will just assemble itself. A few years ago, during one of these exact weeknight panics, I tried to make a quick chicken and rice casserole. I figured I could just throw raw rice, some chicken breasts, a can of cream of chicken soup, and a splash of water into a baking dish and hope for the best.
What came out of the oven was a culinary tragedy. The rice on the edges was burnt to a crisp, the rice in the middle was a mushy, gluey paste, and the chicken was incredibly dry yet somehow soggy on the outside. It was a texture nightmare. My family politely ate a few bites, but we ended up ordering pizza.
That disaster sent me on a personal mission. I wanted to create a chicken and rice bake that actually worked. I wanted juicy, tender chicken with an insanely crispy, golden-brown crust. I wanted the rice underneath to be rich, creamy, and packed with flavor, almost like a shortcut risotto, without being mushy. After dozens of trials, ruined pans, and adjustments to liquid ratios, I finally cracked the code. This crispy garlic parmesan chicken and rice bake is the absolute crown jewel of my weeknight dinner rotation, and today, I am sharing every single secret, trick, and mistake I learned along the way so you can get it perfect on your very first try.
Why This Recipe Actually Works
The biggest challenge with any chicken and rice bake is timing. Rice and chicken do not cook at the same rate, nor do they like the same environment. Chicken thighs love high, dry heat to get that skin or crust crispy. Rice, on the other hand, needs trapped steam and moisture to plump up and soften. If you cook them together uncovered the whole time, your rice dries out. If you cover them the whole time, your chicken crust turns to mush.
To solve this, we use a two-step approach. First, we give the chicken a quick pan-sear to lock in the juices and kickstart that crispy parmesan crust. Second, we par-cook the rice in a rich garlic butter broth before nesting the chicken on top and finishing it in the oven. This ensures the rice absorbs all the delicious chicken drippings while it bakes, while the top of the chicken remains exposed to the dry heat of the oven, allowing the garlic parmesan crust to get incredibly crispy.
The Ingredients You Need
To make this dish truly spectacular, you want to use fresh, high-quality ingredients. Do not use the pre-grated parmesan cheese that comes in a green shaker bottle. It contains anti-caking agents that prevent it from melting properly, which will leave you with a gritty, sandy crust instead of a beautiful, golden melt.
| Ingredient | Amount | Notes |
|---|---|---|
| Boneless skinless chicken thighs | 6 medium pieces | Thighs stay much juicier than breasts |
| Panko breadcrumbs | 1 cup | Gives the ultimate crispy crunch |
| Freshly grated Parmesan cheese | 1 cup | Finely grated from a block |
| Garlic powder | 2 teaspoons | For the chicken seasoning |
| Paprika | 1.5 teaspoons | Adds a beautiful golden color |
| Italian seasoning | 1 teaspoon | Dried herbs blend |
| Salt and black pepper | To taste | Do not be shy with the seasoning |
| All-purpose flour | 0.25 cup | Helps the egg wash stick |
| Large eggs | 2 units | Beaten well for the egg wash |
| Long-grain white rice | 1.5 cups | Uncooked, rinsed thoroughly |
| Chicken broth | 2.5 cups | Low-sodium preferred to control salt |
| Heavy cream | 0.5 cup | Makes the rice incredibly rich |
| Unsalted butter | 4 tablespoons | Divided for searing and rice |
| Fresh garlic | 4 cloves | Minced finely |
| Fresh parsley | 2 tablespoons | Chopped for garnish |
Step-by-Step Instructions
Before you start, preheat your oven to 375 degrees Fahrenheit (190 degrees Celsius). Grab a 9×13 inch baking dish and lightly grease it with cooking spray or a little melted butter.
First, let us prep the chicken. I highly recommend using boneless, skinless chicken thighs for this recipe. Chicken breasts can work, but they dry out very quickly in the oven. Thighs have a bit more fat, which keeps them incredibly juicy and forgiving even if they stay in the oven a few minutes too long. Pat your chicken thighs completely dry with paper towels. This is a crucial step. If the chicken is wet, the breading will slip right off.
Set up three shallow bowls for your breading station. In the first bowl, put your all-purpose flour. In the second bowl, beat your two eggs with a tablespoon of water. In the third bowl, combine the panko breadcrumbs, freshly grated parmesan cheese, garlic powder, paprika, Italian seasoning, a teaspoon of salt, and half a teaspoon of black pepper. Stir this mixture well so the cheese and spices are evenly distributed throughout the breadcrumbs.
Season your dry chicken thighs lightly with salt and pepper on both sides. Dredge a chicken thigh in the flour, shaking off any excess. Next, dip it into the egg wash, ensuring it is completely coated. Finally, press the chicken firmly into the garlic parmesan panko mixture. You want to press hard so the breadcrumbs adhere to every nook and cranny of the chicken. Repeat this for all the thighs and set them on a plate.
Now, let us get a head start on the stovetop. Heat two tablespoons of butter in a large skillet over medium-high heat. Once the butter is melted and foaming, add the chicken thighs. We are not trying to cook the chicken all the way through here. We just want to sear them for about two to three minutes on each side until the crust turns a light golden brown. This step also renders out some of the chicken fat, which adds incredible flavor. Remove the chicken from the skillet and set it aside on a plate. Do not clean out the skillet!
Turn the heat down to medium. Add the remaining two tablespoons of butter to the same skillet. Once melted, toss in your minced fresh garlic and sauté it for about one minute until it smells absolutely amazing. Do not let it burn, or it will taste bitter. Pour your uncooked, rinsed long-grain white rice directly into the skillet with the garlic and butter. Stir the rice constantly for about two minutes. We are toasting the rice grains here. Toasting the rice coats each grain in butter and garlic, which helps keep the grains separate and prevents them from turning into a mushy clump later on.
Slowly pour in the chicken broth and heavy cream. Bring the mixture to a gentle simmer, scraping up any delicious browned bits from the bottom of the skillet with a wooden spoon. Let it simmer for just two minutes, then turn off the heat.
Pour this hot rice and broth mixture directly into your prepared 9×13 inch baking dish. Carefully arrange your seared chicken thighs on top of the rice. You want the chicken to sit on top of the rice, not be completely submerged in the liquid. If the breaded tops of the chicken get submerged, they will lose their crunch.
Pop the baking dish into your preheated oven, uncovered. Bake for about 25 to 30 minutes. You will know it is done when the rice has absorbed all the liquid and is tender, and the chicken has reached an internal temperature of 165 degrees Fahrenheit (74 degrees Celsius) when checked with a digital meat thermometer.
Remove the dish from the oven. If you want an extra-crispy top, you can pop it under the broiler for one to two minutes, but keep a very close eye on it because parmesan cheese can burn in a matter of seconds. Let the dish rest for five minutes before serving. This allows the creamy rice to set up beautifully. Garnish with fresh chopped parsley and a sprinkle of extra parmesan if you are feeling indulgent.
Crucial Lessons I Learned Along the Way
I have made almost every mistake possible with this dish, so let me share my hard-earned wisdom so your dinner is absolute perfection.
Rinsing the rice is non-negotiable. I used to skip this step because I thought it was an unnecessary chore. I was wrong. Unrinsed rice is coated in a layer of surface starch. When you cook it in a casserole, that starch mixes with the liquid and creates a gummy, sticky paste. Pour your dry rice into a fine-mesh strainer and run cold water over it, agitating it with your fingers, until the water runs completely clear. Shake off as much excess water as possible before toasting it in the skillet.
Do not use instant rice or arborio rice for this. Instant rice will cook far too quickly and turn to mush before the chicken is done. Arborio rice (risotto rice) releases too much starch and will make the casserole extremely heavy and sticky. Standard long-grain white rice or jasmine rice works beautifully here. If you want to use brown rice, you will need to add about half a cup of extra liquid and increase the baking time by twenty minutes, which will overcook your chicken. I highly recommend sticking to white rice for this particular dish.
The liquid ratio must be precise. Because we are baking this uncovered to keep the chicken crispy, some of the liquid evaporates into the oven air. That is why we use a slightly higher liquid-to-rice ratio than you would use on a covered stovetop. If you find your rice is still a bit chalky in the center but all the liquid is gone, your oven might run hot. Next time, cover the dish loosely with foil for the first fifteen minutes, then remove the foil for the final fifteen minutes to let the chicken crisp up.
Let the dish rest. When you first pull the bake out of the oven, the rice might look a little wet or saucy. Do not panic! As it sits on the counter for five to ten minutes, the rice will continue to absorb that remaining creamy garlic broth, turning into an incredibly rich, luxurious texture.
Customizing Your Bake
Once you master the base recipe, you can start having fun with it and customizing the flavors to suit your family's preferences.
If you love a spicy kick, add half a teaspoon of red pepper flakes to the garlic butter when you are toasting the rice. You can also mix a little cayenne pepper into the panko breading mixture. This gives the crispy crust a beautiful warm heat that contrasts wonderfully with the creamy, buttery rice underneath.
To pack some veggies into this meal, you can stir in some finely chopped broccoli florets, baby spinach, or frozen peas and carrots right before you pour the rice mixture into the baking dish. Just make sure to chop the broccoli quite small so it cooks through in the same thirty minutes. Spinach is fantastic because it wilts instantly in the hot broth.
For an even cheesier experience, sprinkle a cup of shredded mozzarella or provolone cheese over the rice layer before placing the chicken on top. As the dish bakes, the cheese melts into the rice, creating irresistible, gooey cheese pulls with every scoop.
Kitchen Tools That Make a Difference
While you do not need fancy equipment to cook a great meal, having the right tools makes the process much smoother and more enjoyable.
A reliable digital meat thermometer is your absolute best friend in the kitchen. Stop guessing if your chicken is done by cutting into it and letting all the juices escape. An instant-read thermometer lets you check the temperature in seconds. For chicken thighs, I actually prefer taking them to about 170 to 175 degrees Fahrenheit. Unlike breasts, thighs have connective tissue that breaks down at slightly higher temperatures, making them even more tender.
A solid 9×13 ceramic or glass baking dish is essential. Ceramic dishes distribute heat very evenly, which helps prevent the rice on the outer edges from burning before the center is cooked. I love using a dish that looks beautiful enough to go straight from the oven to the dining table.
A fine-mesh strainer is a lifesaver for rinsing rice. Standard colanders have holes that are too large, and you will lose half your rice down the sink drain. A cheap, stainless-steel, fine-mesh sieve keeps every grain safe while letting the starch wash away.
How to Store and Reheat Leftovers
If you are lucky enough to have leftovers, they make an incredible lunch the next day. Store the leftovers in an airtight container in the refrigerator for up to three to four days.
The biggest challenge with reheating this dish is maintaining that crispy chicken crust. If you microwave it, the chicken will get hot, but the crust will turn completely soft and soggy.
To reheat it perfectly, I recommend using an air fryer or your oven. For the air fryer, place the chicken thigh in the basket at 350 degrees Fahrenheit (175 degrees Celsius) for about five to six minutes. It will heat the chicken through and make that garlic parmesan crust just as crispy as the day you made it. You can microwave the rice separately for a minute with a splash of water or chicken broth to loosen it up and make it creamy again.
If you are using a conventional oven, place the chicken and rice in an oven-safe dish, cover the rice loosely with foil to keep it from drying out, but leave the chicken exposed. Bake at 350 degrees Fahrenheit for about twelve to fifteen minutes until heated through.
Troubleshooting Common Issues
Even with the best instructions, cooking can sometimes throw you a curveball. Here are some quick solutions to common issues you might run into.
If your rice is still hard after thirty minutes, your oven temperature might be running low, or the rice was not submerged enough in the liquid. To fix this, splash an extra quarter-cup of hot chicken broth over the dry areas of the rice, cover the dish tightly with aluminum foil, and return it to the oven for another five to ten minutes. The foil will trap the steam and cook those stubborn grains.
If your breading is falling off the chicken, it usually means the chicken was too wet before breading, or the skillet was not hot enough. Next time, ensure you pat the chicken completely dry with paper towels. When you place the chicken in the skillet, you should hear a loud, immediate sizzle. If it gently bubbles, the pan is too cold, and the breading will absorb the fat and get soggy instead of searing and sticking to the meat.
If the garlic parmesan crust is browning too fast in the oven, simply tent a piece of aluminum foil loosely over the chicken. This will protect the top from the direct heat while allowing the rice underneath to finish cooking.
This crispy garlic parmesan chicken and rice bake has truly transformed weeknight dinners in my household. It is comforting, incredibly flavorful, and brings that satisfying texture contrast that makes you want to keep eating. Give it a try tonight, avoid those easy mistakes, and enjoy a stress-free dinner that everyone at your table will absolutely love.