
It was a rainy Tuesday evening, the kind of day where the damp cold seems to seep right into your bones. I had spent the afternoon running errands, staring at my computer screen, and dealing with a endless stream of emails. By the time five o clock rolled around, my brain was completely fried, my feet were aching, and my stomach was letting out loud, impatient growls. My family was already hovering around the kitchen, looking at me with those big, expectant eyes that ask, what is for dinner, without them actually having to say the words.
I wanted comfort food. Specifically, I wanted a giant, bubbling, cheesy slice of lasagna. But if you have ever made a traditional lasagna from scratch, you know it is not a quick weeknight project. You have to boil the noodles, mix up the ricotta filling with eggs and herbs, brown the meat, simmer a sauce, and then meticulously layer everything together like a delicate construction project. By the time you actually put it in the oven, you have dirtied at least four different bowls, a couple of pots, and a frying pan. On a exhausted Tuesday night, that felt less like cooking and more like a punishment.
Just as I was about to give up and order an expensive delivery pizza, I opened my freezer and spotted a big bag of frozen cheese ravioli. That was my lightbulb moment. Ravioli is essentially just mini pockets of pasta stuffed with ricotta cheese. If I used frozen ravioli instead of flat lasagna sheets, I could completely skip the step of boiling pasta, and I would not have to make a ricotta filling because the cheese was already sealed inside the pasta.
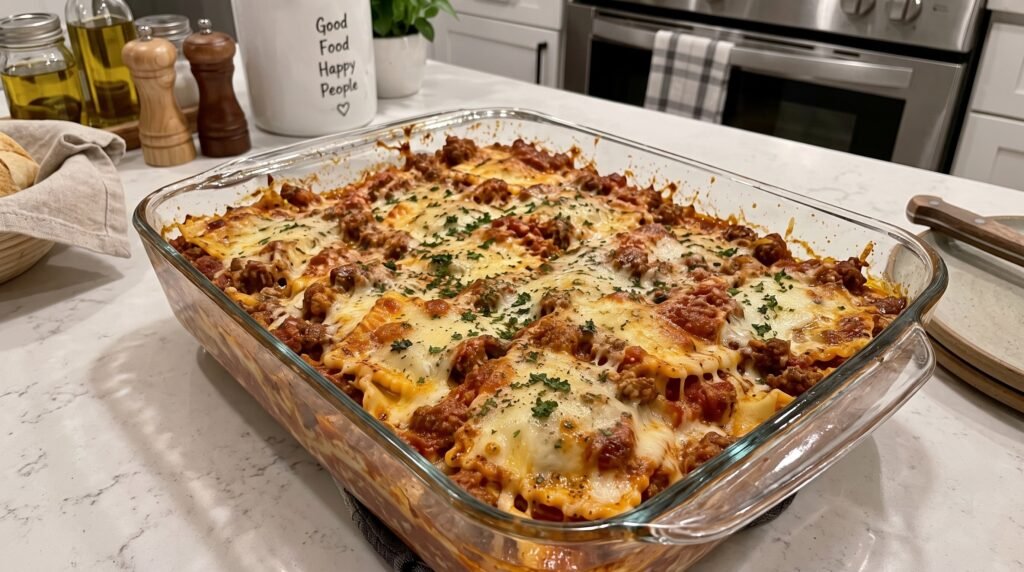
I grabbed a jar of marinara sauce from the pantry, some ground Italian sausage from the fridge, and a big bag of shredded mozzarella cheese. Within ten minutes, I had a beautiful casserole assembled and sliding into the oven. The result was absolute magic. It had the exact same rich, bubbly, cheesy comfort of a classic lasagna, but with a fraction of the work and only one pan to wash at the end of the night. Ever since that night, this baked ravioli casserole has been my absolute go-to recipe for busy weeknights, potlucks, and cozy weekend dinners.
Why This Cheat Code Recipe Works
To understand why this baked ravioli recipe is such a game-changer, you have to look at the anatomy of pasta. In a classic lasagna, you need a balance of pasta sheets, a flavorful meat or tomato sauce, and a creamy cheese layer, which is usually a mixture of ricotta, parmesan, herbs, and egg to bind it all together.
When you use frozen cheese ravioli, you are using a built-in shortcut. The ravioli provides both the pasta element and the creamy cheese element simultaneously. As the casserole bakes, the frozen pasta absorbs the moisture from the marinara sauce, cooking to a perfect tender texture right there in the baking dish. Meanwhile, the cheese filling inside the ravioli melts, giving you pockets of warm, gooey ricotta and Romano cheese in every single bite.
By using frozen ravioli, you also eliminate the risk of mushy, overcooked pasta. One of the biggest complaints people have with homemade lasagna is that the noodles can easily get soggy or tear apart during assembly. Frozen ravioli holds its shape beautifully. It creates a structured, easily sliceable casserole that looks incredibly impressive when you bring it to the dinner table.
The Ingredients You Need
One of the best things about this recipe is its simplicity. You only need a handful of basic ingredients, most of which you probably already have in your pantry or freezer. Here is a quick look at what you will need to gather before you start cooking.
| Ingredient | Amount | Notes |
|---|---|---|
| Frozen cheese ravioli | 25 ounces | Do not thaw them before baking |
| Mild or sweet Italian sausage | 1 pound | Can substitute with ground beef or turkey |
| Marinara sauce | 48 ounces | Two standard jars of your favorite brand |
| Shredded mozzarella cheese | 3 cups | Low-moisture mozzarella melts the best |
| Grated parmesan cheese | 0.5 cup | Adds a nice salty, nutty bite |
| Garlic powder | 1 teaspoon | For extra depth of flavor in the sauce |
| Dried Italian seasoning | 1 teaspoon | To elevate the jarred sauce |
| Fresh parsley | 2 tablespoons | Finely chopped for a bright garnish |
Choosing the Right Ingredients
While this is a highly forgiving recipe, the quality of your ingredients will directly impact the final flavor of your dish. Because we are keeping things simple, choosing the right components makes a huge difference.
First, let us talk about the ravioli. You can find frozen ravioli in almost any grocery store freezer aisle. I highly recommend using medium-sized cheese ravioli for this casserole. Beef or spinach ravioli work great too, but cheese ravioli gives you that authentic lasagna flavor. Do not buy the fresh, refrigerated ravioli for this particular baking method. Fresh ravioli cooks much faster than frozen and can turn to mush during a forty-five-minute bake. Frozen ravioli has the perfect density to withstand the baking time while absorbing the sauce.
Next is the sauce. Since the sauce is the liquid medium that cooks your pasta, you want something flavorful and high-quality. Do not just buy the cheapest jar on the shelf unless you plan on heavily doctoring it up. Look for a marinara sauce that has tomatoes, olive oil, garlic, and basil listed as the first few ingredients, without a lot of added sugar or preservatives. If you have homemade marinara sitting in your freezer, even better.
For the meat, I absolutely love using sweet Italian sausage. It comes pre-seasoned with fennel, garlic, and herbs, which instantly boosts the flavor of jarred marinara. If your family prefers a milder flavor, lean ground beef works wonderfully. If you want a lighter option, ground turkey or ground chicken are great substitutes. Just make sure to season your ground beef or turkey with a little salt, pepper, and Italian seasoning while you brown it, as they do not have the built-in spices that sausage does.
Finally, let us discuss the cheese. For that classic, stretchy cheese pull, low-moisture, whole-milk mozzarella is the gold standard. Avoid pre-shredded cheese if you have the time and energy to grate your own. Pre-shredded cheese is coated with potato starch or cellulose to prevent it from clumping in the bag, but this coating also prevents it from melting into that ultra-creamy, gooey blanket we want on top of our casserole. Grating a block of mozzarella yourself takes about three minutes, but it completely transforms the texture of the dish.
Step By Step Instructions
Now that you have your ingredients ready, let us walk through the process of putting this comfort food masterpiece together.
Step One: Brown your meat. Start by preheating your oven to 375 degrees Fahrenheit. While the oven is warming up, place a large skillet or frying pan over medium-high heat. Add your ground Italian sausage, breaking it up with a wooden spoon or a meat masher into small, even crumbles. Cook the meat until it is completely browned and there is no pink left, which should take about six to eight minutes.
Step Two: Drain the excess fat. Once the meat is cooked, you will want to drain off any excess grease. If you leave too much fat in the pan, it will rise to the top of your casserole during baking, resulting in a greasy, oily layer on top of your cheese. I like to tilt my pan and use a spoon to scoop the grease into an empty can, or you can dump the meat onto a plate lined with paper towels to absorb the extra oil.
Step Three: Combine the meat and sauce. Return the drained meat to your skillet over low heat. Pour in both jars of marinara sauce. Add your garlic powder and dried Italian seasoning. Stir everything together until the meat is evenly distributed throughout the sauce. Let this mixture simmer gently for about two to three minutes so the flavors can marry.
Step Four: Create the base layer. Grab a 9×13-inch glass or ceramic baking dish. Before you put any pasta down, ladle about one cup of your warm meat sauce into the bottom of the dish. Use the back of your spoon to spread it out into a thin, even layer. This bottom layer of sauce is absolutely crucial. It acts as a barrier, preventing your ravioli from sticking to the bottom of the pan and burning.
Step Five: Layer the frozen ravioli. Open your bag of frozen ravioli. Lay half of the frozen ravioli in a single, even layer over the sauce. It is completely fine if they touch or overlap slightly, but try not to crowd them too much or they will cook unevenly. Do not thaw them first; put them in straight from the freezer.
Step Six: Add the sauce and cheese layers. Spoon half of the remaining meat sauce over your first layer of ravioli, spreading it out to cover the pasta completely. Sprinkle half of your shredded mozzarella cheese and half of your grated parmesan cheese over the sauce.
Step Seven: Repeat the process. Place the rest of your frozen ravioli in an even layer over the cheese. Pour the remaining meat sauce over the top, making sure every single ravioli pocket is covered in sauce. If any edges of the pasta are left exposed to the dry heat of the oven, they will become hard, crunchy, and unpleasant to chew. Finish it off by scattering the rest of the mozzarella and parmesan cheese over the top.
Step Eight: Cover and bake. Cover your baking dish tightly with a sheet of aluminum foil. If your cheese layer is sitting high in the dish, you can spray the underside of the foil with a little non-stick cooking spray before putting it on. This prevents the melting cheese from sticking to the foil and peeling off when you uncover it. Pop the dish into your preheated oven and bake for about thirty-five minutes.
Step Nine: Uncover and brown. After thirty-five minutes, carefully remove the aluminum foil. The casserole should be bubbling vigorously around the edges, and the cheese should be completely melted. Place the dish back in the oven, uncovered, for another ten to fifteen minutes, or until the cheese on top is beautifully melted, bubbly, and spotted with golden-brown patches. If you want a really crispy, browned top, you can turn on your oven broiler for the last two to three minutes, but watch it like a hawk so it does not burn.
Step Ten: Let it rest and garnish. Once the casserole is done, remove it from the oven. Let it sit on the counter for about ten to fifteen minutes before you attempt to slice into it. I know this is the hardest part of the entire recipe because the kitchen will smell absolutely incredible, but resting is essential. It allows the sauce to thicken up and the cheese to set. If you cut into it immediately, the hot layers will slide apart and turn into a messy soup on your plate. Just before serving, sprinkle your finely chopped fresh parsley over the top for a beautiful pop of green.
Crucial Lessons I Learned the Hard Way
Like any home cook, I have made my fair share of mistakes while perfecting this recipe over the years. Sharing these blunders will help you avoid the same pitfalls in your own kitchen.
My very first mistake was trying to thaw the ravioli before assembly. I thought that because they were frozen, they would need a head start to cook properly in the oven. I pulled the bag out of the freezer in the morning and let it sit in the fridge all day. When I went to make dinner, the ravioli had thawed into a sticky, gummy clump. When I baked the casserole, the pasta completely disintegrated into mush, creating a texture that was closer to baby food than lasagna. Keep them frozen. The slow, gentle heat of baking frozen ravioli inside the sauce allows the pasta to cook to a perfect al dente texture.
Another mistake I made was trying to make a low-fat version by using fat-free mozzarella and skipping the meat. While I am all for healthier options, fat-free cheese does not melt. It turned into a weird, rubbery, plastic-like sheet on top of my casserole that refused to brown. If you want a lighter version, use part-skim mozzarella instead of fat-free. It still melts beautifully and has a wonderful, creamy texture.
I also once made the mistake of using a dry, cheap brand of pre-cooked ravioli. It had very little cheese filling, and the pasta dough was incredibly thick. Because the pasta was so thick, it did not absorb enough moisture from the sauce, leaving me with tough, chewy pockets. Always look for a reputable brand of frozen ravioli with a thin, tender pasta shell and a generous amount of filling.
Fun Variations and Customizations
Once you have mastered the basic recipe, you can start experimenting with different flavors to keep things exciting. This casserole is incredibly versatile, and you can easily adapt it to fit your family's preferences or whatever ingredients you have lingering in your pantry.
If you want to pack some extra vegetables into your dinner, you can easily make a spinach and mushroom version. Simply sauté a package of sliced baby bella mushrooms and a couple of handfuls of fresh baby spinach in a little olive oil and garlic until tender. Layer the cooked veggies right on top of the ravioli layers before adding your sauce and cheese. You can also use frozen spinach; just make sure to thaw it and squeeze out every single drop of excess water in a clean kitchen towel so it does not make your casserole watery.
For a rich, white-sauce version, you can swap out the marinara sauce for a creamy Alfredo sauce. I love to make this with chicken ravioli or spinach and ricotta ravioli. Layer the ravioli with Alfredo sauce, shredded chicken breast, and a mixture of mozzarella and provolone cheese. It is an incredibly decadent, comforting twist that tastes like a high-end restaurant dish.
If you have spice lovers in your house, you can easily kick up the heat. Use hot Italian sausage instead of sweet, and swap out the standard marinara for a spicy arrabbiata sauce. You can also add a generous pinch of crushed red pepper flakes to your meat mixture as it simmers.
For a vegetarian-friendly option, simply omit the meat altogether. To keep the sauce hearty and full of texture, you can add sautéed zucchini, bell peppers, onions, and garlic to your marinara sauce. A vegetarian baked ravioli is just as satisfying and comforting as the meaty version.
Meal Prep and Freezing Instructions
This baked ravioli casserole is an absolute dream for meal prepping. If you are a busy parent or someone who works long hours, having a pre-assembled meal waiting in your freezer is the ultimate lifesaver.
To freeze this dish unbaked, assemble the entire casserole in a disposable aluminum foil pan according to the recipe instructions. Once assembled, do not bake it. Cover the pan tightly with a layer of plastic wrap, pressing it down gently so it touches the top layer of cheese to prevent freezer burn. Then, wrap the entire pan tightly in two layers of heavy-duty aluminum foil. Label the top with the date and baking instructions. You can store this in your freezer for up to three months.
When you are ready to eat, you have two options. You can thaw the casserole in your refrigerator overnight and then bake it at 375 degrees Fahrenheit for about forty to forty-five minutes covered, and another ten minutes uncovered.
Alternatively, you can bake it straight from frozen. If baking from frozen, keep the foil on and bake at 375 degrees for about one hour and fifteen minutes. Then, remove the foil and bake for another fifteen to twenty minutes until the center is piping hot and the cheese is bubbly and golden. This is incredibly convenient for those nights when you completely forget to plan ahead for dinner.
If you have leftovers after baking, they store beautifully. Put the leftovers in an airtight container and keep them in the fridge for up to four days. To reheat, I highly recommend using the oven or a toaster oven rather than the microwave. Reheating a slice in the oven at 350 degrees for about fifteen minutes will restore that wonderful, crispy texture to the edges of the pasta and keep the cheese perfectly stretchy.
What to Serve with Baked Ravioli
Since this casserole is incredibly rich, saucy, and cheesy, you want to serve it with side dishes that offer a fresh, crisp contrast.
My absolute favorite pairing is a simple, bright green salad. I love tossing fresh arugula or romaine lettuce with a zesty lemon-vinaigrette dressing. The acidity of the lemon dressing cuts through the richness of the cheese and sausage beautifully, cleansing your palate between bites. A classic Caesar salad with crisp croutons and a creamy garlic dressing is also a fantastic option.
And, of course, you cannot have a pasta bake without some form of garlic bread. I love taking a fresh French baguette, slicing it in half, and slathering it with a mixture of softened butter, minced fresh garlic, dried parsley, and a pinch of salt. Bake it in the oven alongside the casserole during the last ten minutes until it is perfectly crispy on the edges and soft in the middle. It is the ultimate tool for scraping up every last drop of delicious meat sauce left on your plate.
If you want to add a green vegetable to the table, simple roasted broccoli or roasted green beans are my go-to choices. Toss them with a little olive oil, salt, pepper, and garlic powder, and roast them on a baking sheet at 400 degrees for about fifteen to twenty minutes until they are slightly charred and tender-crisp.
The Secret to Cutting Perfect Slices
If you have ever tried to serve a hot lasagna or pasta bake only to have it slide into a messy puddle on the plate, you know how frustrating it can be. While it will still taste delicious, we eat with our eyes first, and there is something incredibly satisfying about serving a perfectly neat, layered slice of casserole.
The absolute most important factor in getting clean slices is patience. As I mentioned in the step-by-step guide, you must let the casserole rest for at least ten to fifteen minutes after it comes out of the oven. When the casserole is boiling hot, the cheese is completely liquid, and the starch from the pasta has not had time to settle. Resting allows everything to firm up and bind together.
Another great trick is to use the right cutting tool. Instead of a standard butter knife, use a long, sharp chef knife or a serrated bread knife to slice through the layers. Cut clean through the pasta, making sure you hit the bottom of the pan with each cut.
Once your slices are cut, use a wide, flexible metal spatula to lift each slice out of the dish. Slip the spatula completely under the slice, supporting the weight of the pasta and cheese from underneath, and lift it quickly onto the plate. The first slice is always the hardest to get out cleanly, but once that first piece is out of the way, the rest of the slices will lift out beautifully.
Final Kitchen Thoughts
At the end of a long, exhausting day, food is so much more than just fuel. It is a way to slow down, connect with the people we love, and find comfort after dealing with the chaos of the world. But you do not have to spend hours standing over a hot stove to create a meal that feels special, warm, and deeply comforting.
This baked ravioli casserole is proof that sometimes the smartest shortcuts yield the most delicious results. It takes a humble bag of frozen pasta and transforms it into a show-stopping dinner that looks like it took hours of preparation. It has saved my Tuesday nights more times than I can count, and it always brings a sense of cozy, slow-paced joy to our family table.
The next time you find yourself craving the rich, cheesy layers of a classic homemade lasagna but do not have the time or energy to tackle the kitchen prep, skip the stress. Grab a bag of frozen ravioli, fire up your oven, and treat yourself to this simple, delicious shortcut. Your family will thank you, your kitchen will smell like a cozy Italian trattoria, and you will actually have time to sit down, relax, and enjoy your evening.