
There is a specific kind of panic that sets in when you are standing over a blazing hot charcoal grill, holding a pair of tongs, watching fifty dollars worth of premium wild-caught shrimp slowly slip through the grates and plunge directly into the glowing white coals. I know this panic because I have lived it. It was a humid July evening, my patio was packed with hungry friends, and I had promised them the best shrimp tacos of their lives. Instead, I gave them a lesson in kitchen disasters. The shrimp were small, unskewered, and slick with an oil-heavy marinade that caused massive flare-ups. Half of them burned to a crisp in seconds, and the other half turned into something resembling rubber shoe soles.
That disastrous night was my turning point. I became absolutely obsessed with mastering the shrimp taco. I spent the next three years testing cooking methods, marinade ratios, grill temperatures, and sauce formulations. I experimented with different sizes of shrimp, various woods for smoking, and countless tortilla-warming techniques. Today, I am sharing everything I learned during that obsession. This is not just a quick recipe pulled from a glossy magazine; this is a battle-tested, crowd-approved blueprint for making jaw-dropping, restaurant-quality grilled shrimp tacos right in your own backyard.
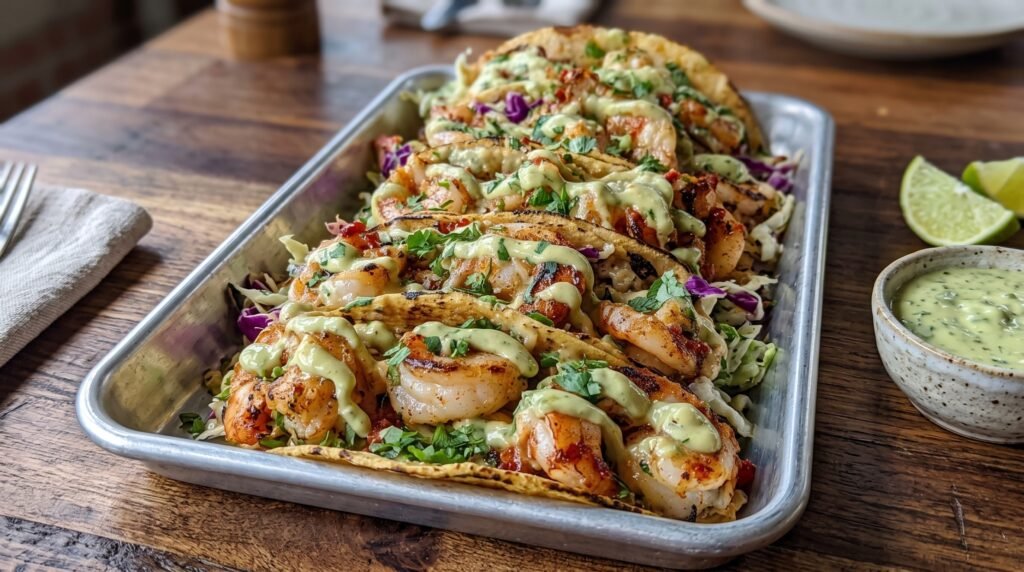
If you have ever had a soggy, bland, or rubbery shrimp taco, I want you to forget that experience entirely. The perfect shrimp taco is a symphony of contrasting textures and temperatures. You want hot, smoky, heavily spiced shrimp with a deeply charred exterior and a juicy, snappy interior. You want that heat countered by a crisp, cold, tangy red cabbage slaw. And finally, you need a velvety, rich, herb-forward cream sauce to tie the whole thing together, all cradled inside a warm, pliable, slightly charred corn tortilla.
Let us dive into the details so you can avoid my past mistakes and nail this recipe on your very first try.
Sourcing the Perfect Shrimp
Before you even turn on your stove or light your grill, your success is largely determined at the seafood counter. Walking up to that glass case can be intimidating with all the numbers, labels, and price points. Here is what you actually need to know.
First, let us talk about size. Shrimp are sold by count per pound. If you see 16/20 on a bag, it means there are between 16 and 20 shrimp in one pound. For tacos, you want to buy extra-large or jumbo shrimp, specifically in the 16/20 or 21/25 range. Anything smaller than this will overcook in a heartbeat on the grill. Small shrimp lose their moisture instantly, leaving you with dry, tough bites. Larger shrimp have enough mass to develop a beautiful grilled crust on the outside while remaining tender and juicy on the inside.
Second, the fresh versus frozen debate is a bit of a trick. Unless you live directly on the coast and are buying from a dock-side market, almost all the fresh shrimp in the seafood display case was shipped frozen and thawed behind the counter. That means those thawed shrimp have been sitting on ice for a day or two, slowly losing their freshness. I highly recommend buying high-quality, wild-caught frozen shrimp. Look for bags labeled IQF, which stands for Individually Quick Frozen. This means each shrimp was frozen separately, preventing them from clumping into a giant block of ice. You can thaw them in about fifteen minutes by placing them in a bowl of cold water in your sink.
Third, look for wild-caught shrimp. Gulf shrimp or wild Pacific shrimp have a sweet, clean, ocean-like flavor and a firm texture. Farmed shrimp, especially imported ones, can sometimes have a muddy taste and a soft, mushy texture due to the conditions in which they are raised. It is worth spending a few extra dollars for wild-caught varieties.
Lastly, do yourself a massive favor and buy them peeled and deveined with the tails removed. Peeling and deveining forty individual shrimp by hand on a busy weeknight is a tedious task that can quickly take the joy out of cooking. If you can only find shell-on shrimp, make sure to set aside an extra twenty minutes for prep work, and use a sharp paring knife to slice down the back of each shrimp to remove that gritty dark vein.
The Chemistry of the Marinade
When it comes to seasoning shrimp, there is a major trap that many home cooks fall into: marinading with acid for too long.
Shrimp are incredibly delicate. Their proteins are highly sensitive to acid, such as lime juice, lemon juice, or vinegar. If you submerge shrimp in a highly acidic marinade and leave them in the refrigerator for an hour, the acid will actually begin to cook the shrimp, essentially turning them into ceviche. This denatures the proteins, making the shrimp chalky, mushy, and dry before they even touch the grill.
The secret to a great shrimp marinade is to separate your flavor components. We want to use dry spices, garlic, and high-quality oil to coat the shrimp before cooking, saving the lime juice for the very end of the process or incorporating it entirely into our creamy sauce.
For the dry rub, I like to create a bold, smoky flavor profile that mimics the char of a wood-fired grill. We use a combination of smoked paprika, chili powder, ground cumin, garlic powder, onion powder, and a touch of cayenne pepper for heat. To help the spices stick and to prevent the shrimp from sticking to the grill grates, we toss them in a neutral oil with a high smoke point, such as avocado oil or canola oil. Avoid extra virgin olive oil here, as its low smoke point can cause it to burn and taste bitter over high grill heat.
The Magic of Avocado Lime Crema
A taco is only as good as its sauce. If you use standard store-bought sour cream, your tacos will taste flat. We want a sauce that offers richness, acidity, herbaceous freshness, and a subtle hint of garlic and spice. Enter the avocado lime crema.
Traditional Mexican crema is thinner and slightly more tart than American sour cream. For our version, we use a base of Mexican crema, but you can easily substitute full-fat sour cream or even Greek yogurt if you want a lighter option. We blend this base with fresh, ripe avocado, which adds an incredible buttery texture and a beautiful pastel green color.
To bring the freshness, we throw in an entire bunch of fresh cilantro. When making this sauce in a blender or food processor, do not waste time picking individual cilantro leaves off the stems. The stems of the cilantro plant actually hold an immense amount of flavor and moisture. Just chop off the bottom inch of the root ends, wash the remaining leaves and stems thoroughly, and toss them right into the blender.
We round out the crema with fresh lime juice, a clove of raw garlic, and half of a jalapeño. If you are sensitive to heat, make sure to scrape out the white ribs and seeds of the jalapeño before tossing it in. If you like things spicy, throw the whole pepper in, seeds and all. Spin it in your blender until it is completely smooth and velvety. If it feels too thick to drizzle, splash in a tablespoon of cold water or extra lime juice to thin it out.
The Supporting Cast: Red Cabbage Slaw
Textural contrast is the unsung hero of great street food. Since shrimp are tender and soft, we need a distinct, loud crunch in every single bite to keep things interesting. Green lettuce just will not cut it here. It wilts too quickly when it comes into contact with the warm shrimp and the heavy sauce.
Red cabbage, also known as purple cabbage, is the absolute perfect vehicle for this crunch. It is incredibly hearty, holds its structure for hours, and adds a stunning pop of bright purple to your serving tray.
Instead of a heavy, mayonnaise-based coleslaw, we make a quick-pickled vinegar slaw. We thinly shred the red cabbage and toss it with fresh lime juice, a splash of white vinegar or apple cider vinegar, a pinch of kosher salt, and some chopped fresh cilantro. Letting this mixture sit on your counter for fifteen to twenty minutes while you prep your grill does wonders. The salt and acid draw out a bit of the cabbage's moisture, tenderizing it slightly while intensifying its vibrant purple color and clean, peppery flavor.
The Tortilla Ritual
I cannot emphasize this enough: do not serve cold, raw tortillas straight out of the plastic bag. A cold corn tortilla is stiff, chalky, and will break along the seam the moment you fold it, spilling your beautiful toppings all over your hands and plate.
To make a corn tortilla soft, aromatic, and pliable, it must be heated properly. There are three excellent ways to do this, depending on your setup.
The gas stove method is my personal favorite for indoor cooking. Turn your burner on medium-low and place a single corn tortilla directly over the open flame. Using metal tongs, let it sit for about twenty to thirty seconds until you see some light charring and char marks on the underside. Flip it and repeat on the other side. This mimics the taste of a clay comal used in traditional Mexican kitchens.
The grill method is perfect if you already have your outdoor grill fired up. Once you finish grilling your shrimp, place your tortillas directly onto the hot grates for about fifteen seconds per side. They will pick up those beautiful grill marks and a wonderful smoky aroma.
The skillet method works beautifully if you do not have a gas stove or an outdoor grill. Heat a dry cast-iron skillet or griddle over medium-high heat. Place the tortillas in the hot pan and heat for about thirty seconds to a minute on each side until they begin to puff up slightly and develop light brown spots.
Whichever method you choose, have a clean kitchen towel or a tortilla warmer ready. As soon as each tortilla comes off the heat, tuck it immediately into the towel to trap the steam. This steaming process is crucial; it softens the structure of the corn, making the tortillas incredibly pliable so they can hold a generous amount of shrimp and toppings without tearing.
Ingredients and Measurements
Before we head to the kitchen, let us make sure we have all of our ingredients gathered. Having everything measured out and ready to go, a practice called mise en place, is the secret to a stress-free cooking process.
| Ingredient | Amount | Notes |
|---|---|---|
| Large Shrimp (16/20 or 21/25 size) | 1.5 pounds | Peeled, deveined, tails removed, thawed |
| Avocado Oil | 2 tablespoons | High smoke point, neutral flavor |
| Smoked Paprika | 1.5 teaspoons | Gives that rich, woody flavor |
| Chili Powder | 1 teaspoon | Standard Mexican-style chili powder |
| Ground Cumin | 0.5 teaspoon | Earthy and aromatic |
| Garlic Powder | 0.5 teaspoon | For savory depth |
| Onion Powder | 0.5 teaspoon | Complements the garlic |
| Cayenne Pepper | 0.25 teaspoon | Adjust to your spice preference |
| Kosher Salt | 1 teaspoon | Crucial for bringing out flavor |
| Corn Tortillas | 12 small | Look for high-quality, local options if possible |
| Ripe Avocado | 1 medium | Peeled and pitted |
| Mexican Crema | 0.5 cup | Can substitute sour cream or Greek yogurt |
| Fresh Cilantro | 1 large bunch | Stems and leaves separated for different steps |
| Fresh Limes | 4 medium | Juiced, plus extra wedges for serving |
| Garlic | 1 clove | Peeled and left whole for the crema |
| Jalapeno Pepper | 1 medium | Seeding is optional based on heat preference |
| Red Cabbage | 0.5 small head | Shredded very thinly |
| White Vinegar | 1 tablespoon | For the quick-pickling of the cabbage |
Step-by-Step Cooking Instructions
Now that your workspace is organized, let us walk through the process step-by-step. Follow these instructions closely, and you will have a spectacular meal on your table in under forty-five minutes.
Step 1: Prep the Red Cabbage Slaw
We want to make the slaw first so it has time to sit and develop its flavor.
Take your half head of red cabbage and slice it as thinly as possible using a sharp chef's knife or a mandoline slicer. Place the shredded cabbage into a medium-sized mixing bowl.
Add the juice of one fresh lime, one tablespoon of white vinegar, a half teaspoon of kosher salt, and about a quarter cup of chopped fresh cilantro leaves. Use your hands or tongs to toss everything together, pressing down slightly on the cabbage to help it absorb the liquids. Set the bowl aside on your counter. Give it a toss every ten minutes or so while you prepare the rest of the meal.
Step 2: Blend the Avocado Lime Crema
In a high-powered blender or food processor, combine the flesh of one ripe avocado, a half cup of Mexican crema, the juice of two fresh limes, one whole peeled clove of garlic, and half of a jalapeño pepper.
Grab your bunch of cilantro and cut off the thick root ends. Throw the remaining stems and leaves directly into the blender. Add a generous pinch of kosher salt.
Blend on high speed for one to two minutes until the sauce is completely smooth, creamy, and a vibrant light green color. Taste the crema. If it needs more salt or acidity, add another squeeze of lime juice or a pinch of salt. Pour the sauce into a squeeze bottle or a small serving bowl, cover it, and place it in the refrigerator to chill and firm up.
Step 3: Prep and Season the Shrimp
If your shrimp were frozen, make sure they are completely thawed. Drain them well in a colander.
This next step is simple but incredibly important: take several paper towels and thoroughly pat the shrimp dry. If your shrimp are wet when you put them on the grill, the moisture will turn into steam. Steamed shrimp are rubbery and will not develop those gorgeous charred spots. We want them bone dry.
Place the dried shrimp into a large mixing bowl. Drizzle with two tablespoons of avocado oil and toss to coat every single shrimp.
In a small bowl, mix together the smoked paprika, chili powder, ground cumin, garlic powder, onion powder, cayenne pepper, and one teaspoon of kosher salt. Sprinkle this spice blend over the oiled shrimp. Use your hands or a spatula to toss the shrimp gently until they are completely and evenly coated in the red spice rub.
Step 4: Thread the Shrimp onto Skewers
If you are cooking on an outdoor grill, trying to flip individual shrimp one by one is a recipe for disaster. They will cook too quickly, your hands will get too close to the heat, and you run a high risk of dropping them into the fire. The solution is simple: skewers.
If you are using wooden bamboo skewers, make sure to soak them in water for at least thirty minutes before grilling so they do not catch fire. Metal skewers work wonderfully too and do not require soaking.
Here is my favorite professional kitchen hack: use the double-skewering method. Instead of threading your shrimp onto a single skewer, use two parallel skewers spaced about half an inch apart. Thread the skewers through both the top and the bottom of each shrimp. This prevents the shrimp from spinning or rotating when you try to flip them on the grill, making your job infinitely easier and ensuring an even cook on both sides.
Thread about five to six jumbo shrimp onto each set of double skewers, leaving a little bit of space between each shrimp so the heat can circulate around them.
Step 5: Fire Up the Grill
Clean your grill grates thoroughly with a wire brush and wipe them down with an oil-soaked paper towel to create a non-stick surface.
If you are using a charcoal grill, pile your hot coals to one side to create a high-heat direct zone and a cooler indirect zone. If using a gas grill, turn your burners to medium-high heat. You want your grill temperature to be around 400 to 450 degrees Fahrenheit.
If you do not have an outdoor grill, do not worry. You can achieve fantastic results indoors by heating a seasoned cast-iron skillet or griddle over medium-high heat until it is smoking hot.
Step 6: Grill the Shrimp
Place your shrimp skewers directly over the hottest part of the grill. Close the lid and let them cook undisturbed for exactly two minutes.
Open the lid and flip the skewers over. The cooked side should have beautiful dark grill marks and a charred, reddish-orange spice crust. Cook on the second side for another one and a half to two minutes.
How do you know when shrimp are perfectly cooked? Look at their shape and opacity. Raw shrimp are translucent gray and relaxed in a wide U-shape. Perfectly cooked shrimp turn opaque pinkish-white and curl gently into a firm C-shape. If your shrimp have curled tightly into a closed O-shape, they are overcooked and will be rubbery. Remove them from the grill immediately. Slide the grilled shrimp off the skewers onto a warm plate and tent them loosely with aluminum foil to keep them hot.
Step 7: Warm the Tortillas
Using your preferred method (gas burner, hot grill, or dry skillet), quickly warm your twelve corn tortillas. Stack them inside a clean kitchen towel to keep them warm and soft.
Step 8: Assemble Your Masterpiece
Now comes the fun part. Grab a warm, pliable corn tortilla.
Start with a generous bed of your cold, crunchy red cabbage slaw at the bottom. This acts as a barrier, preventing the juices of the shrimp from soaking into the tortilla and making it soggy.
Place three to four hot, smoky grilled shrimp on top of the cabbage slaw.
Drizzle a generous amount of the cold, creamy avocado lime crema over the shrimp.
Garnish with a handful of fresh chopped cilantro leaves, a sprinkle of crumbled cotija cheese or queso fresco if you like, and serve immediately with fresh lime wedges on the side. Encouraging your guests to squeeze a fresh burst of lime juice over their tacos right before taking their first bite elevates the flavor to a whole new level.
Common Mistakes to Avoid
Even with a detailed recipe, minor details can make a major difference. Here are the most common mistakes I see people make when cooking shrimp tacos, and how you can avoid them easily.
- Overcooking the shrimp: I cannot repeat this enough. Shrimp cook incredibly fast. From start to finish, jumbo shrimp only need about three to four minutes of total cooking time over high heat. Keep a close eye on them, look for that gentle C-shape, and remove them from the heat immediately when they lose their translucency.
- Skipping the drying step: If your shrimp are wet from thawing or washing, they will steam instead of sear. This prevents that delicious caramelization of spices and leaves you with a soft, soggy texture. Always pat your shrimp thoroughly dry with paper towels before oiling and seasoning.
- Not warming the tortillas properly: Serving cold, stiff corn tortillas is the quickest way to ruin a taco night. Take the extra five minutes to char and steam your tortillas. It makes a massive difference in both flavor and structural integrity.
- Adding lime juice to the raw marinade: Keep your acids out of the raw shrimp marinade. Let your dry spices do the heavy lifting while cooking, and save the bright, fresh lime juice for your sauces, slaws, and table garnishes.
- Overfilling the tacos: It is incredibly tempting to pile your tacos high with every topping under the sun. However, a great taco is about balance. If you put too much slaw, shrimp, and sauce in a single small corn tortilla, it will tear, break, and become a messy plate of salad. Keep your portions moderate so you can cleanly fold the taco and enjoy every element in a single cohesive bite.
Fun Variations and Substitutions
One of the reasons I love tacos so much is their incredible versatility. Once you master the basic technique, you can easily adapt this recipe to suit your dietary needs, pantry ingredients, or personal flavor preferences.
If you do not have shrimp, this exact same spice rub, slaw, and crema combination works beautifully with firm white fish, such as mahi-mahi, cod, halibut, or tilapia. Simply brush the fish fillets with oil, apply the spice rub, and grill for about three to four minutes per side until the fish flakes easily with a fork.
If you want a dairy-free version of the avocado lime crema, you can substitute the Mexican crema with a high-quality vegan sour cream, unsweetened coconut milk yogurt, or simply increase the amount of fresh avocado and blend it with a splash of water to create a rich, creamy, completely plant-based avocado dressing.
If you prefer flour tortillas over corn, feel free to make the switch. Flour tortillas are naturally softer and hold together beautifully, though they lack that distinct, earthy corn flavor. Make sure to warm them on your grill or skillet for a few seconds until they puff up slightly before serving.
For a sweet and spicy twist, try adding a fresh fruit salsa to your taco. A quick salsa made with diced fresh mango, red onion, jalapeño, cilantro, and lime juice pairs absolutely beautifully with the smoky, charred flavor of the grilled shrimp and the cool avocado crema.
Storing and Reheating Leftovers
On the off chance that you have leftovers, storing and reheating shrimp requires a gentle touch.
Store any leftover grilled shrimp in an airtight container in your refrigerator for up to two days. Keep your leftover cabbage slaw and avocado lime crema in separate airtight containers.
When you are ready to eat, do not use the microwave to reheat your shrimp. Microwave ovens heat food unevenly and will instantly turn your perfectly cooked, tender shrimp into tough, rubbery little pellets.
Instead, heat a small skillet over medium-low heat. Add a teaspoon of butter or oil to the pan. Toss in your leftover shrimp and cook gently for about one to two minutes, turning them frequently, just until they are warmed through. This gentle reheating method preserves their juicy, snappy texture. Warm up some fresh tortillas, assemble your toppings, and you have a spectacular lunch ready in minutes.