
We have all been there. It is Sunday evening, the weekend is winding down, and the dread of the upcoming work week is starting to settle in. You want something comforting, warm, and deeply satisfying for dinner, but the thought of another dry, gray, ketchup-topped brick of meatloaf makes you want to order takeout instead. For years, meatloaf was the joke of the culinary world, a heavy block of ground beef that seemed to exist solely to test our jaw strength and patience. My own mother, bless her heart, used to bake a meatloaf that was so dense we practically needed a chainsaw to get through it.
I made it my personal mission to rescue meatloaf from its boring, dry reputation. After countless experiments in my kitchen, some of which resulted in smoky kitchen disasters and cheese-covered oven floors, I finally unlocked the holy grail of comfort food. Enter the stuffed bacon cheeseburger meatloaf roll-up.
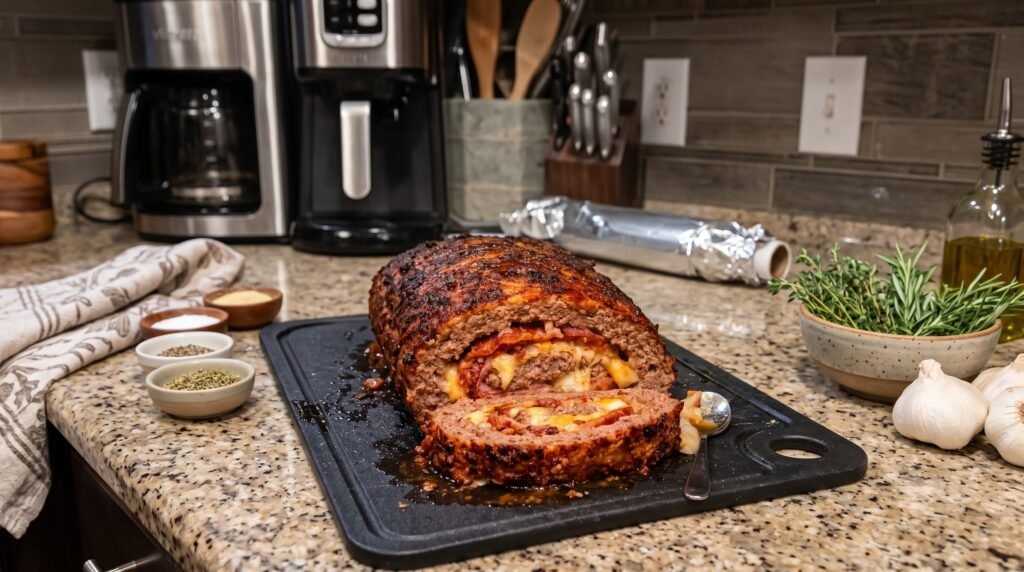
This recipe takes the classic, comforting elements of a bacon cheeseburger and transforms them into an elegant, pinwheel-style roll. Every single slice gives you a beautiful swirl of seasoned beef, smoky bacon, gooey melted cheese, and a sweet, caramelized barbecue glaze. It is juicy, visually stunning, and guaranteed to make your family look at meatloaf in a whole new light.
Why the Rolled Technique Changes Everything
When you bake a traditional meatloaf in a standard loaf pan, the meat packs down tightly. As it cooks, the fat renders out and pools at the bottom, leaving the top dry while the bottom gets soggy. Even worse, the center of a thick meatloaf takes a long time to cook, which often leads to overcooking the outer edges.
By rolling the meat out flat before stuffing and rolling it back up like a jelly roll, you solve all of these problems at once. First, the meat cooks much more evenly because the thickness of the meat layer is uniform throughout. Second, the stuffing materials, especially the cheese and bacon, are distributed in a spiral pattern. This means every single bite contains the perfect ratio of meat, cheese, and seasoning.
Best of all, as the cheese melts inside the spiral, it bastes the surrounding beef from the inside out. This keeps the meat incredibly juicy and prevents that dry, crumbly texture that plagues traditional loaves.
The Chemistry of a Moist Meat Mixture
Before we look at the ingredients, we need to talk about the science of ground meat. When you mix ground beef, you are working with proteins that want to bind together tightly. If you overwork the meat or use the wrong ingredients, those proteins will link up like a chain-link fence, squeezing out all the natural juices and leaving you with a rubbery texture.
To prevent this, we use a panade. A panade is a mixture of starch and liquid, in this case, breadcrumbs and milk, that is mixed into the meat. The starch molecules coat the meat proteins and physically prevent them from bonding too tightly. This keeps the cooked meat tender, moist, and soft enough to melt in your mouth while still holding its rolled shape beautifully.
I highly recommend using 80/20 ground chuck for this recipe. Lean ground beef, like 90/10 or 93/7, simply does not have enough fat to keep the roll moist during the cooking process. Remember, fat equals flavor and moisture.
Stuffed Bacon Cheeseburger Meatloaf Roll-Up Ingredients
| Ingredient | Amount | Notes |
|---|---|---|
| Ground beef | 2 pounds | 80/20 ground chuck is highly recommended |
| Thick-cut bacon | 10 slices | Cooked until crispy and crumbled |
| Shredded sharp cheddar | 1.5 cups | Freshly grated melts much better than pre-bagged |
| Shredded mozzarella | 1 cup | Provides that classic, stretchy cheese pull |
| Breadcrumbs | 1/2 cup | Plain or Italian seasoned panko crumbs |
| Eggs | 2 large | Lightly beaten to act as the primary binder |
| Whole milk | 1/4 cup | Essential for creating a moisture-retaining panade |
| Yellow onion | 1 medium | Finely minced to blend smoothly into the meat |
| Garlic powder | 1 tablespoon | For a rich, savory depth of flavor |
| Onion powder | 1 tablespoon | Complements the fresh onions beautifully |
| Smoked paprika | 1 teaspoon | Adds a subtle, rustic backyard grill flavor |
| Kosher salt | 1.5 teaspoons | Adjust slightly if your BBQ sauce is very salty |
| Coarse black pepper | 1 teaspoon | Freshly cracked gives the best aromatic punch |
| BBQ sauce | 1 cup | Divided for interior brushing and final glaze |
| Worcestershire sauce | 2 tablespoons | Adds a deep, savory umami background note |
Step-by-Step Guide to the Perfect Roll
Preparation is key when making this recipe. I like to get all my ingredients measured out and prepped before I even touch the raw meat. This keeps my workspace clean and prevents cross-contamination.
Start by cooking your bacon. You want the bacon to be crispy enough to crumble easily, but not burnt. I prefer baking my bacon in the oven at 400 degrees Fahrenheit on a foil-lined baking sheet for about fifteen to twenty minutes. It cooks flat, drains well, and leaves you with perfectly crispy strips that are easy to crumble. Once cooked, drain the bacon on paper towels, let it cool, and chop or crumble it into bite-sized pieces.
Next, grate your cheese. While it is tempting to buy a bag of pre-shredded cheese to save time, I strongly urge you to grate your own cheese from a block. Pre-packaged shredded cheeses are coated in potato starch and cellulose to prevent them from clumping in the bag. This coating also prevents the cheese from melting smoothly, which can lead to a grainy, clumpy texture inside your meat roll. Freshly grated cheddar and mozzarella will melt into a glorious, smooth, gooey river.
In a small bowl, combine your breadcrumbs, milk, beaten eggs, minced onion, garlic powder, onion powder, smoked paprika, salt, black pepper, and Worcestershire sauce. Stir this mixture together until it forms a wet paste. Let it sit for about five minutes. This allows the breadcrumbs to fully absorb the milk and seasonings, ensuring that the flavor is distributed evenly throughout the beef.
In a large mixing bowl, add your ground beef. Pour the seasoned breadcrumb mixture over the meat. Now, use your hands to gently combine everything. The secret here is to be as gentle as possible. Do not squeeze, mash, or knead the meat like bread dough. Mix just until the wet paste is incorporated into the beef. Overmixing will make your meatloaf tough and dense.
Mastering the Roll: The Plastic Wrap Trick
This is the part of the recipe that intimidates most home cooks, but with a simple trick, it is incredibly easy. Do not try to roll this freehand on a cutting board. Instead, use plastic wrap.
Tear off a sheet of plastic wrap that is about twenty inches long and lay it flat on your clean kitchen counter. If your plastic wrap keeps sliding around, dampening the counter with a few drops of water before laying the wrap down will help it stick in place.
Transfer your seasoned meat mixture onto the center of the plastic wrap. Gently pat and press the meat out into a flat, even rectangle. Aim for a rectangle that is roughly twelve inches wide and ten inches long, and about half an inch thick. Try to keep the edges as straight and uniform as possible. If the edges are too thin, they will burn; if they are too thick, they will be difficult to roll.
Once your meat rectangle is shaped, brush about a quarter cup of your favorite barbecue sauce evenly over the surface, leaving a half-inch border around the edges. This interior layer of sauce adds a wonderful tanginess to every slice.
Next, sprinkle your crumbled bacon evenly over the barbecue sauce. Follow this with your grated cheddar and mozzarella cheeses. Be careful not to pile the cheese too high, especially near the edges. Leave that half-inch border clean all the way around. If the cheese is too close to the edge, it will squeeze out during the rolling process and escape into your oven.
Now, it is time to roll. Start with the long edge closest to you. Grab the corners of the plastic wrap and lift them, gently folding the edge of the meat over the filling. Peel back the plastic wrap as you go. Do not roll the plastic wrap into the meatloaf.
Continue rolling forward, using the plastic wrap to guide and compress the log as you roll it away from you. The plastic wrap acts as a support system, keeping the meat from tearing or falling apart. Once you reach the end, you should have a perfectly shaped cylinder of meat wrapping around a core of bacon and cheese.
Carefully pinch the seam along the length of the roll to seal it closed. Next, pinch the ends of the roll together, tucking any loose meat inward to completely seal the cheese inside. Think of it like sealing a burrito. If you leave any gaps or holes, the melted cheese will find them and leak out during baking.
Once sealed, wrap the entire log tightly in the plastic wrap and place it on a baking sheet. Put it in the refrigerator for at least thirty minutes. This chilling step is crucial. It allows the fat in the meat to firm back up and helps the roll hold its shape beautifully when it hits the heat of the oven or smoker.
Cooking Options: Oven Baking vs. Backyard Smoking
You have two fantastic options for cooking this masterpiece: the traditional indoor oven or a backyard smoker. Both yield incredible results, but they offer different flavor profiles.
If you are cooking indoors, preheat your oven to 375 degrees Fahrenheit. Line a rimmed baking sheet with aluminum foil for easy cleanup, and place a wire rack on top of the foil. Spray the wire rack with non-stick cooking spray.
Carefully unwrap your chilled meat roll and transfer it onto the wire rack, seam-side down. Placing the meatloaf on a rack allows the hot air to circulate completely around the roll, which ensures even cooking and prevents the bottom from getting soggy in its own grease.
Bake the meatloaf for about forty-five minutes. At this point, the internal temperature of the meat should be around 145 degrees Fahrenheit. Remove the meatloaf from the oven and brush the remaining barbecue sauce generously over the top and sides of the roll. Return it to the oven for another fifteen minutes, or until the internal temperature reaches 160 degrees Fahrenheit and the glaze is bubbly, sticky, and slightly caramelized.
If you prefer a smoky, backyard flavor, you can cook this on your smoker. Set your smoker to 250 degrees Fahrenheit using a mild wood like apple, cherry, or pecan. Strong woods like hickory or mesquite can easily overwhelm the flavor of the beef and cheese.
Place the chilled meat roll directly on the smoker grate, seam-side down. Let it smoke for about two hours, or until the internal temperature reaches 145 degrees Fahrenheit. Brush the roll with your barbecue sauce glaze and continue smoking for another twenty to thirty minutes, until the glaze sets and the internal temperature hits 160 degrees Fahrenheit. The low and slow heat of the smoker will give the meat a gorgeous pink smoke ring and a deep, complex flavor that pairs perfectly with the melted cheese and bacon.
No matter which cooking method you choose, do not slice the meatloaf immediately after taking it out of the heat. If you slice it hot, the melted cheese will rush out like lava, and the meat will crumble. Let the meatloaf rest on a cutting board for ten to fifteen minutes. This resting time allows the juices to redistribute throughout the meat and lets the cheese cool just enough to set up slightly, giving you those clean, beautiful, picture-perfect pinwheel slices.
Troubleshooting Common Roll-Up Disasters
Even seasoned home cooks run into trouble occasionally. Here are the most common issues you might face when making this recipe, and exactly how to prevent or fix them.
My cheese leaked out everywhere. This is the most common issue. It usually happens for one of three reasons: the ends of the roll were not sealed tightly enough, the meat was rolled too thinly, or the cheese was piled too close to the edges before rolling. Next time, make sure to leave a solid half-inch border of bare meat all around your rectangle. When sealing, pinch the seams firmly and pat them smooth with a little water on your fingers. If you notice a small tear in the meat before cooking, patch it with a tiny piece of excess meat.
The meatloaf fell apart when I sliced it. This is usually caused by slicing the meat loaf too hot or using a dull knife. Let the meat loaf rest for at least ten to fifteen minutes before slicing. When you are ready to cut, use a long, sharp serrated knife, like a bread knife. Use a gentle sawing motion rather than pressing straight down. Pressing down will squash the roll and squeeze the cheese out.
The meat is dry and crumbly. This happens when the meat mixture is overmixed or when using meat that is too lean. Remember to use 80/20 beef and to mix the ingredients with a light touch. Also, make sure you do not skip the panade of breadcrumbs and milk, as this is your insurance policy against dryness.
The bottom of my meatloaf is greasy and soggy. If you bake the meatloaf directly on a flat baking sheet, it will sit in its own rendered fat as it cooks. Always use a wire rack placed inside a rimmed baking sheet. This lifts the meat up and allows the grease to drip away, leaving you with a beautifully browned crust all the way around the roll.
Creative Variations to Try
Once you master the basic bacon cheeseburger roll-up, you can start experimenting with different flavor profiles. The possibilities are endless, but here are three of my favorite variations that have been huge hits in my household.
The Italian Feast: Swap out the ground chuck for a mix of half ground beef and half sweet Italian sausage. Instead of barbecue sauce, use a rich marinara sauce. For the filling, layer thin slices of pepperoni, fresh basil leaves, and shredded provolone and mozzarella cheeses. Glaze the outside with more marinara sauce and a sprinkle of parmesan cheese during the last ten minutes of baking.
The Jalapeno Popper: If you love a bit of heat, this version is incredible. For the filling, spread a layer of softened cream cheese over the meat. Top the cream cheese with diced fresh jalapenos, crispy bacon, and sharp cheddar. This creates a rich, creamy, spicy interior that contrasts beautifully with the savory beef.
The French Onion: Caramelize two large yellow onions in butter until they are deep golden brown and sweet. Spread the caramelized onions over the beef rectangle, top with a splash of sherry, and layer with plenty of shredded Gruyere or Swiss cheese. Glaze the outside with a savory beef consomme reduction for an incredibly rich, French-bistro-inspired meal.
What to Serve with Your Masterpiece
Since this stuffed meatloaf is rich, savory, and decadent, you want side dishes that can either stand up to those bold flavors or provide a refreshing contrast.
You can never go wrong with garlic mashed potatoes. The creamy, buttery texture of mashed potatoes is the perfect canvas for any extra barbecue glaze or meat juices that run onto your plate. If you want something a bit lighter, roasted garlic green beans or a crisp green salad with a tangy vinaigrette will help cut through the richness of the cheese and beef.
For a true backyard barbecue experience, serve this alongside some creamy macaroni and cheese, homemade coleslaw, or sweet cornbread muffins. The sweetness of the cornbread pairs beautifully with the smoky bacon and savory beef.
Storing and Giving New Life to Leftovers
If you happen to have any leftovers, count yourself lucky. This meatloaf makes for some of the best leftover meals you will ever experience.
Store any remaining slices in an airtight container in the refrigerator for up to three to four days. To reheat, place a slice on a microwave-safe plate, cover it with a damp paper towel to retain moisture, and microwave on medium power for one to two minutes. Alternatively, you can reheat slices in a 350-degree oven wrapped in foil to prevent the cheese from burning.
My absolute favorite way to use leftover stuffed meatloaf is to make the ultimate breakfast sandwich. Heat a slice of the meatloaf in a hot skillet with a little butter until the edges get crispy and caramelized and the cheese starts to melt again. Place the crispy slice on a toasted brioche bun, top with a fried egg with a runny yolk, and add a drizzle of maple syrup or hot sauce. It is a breakfast experience that will make you look forward to leftovers every single time.
You can also crumble the leftover meatloaf into a warm skillet, heat it through, and use it as a rich, savory filling for tacos, quesadillas, or even as a topping for a loaded baked potato. The blend of seasoned beef, bacon, and melted cheese means the leftovers are already packed with flavor, saving you tons of prep time on busy weeknights.
Making a rolled, stuffed meatloaf might seem like a lot of work at first, but once you take that first bite of juicy beef, crispy bacon, and gooey melted cheese, you will realize it is worth every single second. It is a fun, creative, and delicious twist on a classic comfort food that is sure to become a regular request in your home. Gather your ingredients, clear off your kitchen counter, and get ready to roll your way to meatloaf perfection.