
There is a specific kind of panic that sets in at around five thirty in the afternoon when you realize you have a hungry family to feed, a sink already half-full of breakfast dishes, and absolutely zero energy left to scrub multiple pots and pans. For years, my default solution to this problem was either ordering takeout or throwing together a mediocre pasta dish that left everyone feeling unsatisfied and sluggish.
But then, out of sheer desperation and a desire to minimize my dishwashing duties, I started experimenting with one-pan meals. I wanted something that felt like a cozy, home-cooked Sunday dinner but could actually be pulled off on a chaotic Tuesday evening.
My first attempt at one-pan chicken and rice was, frankly, an absolute disaster. I made the classic mistake of throwing raw chicken breasts, dry white rice, and chicken broth into a baking dish, wrapping it in foil, and hoping for the best.
What came out of the oven fifty minutes later was a sad, grey tragedy. The chicken breasts were dry and rubbery enough to bounce off the floor, the rice in the center of the pan was a gluey, overcooked paste, while the rice around the edges was still chalky and undercooked. It was a texture nightmare, devoid of any real depth of flavor.
I almost gave up on the concept entirely, thinking that perfect, fluffy rice and juicy, crispy-skinned chicken were simply destined to cook at different rates and could never share a pan. But I am stubborn when it comes to food. I knew there had to be a way to make these ingredients play nice together.
After dozens of test runs, a lot of wasted rice, and plenty of feedback from my wonderfully honest family, I finally unlocked the secret. It all comes down to choosing the right cut of meat, understanding the liquid-to-rice ratio, and mastering the transition from the stovetop to the oven.
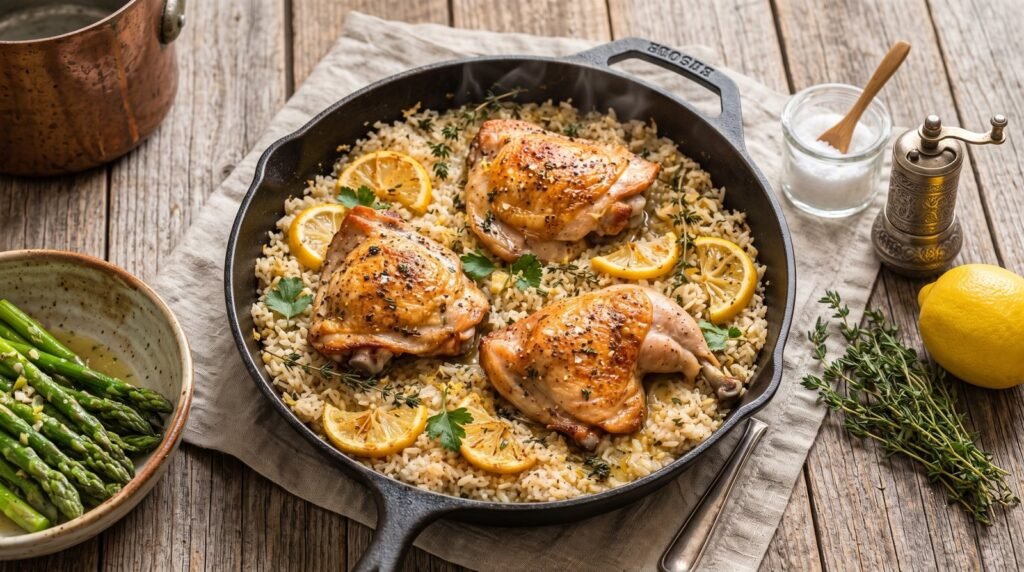
Today, I am sharing the exact formula for my holy grail dinner: One-Pan Crispy Lemon Herb Chicken and Rice. This is the dish featured in the photo, and I promise you, it tastes even better than it looks. It features shatteringly crisp chicken skin, juicy meat that pulls away from the bone with ease, and rice that has absorbed all the rich chicken juices, lemon zest, and woodsy herbs. Best of all, it only requires a single cast-iron skillet.
Let us dive into the details of how to make this culinary magic happen in your own kitchen.
The Science of One-Pan Cooking
Before we look at the ingredients list, we need to talk about why this dish works, because understanding the why will make you a much better intuitive cook.
In a standard cooking setup, you would boil rice in water or broth until tender, and you would roast or sear your chicken separately. When you combine them into one pan, they begin to influence each other.
The chicken sits on top of the bed of rice. As it bakes, the fat from the chicken skin renders out and drips down into the rice below. This is not just fat; it is liquid gold. It coats each grain of rice, preventing them from sticking together while infusing the entire pan with a rich, savory flavor that you can never get by cooking rice in plain water.
However, this means we have to adjust our liquid ratios. If you use the standard amount of broth you would use for stovetop rice, plus the moisture and fat releasing from the chicken, you will end up with a soggy, wet mess. We have to use slightly less liquid than you might think, and we must cook the dish uncovered for a portion of the time to allow steam to escape.
Furthermore, we cannot use chicken breasts for this recipe. Chicken breasts are lean and cook incredibly fast. By the time your rice is tender and has absorbed all the liquid, a chicken breast will be completely dried out and chalky.
Instead, we use bone-in, skin-on chicken thighs. Thighs are incredibly forgiving because they have a higher fat content and a lot of connective tissue. They can bake for forty-five minutes and remain incredibly juicy, tender, and flavorful. Plus, that skin is essential for getting the crispy texture that contrasts so beautifully with the soft, fluffy rice.
The Ingredients
To make this recipe successfully, you need simple, high-quality ingredients. Here is what you should gather before you start cooking.
| Ingredient | Amount | Notes |
|---|---|---|
| Bone-in, skin-on chicken thighs | 4 to 6 thighs | Trim off any excess hanging skin, but keep the main skin intact |
| Long-grain white rice | 1 and 1/4 cups | Jasmine rice works beautifully here; do not use instant or brown rice |
| Chicken broth or stock | 2 cups | Low-sodium is best so you can control the salt levels yourself |
| Fresh lemons | 2 medium lemons | You will need the zest of one, the juice of both, and one sliced for the pan |
| Garlic cloves | 4 to 5 cloves | Finely minced or grated; do not use the jarred pre-minced stuff |
| Yellow onion | 1 medium onion | Finely diced so it melts into the rice as it cooks |
| Fresh thyme | 6 to 8 sprigs | Fresh is highly recommended over dried for that bright, herbaceous note |
| Fresh flat-leaf parsley | 1/4 cup | Chopped, for a fresh pop of color and flavor at the end |
| Olive oil | 1 tablespoon | Just a touch to help get the chicken skin searing |
| Kosher salt | 2 teaspoons | Divided between the chicken and the rice seasoning |
| Freshly cracked black pepper | 1 teaspoon | Coarsely ground is best for texture on the chicken skin |
Setting Up for Success: The Gear
While you can technically make this in a deep, oven-safe stainless steel skillet, a large seasoned cast-iron skillet is the absolute best tool for the job.
Cast iron holds heat like nothing else. When you sear the chicken skin-side down in a hot cast-iron pan, it creates an even, deep golden crust that you simply cannot replicate in thinner pans.
Additionally, cast iron transitions seamlessly from the stovetop to the oven. You can do all your heavy-duty searing on your burner, stir in your rice and liquid, and slide the entire heavy skillet directly onto your oven rack without worrying about warped metal or melting handles.
If you do not own a cast-iron skillet, look for a heavy-bottomed Dutch oven or a deep braiser with a tight-fitting lid. Just make sure whatever cookware you choose is wide enough so your chicken thighs are not crammed tightly against each other. They need a little breathing room so the steam can escape, allowing the skin to crisp up instead of boiling.
Step-by-Step Instructions
Now that we have our ingredients and gear ready, let us walk through the process step-by-step. I will explain the reasoning behind each step so you know exactly what to look for visually as you cook.
Step 1: Prep the Chicken Thighs
Take your chicken thighs out of the refrigerator about fifteen to twenty minutes before you plan to start cooking. Cold meat hitting a hot pan causes the muscle fibers to tense up, which can make the meat tough. Bringing it closer to room temperature ensures even cooking.
Pat the chicken thighs completely dry with paper towels. I cannot stress this enough. Moisture is the ultimate enemy of crispiness. If there is water on the surface of the skin, it will steam in the pan rather than sear. Spend a good minute blotting every nook and cranny of those thighs.
Once dry, season both sides generously with kosher salt and freshly cracked black pepper. Do not be shy with the seasoning. The salt helps draw out remaining moisture from the skin, which will aid in the rendering process, and it seasons the meat deeply.
Step 2: Render and Sear the Chicken
Place your cast-iron skillet over medium heat and add a tiny splash of olive oil. We do not need much oil because the chicken thighs are going to release a massive amount of their own fat.
Once the pan is hot but not smoking, place the chicken thighs into the skillet, skin-side down. You should hear a gentle, steady sizzle. If it sounds like a raging fire, turn the heat down slightly.
Leave the chicken alone. This is where many home cooks mess up. They want to constantly flip, nudge, and peek under the chicken. Let it sit undisturbed for about eight to ten minutes.
During this time, the fat beneath the skin is rendering out into the pan, and the skin is slowly turning a beautiful, deep golden brown. If you try to flip it too early, the skin will stick to the bottom of the pan and tear off, which is a tragedy. When the skin is ready, it will naturally release from the pan easily.
Once the skin is golden and crispy, flip the thighs over and cook the flesh side for about three to four minutes. The chicken will not be fully cooked through at this stage, and that is exactly what we want. We are just building color and flavor right now.
Remove the chicken thighs from the skillet and place them on a clean plate. You will notice a large pool of rendered chicken fat in your skillet. This is pure flavor. Do not discard it, but if it looks like more than three tablespoons, you can spoon a little bit of the excess out into a glass jar for later use.
Step 3: Sauté the Aromatics
Turn the heat down to medium-low. Add your finely diced yellow onion directly into the hot chicken fat remaining in the skillet.
Sauté the onion for about four to five minutes, stirring frequently with a wooden spoon. Use your spoon to scrape up all those delicious, caramelized browned bits stuck to the bottom of the pan from the chicken. Those bits are called fond, and they are packed with concentrated savory flavor.
Once the onions are soft and translucent, add your minced garlic, fresh thyme sprigs, and lemon zest. Cook these aromatics for only about one minute. You will know it is ready when your kitchen suddenly smells like an incredible Italian trattoria. Keep a close eye on the garlic; it burns easily, and burnt garlic will impart a bitter taste to your entire dish.
Step 4: Toast the Rice
This is the secret step that separates mushy, boring rice from legendary, fluffy rice. Add your dry, uncooked long-grain white rice directly into the skillet with the sautéed onions and garlic.
Stir the rice continuously for two to three minutes. You want every single grain of rice to be coated in that aromatic chicken fat.
As the rice toasts, you will notice the grains transition from a translucent white to an opaque, slightly golden color. It will start to smell distinctly nutty. This toasting process creates a protective barrier around each grain of rice, helping it retain its structure and preventing it from turning mushy when we add the liquid.
Step 5: Deglaze and Pour in the Liquid
Pour your chicken broth and fresh lemon juice into the hot skillet. It will hiss and steam vigorously, which is exactly what we want.
Use your wooden spoon to give the bottom of the pan one final, thorough scrape to ensure all those flavorful browned bits are fully incorporated into the cooking liquid.
Add about a half-teaspoon of kosher salt to the liquid and stir well. Taste the broth. It should taste pleasantly seasoned, savory, and bright from the lemon juice. If it tastes bland now, your rice will taste bland later. Adjust the seasoning if necessary.
Bring the liquid to a gentle simmer.
Step 6: Nestle the Chicken and Bake
Once the liquid is simmering, grab your seared chicken thighs and nestle them back into the pan, skin-side up.
Here is a crucial detail: do not submerge the chicken thighs entirely in the liquid. You want the rice and the bottom of the chicken thighs to be resting in the broth, but the crispy, golden chicken skins should remain completely exposed above the water line. If you drown the chicken, your carefully cultivated crispy skin will turn soggy and rubbery in the oven.
Arrange a few fresh lemon slices and extra sprigs of thyme around the chicken thighs. This not only looks beautiful but infuses the dish with a continuous release of citrus oils as it bakes.
Transfer the skillet carefully into your preheated oven at 375 degrees Fahrenheit (approx. 190 degrees Celsius).
We are going to bake this uncovered. Baking it uncovered allows the steam to cook the rice while simultaneously circulating dry, hot air around the exposed chicken skins, keeping them incredibly crispy.
Bake for thirty-five to forty minutes. You will know it is done when all the liquid has been fully absorbed by the rice, and a meat thermometer inserted into the thickest part of the chicken thigh registers at least 165 degrees Fahrenheit (approx. 74 degrees Celsius). Personally, I prefer chicken thighs cooked to about 175 to 180 degrees Fahrenheit, as the meat becomes incredibly tender and literally falls off the bone at that temperature.
Step 7: The Rest and Serve
Once you pull the hot skillet out of the oven, resist the urge to dive in immediately. The rice needs to rest.
Let the skillet sit on your counter for about five to ten minutes. During this resting period, the steam inside the pan redistributes, settling the starch in the rice and allowing it to firm up slightly. If you scoop into it immediately, the rice can texture as slightly wet.
After resting, remove the chicken thighs temporarily to a platter so you can fluff the rice. Use a fork to gently lift and separate the grains of rice. Do not use a spoon, which can mash the hot grains together.
Stir in your fresh, finely chopped flat-leaf parsley. Place the chicken thighs back on top of the fluffy bed of rice, bring the skillet directly to the table, and serve.
Crucial Lessons Learned and Mistakes to Avoid
Over the years, I have made every mistake possible with this dish. To save you the heartbreak of a ruined dinner, here are the most common pitfalls and exactly how to avoid them.
Using the Wrong Type of Rice
This is perhaps the most common point of failure. You must use dry, raw long-grain white rice for this specific recipe. Long-grain rice contains less starch than short-grain rice (like arborio or sushi rice), meaning the grains will stay separate and fluffy rather than sticking together.
Do not use brown rice in this recipe without major modifications. Brown rice requires significantly more liquid and nearly double the cooking time of white rice. If you try to swap it in directly, your liquid will evaporate, your rice will remain rock-hard, and your chicken will be severely overcooked.
Similarly, do not use instant or converted rice. It cooks too quickly and will turn to mush before the chicken thighs can cook through.
Skipping the Rinsing Process
While some cooks skip this step, I highly recommend rinsing your rice before adding it to the pan.
Place your rice in a fine-mesh strainer and run cold water over it, agitating it with your fingers, until the water running through the bottom is completely clear. This removes the excess surface starch on the grains. If you leave that starch on, it will mix with the cooking liquid and create a sticky, gummy texture in your finished dish.
Just make sure to shake as much water out of the strainer as possible before adding the rice to the pan so you do not accidentally throw off your liquid measurements.
Opening the Oven Door Constantly
It is incredibly tempting to keep opening the oven door to check on the progress of your dinner, especially when those incredible aromas start filling your home.
Try to resist this urge. Every time you open the oven door, a massive amount of heat and steam escapes. This lowers the temperature of your oven and disrupts the delicate steaming process happening inside the skillet. Trust the timer, and only open the door when you are ready to check the internal temperature of the chicken at the very end.
Not Using Fresh Lemon
Please do not use the pre-packaged, concentrated lemon juice that comes in a plastic squeeze bottle. It has a harsh, metallic, and overly acidic flavor that can easily ruin the delicate balance of this dish.
Real, fresh lemons are incredibly cheap and make a world of difference. The fresh zest provides those bright, aromatic essential oils, while the freshly squeezed juice offers a clean, vibrant acidity that cuts through the richness of the chicken fat beautifully.
Creative Variations to Keep Things Fresh
Once you master the basic technique of this one-pan lemon herb chicken and rice, you can use it as a canvas for all kinds of flavor profiles. Here are a few of my favorite variations that I rotate through my weekly meal planning.
The Mediterranean Variation
To give this dish a sun-drenched Greek flavor profile, swap out the thyme for fresh oregano. Along with your onions and garlic, sauté half a cup of chopped kalamata olives and half a cup of chopped marinated artichoke hearts.
Proceed with the recipe as normal. Right when the dish comes out of the oven, crumble half a cup of high-quality feta cheese over the top of the hot rice and let it soften slightly before serving. It adds a salty, creamy, tangy dimension that is absolutely addictive.
The Spanish Arroz con Pollo Style
For a smoky, vibrant twist, add one teaspoon of sweet smoked paprika and a pinch of saffron threads to your aromatics while they sauté.
Along with your yellow onions, finely dice half of a red bell pepper and sauté them together. Just before you nestle your chicken thighs back into the pan, stir in half a cup of frozen sweet peas. The saffron turns the rice a gorgeous golden-yellow color, and the smoked paprika gives the chicken a beautiful, deep reddish crust.
The Creamy Garlic Parmesan Version
If you are craving pure comfort food, you can transform this into a rich, creamy baked rice dish.
After your rice has finished cooking in the oven, remove the chicken thighs. Stir a splash of heavy cream (about three tablespoons) and half a cup of freshly grated Parmigiano-Reggiano cheese directly into the hot rice. The residual heat will melt the cheese, creating a luxurious, silky sauce that coats the fluffy grains of rice. Nestle the chicken back on top and serve immediately.
Troubleshooting Common Cooking Issues
Even with the best instructions, cooking can sometimes throw you a curveball. Here is how to diagnose and fix common issues in real-time.
My Rice is Still Crunchy, but All the Liquid is Gone
Do not panic. This usually happens if your stove ran a bit too hot during the initial simmer, causing too much liquid to evaporate before you put the pan into the oven, or if your oven heat is uneven.
To fix this, simply drizzle about one-quarter cup of hot chicken broth or boiling water evenly over the rice (avoiding the chicken skin). Cover the skillet tightly with a sheet of aluminum foil and return it to the oven for an additional eight to ten minutes. The trapped steam will quickly soften those stubborn grains of rice.
My Rice is Wet and Mushy
This is usually the result of using too much liquid, using the wrong type of rice, or failing to let the dish rest after baking.
If you pull the skillet out of the oven and see a pool of liquid still resting on top of the rice, remove the chicken thighs and place them on a plate. Return the skillet of rice to the oven uncovered and turn your oven up to 400 degrees Fahrenheit (approx. 204 degrees Celsius) for about five to seven minutes to help evaporate that excess moisture. Let it rest for a full ten minutes before fluffing. Next time, make sure to measure your liquid carefully and ensure you are using long-grain white rice.
My Chicken Skin is Soft and Soggy
If your oven does not circulate heat well, or if your chicken thighs were too deeply submerged in the liquid, your chicken skin might not have achieved that signature crunch.
Fortunately, there is an incredibly easy fix for this. Turn your oven to the broil setting (high heat). Place your skillet on the top rack of your oven, directly under the broiler element.
Watch it like a hawk. Do not walk away from the oven. Under the intense direct heat of the broiler, that chicken skin will blister and turn shatteringly crisp in about ninety seconds to two minutes. As soon as you see bubbles forming on the skin and it turns a deep mahogany color, pull the pan out immediately before it burns.
Storing, Reheating, and Make-Ahead Tips
This one-pan meal makes fantastic leftovers. In fact, many members of my family claim that the rice tastes even better the next day after the flavors have had twelve to twenty-four hours to meld and mature in the refrigerator.
How to Store
Allow the leftovers to cool completely to room temperature. Do not leave the food sitting out on your counter for more than two hours, as rice can be prone to bacterial growth if left in the danger zone for too long.
Transfer the chicken and rice to an airtight container. It will keep beautifully in the refrigerator for up to four days.
How to Reheat Without Drying Everything Out
Reheating chicken and rice can be tricky. If you just throw it in the microwave, the rice will dry out and turn into hard, chalky little pebbles, and the chicken skin will turn rubbery.
For the absolute best results, reheat this dish in your oven. Place the desired portion of rice and a chicken thigh into a small oven-safe dish. Splash about one tablespoon of chicken broth or water over the rice to help rehydrate it. Cover the dish tightly with aluminum foil to trap the steam.
Bake at 350 degrees Fahrenheit (approx. 177 degrees Celsius) for about fifteen minutes, or until the chicken is hot all the way to the bone. If you want to crisp the skin back up, remove the foil for the last three minutes of reheating.
If you are in a rush and must use the microwave, place your portion on a plate and cover it with a damp paper towel. The damp towel will create a steam chamber as it heats, keeping the rice soft and fluffy. Heat on medium power in one-minute increments until hot.
Final Thoughts
Cooking does not have to be complicated, and it certainly does not require you to dirty every dish in your kitchen to create something extraordinary.
This One-Pan Crispy Lemon Herb Chicken and Rice is proof of that. It is a humble, honest dish that relies on simple techniques, smart ingredient choices, and a little bit of patience. Once you see the look on your family's faces when you bring this hot, steaming, gorgeous cast-iron skillet to the table, this recipe will quickly find a permanent home in your weekly dinner rotation.
Grab your cast-iron skillet, head to the kitchen, and give this a try tonight. Your tastebuds, your family, and your dishwasher will thank you.