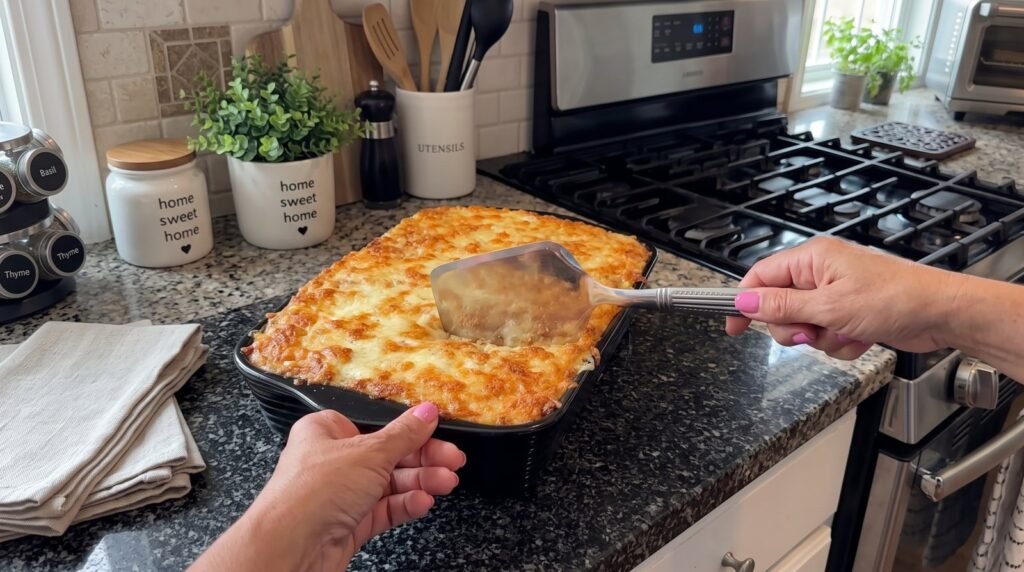

There is a specific kind of magic that happens when a baking dish full of potatoes, cheese, and cream comes out of a hot oven. I am not talking about a delicate, fancy potato gratin with paper-thin slices arranged in perfect concentric circles. I am talking about the kind of honest, bubbling, deeply golden brown comfort food that makes your kitchen smell like a cozy diner on a rainy Sunday morning. The kind of casserole that demands a sturdy spatula, a crowd of hungry people, and absolutely zero calorie counting.
For years, I was the person who brought the mediocre potato dish to the family potluck. You know the one. It was either a little too watery at the bottom, or the potatoes had a strange, squeaky crunch because they had not cooked all the way through. Sometimes, in a desperate bid to save time, I would dump a bag of frozen potatoes and a can of soup into a bowl, stir it half-heartedly, throw it in the oven, and hope for the best. The result was always okay, but it was never legendary.
That all changed about six years ago during a particularly chaotic Thanksgiving. My oven was overcrowded, my schedule was blown to bits, and I made almost every classic potato mistake in the book. That disaster forced me to actually sit down and figure out the science of the hashbrown casserole. I spent the next three months testing different potato shapes, experimenting with dairy ratios, and driving my family crazy with weekly potato bakes.
What I discovered is that a truly great cheesy hashbrown casserole is not just a random collection of convenient ingredients. It is a balance of starch, fat, salt, and heat. When you get the proportions right, you get a interior that is incredibly creamy but not mushy, surrounded by a crispy, deeply caramelized cheese crust that everyone will fight over. Here is everything I have learned about making a truly spectacular hashbrown casserole from scratch, including the mistakes you need to avoid if you want to become the undisputed champion of the potluck.
The Great Potato Debate: Frozen Versus Fresh
When I first started trying to perfect this recipe, I thought the ultimate gourmet move would be to grate my own fresh Russet potatoes. I spent an hour peeling, grating, soaking, squeezing, and drying five pounds of potatoes. I felt like a culinary artist.
The result? It was a watery, gray, disappointing mess.
Here is the secret that professional chefs and seasoned home cooks alike will tell you: frozen hashbrowns are actually superior for this specific application. When potatoes are commercially frozen, they undergo a flash-freezing process that breaks down the cell walls just enough to help them absorb the creamy sauce without disintegrating. Plus, they have already been blanched, which removes excess starch that can make your casserole gummy or gluey.
If you use fresh potatoes, you have to wash out almost all of the surface starch, squeeze every single drop of moisture out of them using a clean kitchen towel, and cook them immediately before they oxidize and turn an unappetizing shade of brown-gray. It is an exhausting amount of work for a result that is, at best, identical to the frozen bag, and at worst, structurally compromised. Save your energy for grating the cheese. Buy the frozen bag of shredded hashbrowns. Your sanity and your casserole will thank you.
Understanding the Creamy Base
The classic version of this dish relies heavily on a can of condensed cream of chicken soup. Now, I am not a food snout. There is a time and a place for canned soups, and they certainly evoke a sense of nostalgic comfort. But if you want to take this dish from good to unforgettable, you have options.
If you choose to go the classic route with canned soup, look for a high-quality brand that list actual chicken or mushrooms near the top of the ingredients. You can use cream of chicken, cream of celery, or cream of mushroom. Personally, I prefer cream of chicken because it adds a rich, savory depth that pairs beautifully with sharp cheddar.
However, if you want to make this completely from scratch, you can easily whip up a quick homemade veloute or bechamel sauce in under ten minutes. All you need is equal parts butter and flour to make a roux, some chicken or vegetable stock, and a splash of heavy cream. This homemade swap removes that slightly metallic, ultra-salty preservative aftertaste that sometimes lingers with canned products. I will explain how to do both versions so you can choose based on how much time you have.
The Cheese Manifesto: Do Not Buy the Bag
If there is only one rule you take away from this guide, let it be this: grate your own cheese.
I know it is tempting to grab those pre-shredded bags of cheddar at the grocery store. They are convenient, cheap, and save you from washing a box grater. But those bags of cheese are coated in anti-caking agents, usually cellulose or potato starch, to keep the shreds from sticking together in the package.
While those starches are great for shipping, they are the absolute enemy of a smooth, creamy melt. When you bake pre-shredded cheese, those starches prevent the cheese fats from melting together cleanly. Instead of a cohesive, gooey pool of dairy goodness, you end up with a slightly grainy, greasy layer that separates as it cools.
For this recipe, we want a sharp or extra-sharp cheddar. The sharp acidity of a good cheddar cuts through the heavy richness of the sour cream and butter. If you use a mild cheddar, the flavor will completely disappear into the potatoes, leaving you with a dish that tastes salty but lacks character. Grab a block of sharp cheddar, pull out your grater, and put in three minutes of arm work. It makes a world of difference.
The Ultimate Cheesy Hashbrown Casserole Recipe
This recipe is designed to fit a standard 9 by 13 inch baking dish. It serves a crowd, travels beautifully, and reheats like a dream.
| Ingredient | Amount | Notes |
|---|---|---|
| Frozen shredded hashbrowns | 30 ounces | Thawed completely and patted dry |
| Unsalted butter | 1/2 cup | Melted, plus extra for greasing the pan |
| Sour cream | 1 cup | Full fat is highly recommended |
| Cream of chicken soup | 10.5 ounces | One can, or equivalent homemade cream sauce |
| Sharp cheddar cheese | 2.5 cups | Freshly grated, divided |
| Yellow onion | 1 medium | Finely minced or grated |
| Garlic powder | 1 teaspoon | Adds a warm, savory undertone |
| Smoked paprika | 1/2 teaspoon | For a subtle warmth and beautiful color |
| Fine sea salt | 1 teaspoon | Adjust based on your soup choice |
| Black pepper | 1/2 teaspoon | Freshly cracked is best |
Step-by-Step Instructions
Step 1: Prep your potatoes.
This is the most critical step in the entire process. Do not skip it. Take your bag of frozen hashbrowns out of the freezer and let them thaw completely. I usually put the bag in the refrigerator the night before, or lay the closed bag flat on the counter for a couple of hours before cooking. Once thawed, empty the potatoes onto a large baking sheet lined with paper towels. Press another layer of paper towels on top to absorb any excess moisture. If your potatoes are too wet when they go into the mixing bowl, they will steam instead of bake, resulting in a soggy, mushy casserole.
Step 2: Preheat and prep your baking dish.
Preheat your oven to 350 degrees Fahrenheit (175 degrees Celsius). Take a tablespoon of butter or some cooking spray and generously coat the bottom and sides of a 9 by 13 inch baking dish. I prefer using a ceramic or cast-iron baker because they distribute heat more evenly than thin metal pans, which helps prevent the bottom of the casserole from burning before the center is cooked through.
Step 3: Build the creamy foundation.
In a very large mixing bowl, combine the melted butter, sour cream, cream of chicken soup, minced yellow onion, garlic powder, smoked paprika, salt, and black pepper. Whisk these ingredients together until you have a completely smooth, uniform, and incredibly creamy sauce. Give it a taste. It should taste slightly over-seasoned at this point; remember, you are about to add nearly two pounds of unseasoned potatoes to this mixture, so the base needs to carry a lot of flavor.
Step 4: Incorporate the cheese and potatoes.
Add two cups of your freshly grated sharp cheddar cheese to the bowl with the creamy base, reserving the remaining half-cup for the top. Stir the cheese in until it is evenly distributed. Next, gently fold in your thawed, dried hashbrowns. Use a large rubber spatula or wooden spoon to turn the potatoes over in the sauce. Be gentle here; you want to coat every single shred of potato without mashing them into a paste. You want to maintain the distinct texture of the individual potato shreds.
Step 5: Fill the baking dish.
Transfer the potato mixture into your prepared baking dish. Use your spatula to spread the mixture out into an even layer, reaching all the way into the corners. Now, here is a crucial tip: do not pack the potatoes down. You are not making a potato brick. Keep the mixture light and airy in the pan. This allows the heat to circulate through the casserole, ensuring that the middle cooks at the same rate as the edges and that the entire dish heats through evenly.
Step 6: The first bake.
Cover the baking dish tightly with aluminum foil. Bake in the preheated oven for 40 minutes. This initial covered baking period steam-cooks the potatoes and allows the onions to soften and the cheese to melt into the sauce without drying out the top of the casserole.
Step 7: The cheese crust finish.
Carefully remove the aluminum foil from the dish. Be careful of the steam that will escape. Scatter the remaining half-cup of grated cheddar cheese evenly across the top of the casserole. If you want to take things a step further, you can mix a handful of crushed potato chips, cornflakes, or panko breadcrumbs with a tablespoon of melted butter and sprinkle that on top alongside the cheese for an extra layer of texture. Put the dish back into the oven, uncovered, for another 15 to 20 minutes.
Step 8: Watch for the signs of perfection.
You will know the casserole is done when the edges are bubbling vigorously, the potatoes in the center are tender when poked with a fork, and the cheese on top has melted into a glorious, patchy canopy of deep golden brown spots. If you want a really crispy top, you can turn on your oven's broiler for the last two minutes, but do not walk away from the oven if you do this. It can go from perfectly toasted to burnt in thirty seconds.
Step 9: The hardest part: let it rest.
When you pull the casserole out of the oven, it will be screaming hot and bubbling like lava. It will be incredibly tempting to scoop a giant portion onto a plate immediately. Resist this urge. If you cut into it right away, the hot sauce will run everywhere, and your neat squares of casserole will collapse into a sloppy heap. Let the dish sit on the counter for 10 to 15 minutes. As it cools slightly, the starches in the potatoes will bind with the cooling fats in the cheese and sour cream, setting up the casserole so that it holds its shape beautifully when served.
Elevating the Flavor: Simple Variations
Once you have mastered the base recipe, you can start treating it as a canvas for your own culinary experiments. Here are a few of my favorite ways to shake things up depending on who I am feeding.
The Loaded Baker Variation
If you want to turn this side dish into a meal that tastes exactly like a loaded baked potato, it is incredibly easy. Fold half a cup of crispy, crumbled bacon pieces and a handful of chopped fresh chives into the potato mixture before baking. Top the finished casserole with an extra dollop of cool sour cream and a sprinkle of raw green onions just before serving.
The Southwestern Kick
For a spicy twist that goes beautifully alongside grilled steak or wrapped up in a breakfast burrito, add a small can of diced green chiles (drained) and half a teaspoon of ground cumin to your creamy base. Swap out the sharp cheddar for a mix of Monterey Jack and Pepper Jack cheese.
The Ham and Swiss Brunch Bake
If you are planning a holiday brunch, you can easily turn this into a main course. Fold two cups of diced, leftover holiday ham and a cup of steamed broccoli florets into the mixture. Swap the cheddar for a nutty Swiss or Gruyere cheese. It is rich, elegant, and hearty enough to keep everyone satisfied until dinner.
Making Your Own Cream Soup Substitute
If you prefer to avoid canned soups entirely, do not let that stop you from making this recipe. Making a quick, homemade replacement is incredibly simple and takes less than ten minutes on the stovetop.
To replace one 10.5-ounce can of cream soup, melt two tablespoons of unsalted butter in a small saucepan over medium heat. Add two tablespoons of all-purpose flour and whisk constantly for about two minutes. This cooks out the raw flour taste and creates a classic roux.
Slowly pour in half a cup of chicken broth and half a cup of whole milk or heavy cream, whisking continuously to prevent lumps from forming. Bring the mixture to a gentle simmer. It will thicken up quickly into a luscious, velvety sauce. Season with a pinch of salt, black pepper, and onion powder. Let it cool slightly before mixing it into your casserole ingredients. Not only is this method incredibly easy, but it also allows you to control the sodium levels in your food.
Crucial Mistakes to Avoid
Even a simple recipe like this has a few potential pitfalls. Here are the most common mistakes I see people make, and how to avoid them.
Using Cold Dairy
If you mix fridge-cold sour cream, cold soup, and cold cheese with cold potatoes, your casserole will take forever to heat up in the oven. The outside edges will dry out and burn before the center even reaches room temperature. Try to let your sour cream and soup sit on the counter for about twenty minutes to take the chill off before mixing.
Skipping the Onions
I have had people ask me if they can leave the onion out because they do not like the texture of cooked onions. Please do not skip them. The onion provides a vital moisture source and an essential sweet, savory contrast to the heavy dairy. If you really hate the texture of minced onions, use a box grater to grate the onion directly into your mixing bowl. This releases all of the flavorful juice and creates an incredibly fine pulp that melts completely into the sauce during baking, giving you all of the flavor with absolutely none of the crunch.
Over-salting
Between the salted butter, the canned soup, the cheese, and the frozen potatoes (which often contain added sodium), it is very easy to end up with a casserole that tastes like a salt lick. Always use unsalted butter so you can control the salt levels yourself. If you are using a standard canned soup, be conservative with your added sea salt until you have mixed everything together.
Baking at Too High a Temperature
It can be tempting to crank the oven up to 400 degrees to speed up the process, but potato casseroles do not like to be rushed. High heat will cause the dairy fats in the sour cream and cheese to break and separate, leaving you with a greasy puddle at the bottom of your dish and curdled, grainy clumps of proteins. Keep the oven at a steady 350 degrees for a gentle, even bake.
Storing, Freezing, and Make-Ahead Tips
One of the reasons this casserole has a permanent spot in my holiday rotation is how incredibly friendly it is to meal prep. You can easily do all of the heavy lifting days, or even months, in advance.
Preparing the Night Before
If you want to serve this for a morning brunch or save yourself some stress on Thanksgiving Day, you can assemble the entire casserole (minus the cheese topping) the night before. Spread the potato mixture into your greased baking dish, cover it tightly with plastic wrap, and store it in the refrigerator overnight.
When you are ready to bake, take the dish out of the fridge and let it sit on the counter for about thirty minutes to lose its chill while your oven preheats. Remove the plastic wrap, cover with foil, and bake as directed. You may need to add five to ten minutes to the initial covered baking time to account for the cool temperature of the dish.
Freezing Unbaked Casseroles
This dish freezes beautifully. If you want to stock your freezer with easy comfort meals, assemble the casserole in a disposable aluminum baking pan. Do not bake it. Cover the surface directly with a layer of plastic wrap to prevent freezer burn, then wrap the entire pan tightly in two layers of heavy-duty aluminum foil. Label it with the date; it will keep perfectly for up to three months.
When you are ready to eat, thaw the casserole in the refrigerator for 24 hours. Once thawed, bake it exactly as directed in the original recipe.
Reheating Leftovers
If you are lucky enough to have leftovers, they make an incredible breakfast the next day alongside some fried eggs. To reheat individual portions, I highly recommend using the oven or an air fryer rather than the microwave. The microwave tends to make the potatoes mushy and can cause the cheese oils to separate.
To reheat in the oven, place your desired portion in a small oven-safe dish, cover with foil, and warm at 350 degrees for about 15 minutes. For a quick option, pop a slice of the cold casserole into your air fryer at 320 degrees for 6 to 8 minutes. This revives that gorgeous crispy crust on top while heating the center through beautifully.
What to Serve with Your Casserole
This is a rich, decadent dish, which means it pairs best with main courses and sides that offer some contrast.
If you are serving this for breakfast or brunch, it pairs beautifully with high-acid fruits like fresh berries or a bright citrus salad. The clean sweetness of the fruit cuts through the heavy creaminess of the potatoes. For proteins, simple maple breakfast sausages or crispy thick-cut bacon are natural companions.
For dinner, this casserole is a match made in heaven for roasted meats. It is spectacular alongside a brown sugar glazed holiday ham, a juicy roasted turkey, or simple garlic-herb roasted chicken. To balance out the plate, I always like to serve a vibrant green vegetable with a bit of bite, such as roasted Brussels sprouts with a splash of balsamic vinegar, or a simple crisp green salad tossed in a sharp lemon vinaigrette.
Final Thoughts on Comfort Food
In a world filled with complex recipes and constantly changing food trends, there is something deeply comforting about a classic potato casserole. It does not pretend to be health food, and it does not require any advanced culinary techniques. It is simple, honest, and designed to bring people together around a table.
By taking just a few small extra steps—grating your own cheese, ensuring your potatoes are dry, and letting the finished dish rest before serving—you can take this humble family favorite and turn it into something truly extraordinary. The next time you are asked to bring a dish to a gathering, skip the pre-packaged options and make this instead. Watch how quickly the dish empties, and enjoy the compliments that are sure to come your way.