
We all have those core food memories from childhood that linger in the back of our minds. For me, it was Friday night sleepovers. My mom, trying to feed a horde of hungry, loud teenagers on a budget, would pull out her secret weapon: pizza burgers. They were hot, gooey, unbelievably messy, and absolutely perfect. But let's be honest, those childhood versions had a few flaws. The buns were often soggy in the middle, the meat was sometimes a bit dry, and the cheese was a single slice of processed American cheese that did not stretch. Years later, as a passionate home cook, I set out on a mission to redeem this nostalgic classic. I wanted to create an open-faced baked pizza burger that retained all the comforting, cheesy magic of the original but elevated the textures and flavors to something truly gourmet.
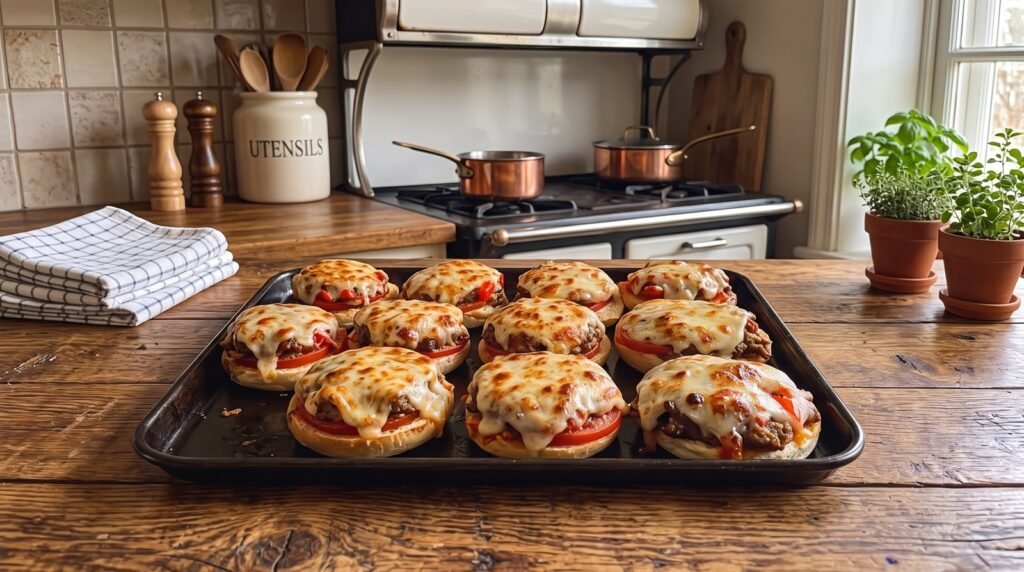
The image you see is the result of months of experimentation, burnt roof-of-the-mouth incidents, and plenty of soggy bun disasters. Look at that gorgeous, bubbly, golden-brown mozzarella draping over seasoned ground beef and a juicy tomato slice, all resting on a perfectly toasted bun bottom. If your mouth is watering, you are in the right place. Grab an apron, because we are going to dive deep into making the ultimate open-faced baked pizza burgers that will feed a crowd and have everyone begging for the recipe.
Why Open Faced is the Superior Way
You might wonder why we do not just put a top bun on these and call it a day. The open-faced approach is key for two massive reasons: texture and cheese capacity. When you bake these open-faced, the cheese gets direct exposure to the heat of the oven. This allows it to bubble, brown, and develop those incredibly flavorful charred spots that we all fight over on a pizza. If you put a top bun on, the cheese just melts into a steam trap, making the bread mushy and robbing you of that toasted cheese flavor. Furthermore, the ratio of filling to bread is vastly superior. You get a thick layer of savory meat, a bright slice of tomato, and a mountain of melted cheese resting on a single, crispy-edged toasted bun. It is comfort food engineering at its finest.
The Great Bun Debate: Finding the Perfect Vessel
Let's talk about the bread first, because it is the foundation of this entire dish. I have tried making these with fancy brioche buns, sourdough rolls, English muffins, and standard, cheap hamburger buns. You might think the fancy bread wins, but in reality, the humble, soft hamburger bun is the champion here, with a small catch. Brioche is too sweet and tends to get greasy when combined with the beef and cheese. Sourdough is too tough to bite through, causing all the toppings to slide off into your lap on the first bite. Standard white or potato hamburger buns have the perfect soft texture that yields easily to a bite, but they need to be pre-toasted. If you skip the pre-toasting step, the sauce and meat juices will soak straight into the bread, turning your dinner into a soggy sponge. We will go over exactly how to prevent this later.
The Meat: Beef, Sausage, or a Blend
The meat mixture is where you can really inject personality into this recipe. Classic recipes often use straight ground beef seasoned with a packet of Italian seasoning. That is fine, but we can do better. After trying various ratios, my absolute favorite blend is a 50/50 mix of ground beef (80/20 lean-to-fat ratio) and sweet or spicy Italian sausage. The Italian sausage brings pre-blended spices, fennel seeds, and a rich depth of flavor that ground beef alone simply cannot match. The beef keeps the texture meaty and substantial. If you want to keep it lighter, ground turkey or chicken can work, but you will need to add a touch of olive oil to the pan and be extra generous with your seasonings to prevent it from tasting dry and bland.
The Sauce and the Tomato Layer
One of the biggest breakthroughs in my pizza burger journey was the addition of a fresh tomato slice directly under the cheese. Many older recipes mix the meat with a ton of marinara sauce, making a sloppy-joe-style mixture that is then spooned onto the bun. While delicious, this contributes heavily to the soggy bun issue. Instead, I like to cook the meat with just a small amount of concentrated tomato paste and spices to keep it flavorful but relatively dry. Then, we place a thinly sliced, seasoned tomato on top of the meat. This fresh tomato slice roasts beautifully in the oven under the blanket of cheese, releasing its sweet, bright juices right into the savory meat without water-logging the bread. It provides a clean, acidic contrast to the rich meat and cheese.
Let's Talk Cheese
Please, I beg of you, do not use pre-shredded mozzarella from a bag if you can avoid it. Pre-shredded cheese is coated with anti-caking agents like potato starch or powdered cellulose. These starch coatings prevent the cheese from clumping in the bag, but they also prevent it from melting into that smooth, gooey, stretchy blanket we want. Buy a block of low-moisture, whole-milk mozzarella and grate it yourself. The difference in meltability and flavor is night and day. If you want to get really fancy, you can mix in some freshly grated provolone for a sharper bite, or a handful of parmesan for a salty, umami kick.
Ingredients List
Let's look at the exact ingredients we need to pull this off. This recipe is designed to make eight generous open-faced burgers, which fits perfectly on a standard half-sheet baking pan.
| Ingredient | Amount | Notes |
|---|---|---|
| Ground beef (80/20 lean) | 1/2 pound | Good fat content for flavor |
| Sweet Italian sausage | 1/2 pound | Casing removed, crumbled |
| Hamburger buns | 4 whole buns | Split into 8 halves (potato buns work great) |
| Garlic | 3 cloves | Finely minced |
| Yellow onion | 1/2 medium | Finely diced |
| Tomato paste | 2 tablespoons | Adds rich, concentrated tomato flavor |
| Dried oregano | 1 teaspoon | Classic Italian herb flavor |
| Dried basil | 1 teaspoon | Adds a sweet, herbal note |
| Red pepper flakes | 1/2 teaspoon | Optional, for a tiny bit of heat |
| Fresh tomatoes | 2 medium | Sliced thin (roma or beefsteak) |
| Low-moisture mozzarella | 2 cups | Shredded from a block |
| Grated parmesan cheese | 1/4 cup | For a salty, savory finish |
| Salt and black pepper | To taste | Don't forget to season the fresh tomatoes |
| Olive oil | 1 tablespoon | For sautéing onions and brushing buns |
Step-by-Step Cooking Guide
Now that we have our ingredients ready, let's walk through the cooking process. Cooking is not just about following a timeline; it is about paying attention to visual cues. Let's get into the kitchen.
Step 1: Prep the Oven and the Buns
Start by preheating your oven to 400 degrees Fahrenheit. While the oven is heating, split your hamburger buns and arrange them cut-side up on a large baking sheet. Lightly brush the cut sides with a tiny bit of olive oil or melted butter. This creates a barrier that prevents the juices from soaking into the bread. Put the buns in the oven for about 5 to 7 minutes, just until they are lightly golden and dry to the touch. This pre-toasting step is your insurance policy against soggy buns. Once toasted, remove them from the oven and set them aside.
Step 2: Cook the Meat and Aromatics
Heat your olive oil in a large skillet over medium-high heat. Add the diced onion and cook for about 3 to 4 minutes until they start to soften and turn translucent. Add the minced garlic and cook for another 30 seconds until your kitchen smells amazing. Be careful not to burn the garlic, as burnt garlic turns bitter. Next, add the ground beef and the Italian sausage to the skillet. Use a wooden spoon or a potato masher to break the meat up into very fine crumbles. We do not want big chunks of meat here; a finer texture will sit better on the buns and ensure a perfect bite. Cook the meat until it is completely browned and no pink remains, about 8 to 10 minutes.
Step 3: Season and De-Grease the Meat
This is a critical step. Once the meat is cooked, tilt your skillet and spoon out most of the excess grease. If you leave all that fat in the pan, it will run off the buns during baking and pool on your baking sheet, making the bottom of your buns greasy and wet. Once drained, return the pan to the heat and stir in the tomato paste, dried oregano, dried basil, red pepper flakes, salt, and black pepper. Cook for about 2 minutes, stirring constantly, to cook out the raw flavor of the tomato paste. The meat should look richly colored and moist, but not saucy or runny. Taste the mixture and adjust the seasoning if needed.
Step 4: Prepare the Tomatoes
While the meat is cooling slightly, slice your tomatoes into thin rounds. You want them thin enough to soften quickly in the oven, but thick enough to hold their shape. Place the slices on a plate lined with paper towels and sprinkle them with a pinch of salt. Let them sit for a few minutes. The salt will draw out excess moisture, which we can pat dry with another paper towel. This is another secret trick to prevent a soggy finished product!
Step 5: Assemble the Masterpieces
Now comes the fun part. Take your pre-toasted bun halves on the baking sheet. Divide the warm meat mixture evenly among the eight halves, pressing it down gently with the back of a spoon so it forms a stable layer that covers the entire surface of the bun. Next, place a seasoned tomato slice on top of the meat layer on each bun. Finally, pile on the shredded mozzarella cheese. Do not be shy here. You want the cheese to completely cover the tomato and the meat, draping slightly over the edges of the bun. Sprinkle the top of the cheese with a little grated parmesan for an extra layer of savory flavor.
Step 6: Bake and Broil
Slide the baking sheet back into the 400-degree oven. Bake for about 10 to 12 minutes. At this point, the cheese should be fully melted and gooey. To get that beautiful, pizzeria-style look shown in our reference photo, turn your oven to broil for the last 1 to 2 minutes. Watch them like a hawk during this step! Broilers are notoriously unpredictable and can go from perfect golden-brown to charred black in a matter of seconds. Once you see beautiful brown spots bubbling across the cheese, pull them out of the oven immediately.
Step 7: The Hardest Step of All
Let them rest. I know, they look incredible, and you want to bite into one immediately. But that cheese is currently molten lava, and the juices need a minute or two to settle. If you bite in right away, you will burn the roof of your mouth, and all the toppings will slide right off the bun. Give them about 3 to 5 minutes to rest on the baking sheet. They will still be piping hot, but the structure will set up beautifully, making them much easier to handle and eat.
My Most Embarrassing Pizza Burger Disasters
We learn more from our failures than our successes. Before I perfected this method, I made every mistake in the book. My very first attempt was a complete disaster. I did not toast the buns, I did not drain the grease from the beef, and I used a very watery store-bought marinara sauce. When I pulled them out of the oven, they looked decent on top, but when I tried to pick one up, the bottom bun completely disintegrated. It was like wet paper mache. We had to eat them with spoons off the baking sheet. That is when I realized that moisture control is the single most important factor in making a successful open-faced baked burger.
Another time, I decided to use fresh mozzarella (the kind packed in water) because I wanted that authentic Italian look. Fresh mozzarella is wonderful on a wood-fired Neapolitan pizza that cooks in 90 seconds, but in a home oven baked for 12 minutes, it releases a massive amount of water. My pizza burgers ended up swimming in a lake of white, milky liquid, which ruined the crispiness of the buns. That was the day I learned that low-moisture block mozzarella is the absolute king for this specific application.
Fun Variations to Try
Once you master the base recipe, the sky is the limit. You can treat these open-faced burgers just like a blank canvas for your favorite pizza toppings. Here are a few variations that have become regulars in my house:
- The Supreme Style: Sauté some finely diced green bell peppers, mushrooms, and black olives along with your onions and garlic. Top the meat layer with a few slices of pepperoni before adding the tomato and cheese. It is like a supreme pizza and a burger had a baby.
- The Spicy Calabrian: Use hot Italian sausage instead of sweet. Add a teaspoon of chopped Calabrian chili paste to the meat mixture. Swap out the regular mozzarella for provolone, and drizzle the finished baked burgers with a bit of hot honey right before serving. The combination of sweet, spicy, and savory is absolutely addictive.
- The White Garlic and Spinach: Skip the tomato paste. Cook the meat with plenty of garlic. Toss in a few handfuls of fresh baby spinach at the end of cooking until wilted. Mix a dollop of ricotta cheese into the meat mixture before assembling, then top with mozzarella and fresh basil. It is creamy, garlic-heavy, and incredibly rich.
- The Hawaiian (Don't Knock It Until You Try It): Use a mix of ground pork and beef. Top the meat with a thin slice of Canadian bacon, a small pineapple ring (patted dry!), and a blend of mozzarella and Monterey jack cheese. The sweet pineapple cuts through the rich pork beautifully.
Planning a Party? How to Scale This Recipe
These pizza burgers are the ultimate crowd-pleaser for game days, birthday parties, or casual get-togethers. They are much easier to serve than traditional burgers because you do not have to stand over a hot grill flipping patties while your guests enjoy themselves. You can easily double or triple this recipe to feed a crowd.
To make things even easier, you can prep the meat mixture up to two days in advance. Store it in an airtight container in the fridge. On the day of your party, toast your buns, assemble the cold meat on top, add the tomato and cheese, and bake. Because the meat starts cold, you may need to add an extra 3 to 4 minutes to the baking time to ensure the meat is heated all the way through before you turn on the broiler.
If you are serving these at a party, I highly recommend setting up a Pizza Burger Bar. Put out the toasted buns, the warm meat mixture, and a variety of toppings like sliced olives, jalapenos, pre-cooked bacon crumbles, roasted red peppers, and different cheeses. Let your guests build their own custom creations, then slide the baking sheets into the oven in batches. It is an interactive, fun, and delicious way to host.
The Science of Cheesy Browning: Why the Broiler is Your Friend
Have you ever wondered why that browned cheese tastes so much better than plain white melted cheese? It is all thanks to the Maillard reaction. This chemical reaction occurs between amino acids and reducing sugars when exposed to high heat. It is the same process that gives seared steak, toasted bread, and roasted coffee their complex, savory flavors.
When you melt mozzarella in a standard oven, it heats up and turns liquid, but it doesn't always get hot enough on top to trigger the Maillard reaction before the rest of the burger overcooks. By switching to the broiler at the end, you are applying intense, direct radiant heat from above. This rapidly evaporates the surface moisture on the cheese, allowing the proteins and sugars to react and create those golden-brown blisters. Those browned spots are packed with glutamate compounds, which our brains perceive as pure savory deliciousness (umami). So do not skip that broiler step; it is science-proven comfort food enhancement!
What to Serve Alongside
Since these open-faced burgers are quite rich, savory, and carb-heavy, you want to pair them with sides that offer some contrast. A simple, bright green salad with a zesty Italian vinaigrette is my go-to. The acidity of the red wine vinegar and lemon juice cuts through the fat of the cheese and sausage, cleansing your palate between bites.
If you want to keep the comfort food train rolling, garlic parmesan fries or zucchini fries are fantastic options. For a healthier side, roasted broccoli or asparagus tossed with lemon zest and garlic matches the Italian flavor profile perfectly. And of course, a cold, crisp lager or a glass of medium-bodied red wine like a Chianti or Barbera pairs beautifully with the rich tomato and sausage flavors.
How to Handle Leftovers
If you somehow end up with leftovers, do not let them go to waste. They reheat surprisingly well if you avoid the microwave. The microwave will make the toasted bun extremely rubbery and tough.
To reheat, place the leftovers on a foil-lined baking sheet or in an air fryer. Heat at 350 degrees Fahrenheit for about 8 to 10 minutes (or 5 minutes in an air fryer) until the cheese is melted and bubbly again, and the bun has regained its crispy edges. It will taste almost as good as it did fresh out of the oven.
Exploring the History of the Pizza Burger
To truly appreciate this dish, it is fun to look at where it came from. The pizza burger is a mid-century American diner classic. During the 1950s and 1960s, diner culture was booming, and cooks were constantly looking for ways to combine two of America's favorite foods: pizza and hamburgers.
Early versions often involved a ground beef patty sandwiched inside a bun with marinara sauce and mozzarella cheese, then pressed in a sandwich toaster. Other regions, particularly in the Midwest, developed the school cafeteria version, which was more like a sloppy joe seasoned with oregano and topped with melted cheese.
Our open-faced baked version takes the best elements of both worlds. It gives you the hearty, meaty texture of a burger patty, the bubbling toasted cheese of a real pizza, and the convenience of a sheet-pan meal. It is a beautiful evolution of a classic piece of Americana.
Choosing the Best Tomatoes for the Job
Since the tomato layer plays such a crucial role in balancing the richness of the meat and cheese, let's dive into tomato selection. In the winter months, when fresh tomatoes can be tasteless and mealy, I highly recommend using Roma (plum) tomatoes. They have a lower water content and a higher ratio of flesh to seed cavity, which means they will not release too much liquid onto your buns. They also tend to retain their sweet, concentrated flavor better than large beefsteak tomatoes during the off-season.
In the height of summer, however, go wild with heirloom tomatoes. A slice of a ripe, juicy heirloom tomato adds an incredible complexity to this dish. Just be sure to use the salting and draining technique we discussed earlier to manage that summer moisture.
The Importance of Garlic and Onion Sizing
When prepping your aromatics, the size of your dice matters more than you might think. For the yellow onion, aim for a very fine dice (about one-eighth of an inch). If the pieces are too large, they will not cook through fully in the short skillet cooking time, leaving you with crunchy, raw onion bites inside your smooth meat mixture.
For the garlic, avoid using a garlic press. Pressed garlic releases a lot of sulfur compounds, which can give the meat a harsh, overly pungent garlic flavor. Instead, take the time to finely mince the garlic cloves with a sharp knife. This results in a sweet, mellow garlic flavor that infuses the meat beautifully without overpowering the other seasonings.
Mastering the Heat: Skillet Management
When browning your beef and sausage, make sure your skillet is hot enough before the meat hits the pan. You should hear a loud, satisfying sizzle the moment the meat touches the surface. If the pan is cold, the meat will slowly release its juices and boil in its own liquid rather than searing.
Searing creates those deeply caramelized brown bits on the meat (another win for the Maillard reaction!) which add immense depth to the final flavor of your meat mixture. Keep the heat on medium-high and let the meat develop some color before you start breaking it down into smaller crumbles.
Adapting for Dietary Restrictions
One of the best things about being a home cook is the ability to adapt recipes to fit everyone's needs. If you have guests with dietary restrictions, this recipe is incredibly easy to modify.
For a gluten-free version, simply swap out the standard hamburger buns for your favorite gluten-free buns. Be sure to toast them extra well, as gluten-free bread can sometimes be more fragile than standard wheat bread. Alternatively, you can use large portobello mushroom caps as the base! Just scoop out the gills, brush them with olive oil, pre-roast them for 10 minutes, then pile the meat, tomato, and cheese inside and bake. It is an incredibly delicious, low-carb, gluten-free alternative.
For a vegetarian version, you can substitute the ground beef and sausage with a high-quality plant-based ground meat alternative. Be sure to add an extra splash of olive oil to the pan when cooking, as plant-based meats tend to have less fat than real beef and pork. Add a splash of soy sauce or Worcestershire sauce (ensure it is a vegetarian version) to bring that rich, savory umami flavor to the plant-based meat.
For a dairy-free option, there are some fantastic plant-based mozzarella alternatives on the market today that melt beautifully. Look for cashew-based or oat-based cheeses, as they tend to have the best texture and meltability under a broiler.
Why Fresh Herbs Make a Difference
While our ingredient list calls for dried oregano and dried basil (which are fantastic for infusing into the warm meat mixture), finishing your baked pizza burgers with a touch of fresh herbs right as they come out of the oven is a total game-changer.
If you have some fresh basil growing on your windowsill, finely slice a few leaves into ribbons (a technique called chiffonade) and scatter them over the hot, melted cheese right as the baking sheet comes out of the oven. The residual heat of the cheese will gently wilt the basil, releasing its aromatic oils and filling your dining room with the scent of a fresh Italian pizzeria. It adds a beautiful pop of bright green color and a sweet, peppery freshness that cuts through the rich, heavy ingredients.
Getting Creative with the Bun Base
While we discussed why standard hamburger buns are the easiest and most practical choice, don't let that stop you from experimenting with other bread bases if you want to switch things up.
- Garlic Bread Base: Before assembling, brush your toasted buns with a mixture of melted butter, minced garlic, and parsley. Toast them in the oven to create a garlic bread base, then pile on the meat, tomato, and cheese. It is incredibly indulgent and delicious.
- French Bread Pizza Style: Buy a loaf of soft French bread, slice it in half lengthwise, and use the halves as giant boats to hold the meat and cheese. Bake the whole loaf, then slice it into individual portions before serving. It makes for an incredibly dramatic presentation at a dinner party.
- English Muffin Style: Using toasted English muffin halves creates a smaller, sturdier bite with lots of nooks and crannies to catch those flavorful meat juices. This is a great option for kid-friendly lunches or afternoon snacks.
The Role of Spices: Balancing Your Seasonings
When seasoning the meat, don't underestimate the power of dried herbs. Unlike fresh herbs, which are best added at the end of cooking, dried herbs need heat and fat to bloom and release their full flavor potential. This is why we add the dried oregano and basil directly to the hot skillet with the meat and tomato paste.
The fat from the meat dissolves the fat-soluble flavor compounds in the dried herbs, distributing them evenly throughout the entire mixture. If you simply sprinkled dried oregano on top of the cheese at the end, it would remain dry, woody, and tasteless. Understanding how to work with your ingredients is what elevates a good home cook to a great one.
Troubleshooting Common Issues
Even with the best instructions, things can sometimes go sideways in the kitchen. Here is how to quickly fix some of the most common issues you might run into while making these baked pizza burgers.
If your cheese is fully melted but refusing to brown, don't panic. Some ovens have weaker broilers, or your oven rack might be positioned too low. Make sure your baking sheet is on the top rack of your oven (about 4 to 6 inches away from the broiler element) when you turn on the broiler. If your broiler has high and low settings, make sure it is set to high.
If your buns are turning too dark around the exposed edges before the cheese is melted, your oven temperature might be running too hot. Every oven is slightly different, and built-in thermometers are notoriously inaccurate. I highly recommend buying a cheap external oven thermometer that hangs on your oven rack. If you notice the edges of the buns browning too quickly, simply tent a piece of aluminum foil loosely over the baking sheet to protect the bread while the cheese finishes melting.
If your meat mixture feels too dry or crumbly after cooking, you may have used meat that was too lean, or cooked it for too long. You can easily fix this by stirring in a few tablespoons of warm marinara sauce or beef broth to restore moisture and help the meat bind together.
The Magic of Family Cooking Traditions
At the end of the day, cooking is about bringing people together over food that makes them feel good. This open-faced baked pizza burger recipe does exactly that. It takes a humble childhood memory, applies a few simple culinary techniques to fix the structural flaws, and transforms it into a meal that is satisfying, incredibly easy to make, and universally loved.
Whether you are looking for a quick weeknight dinner, a fun game-day snack, or a nostalgic meal to share with your family, these pizza burgers are sure to become a staple in your household. Turn off your phone, gather your family or friends around the kitchen counter, and enjoy the simple pleasure of gooey, messy, perfectly browned cheese on a warm, crispy bun. Let me know how yours turned out, and what creative toppings you decided to try!