
We have all been there. You want to host a dinner party that feels incredibly luxurious, the kind where your guests gasp when you bring the main dish to the table, but you also do not want to spend the entire night sweating over a hot stove while everyone else is enjoying their wine in the living room.
For years, my go-to fancy dinner was a classic seafood risotto. But if you have ever made risotto for eight people, you know it is an absolute test of endurance. You are standing there, stirring constantly, pouring warm stock, and praying the rice co-operates. One night, after accidentally serving a slightly crunchy lobster risotto to my husband's boss, I decided I needed a new signature dish. It had to be something I could prep entirely ahead of time, pop in the oven when guests arrived, and serve with absolute confidence.
That is how I fell head over heels in love with seafood stuffed shells.
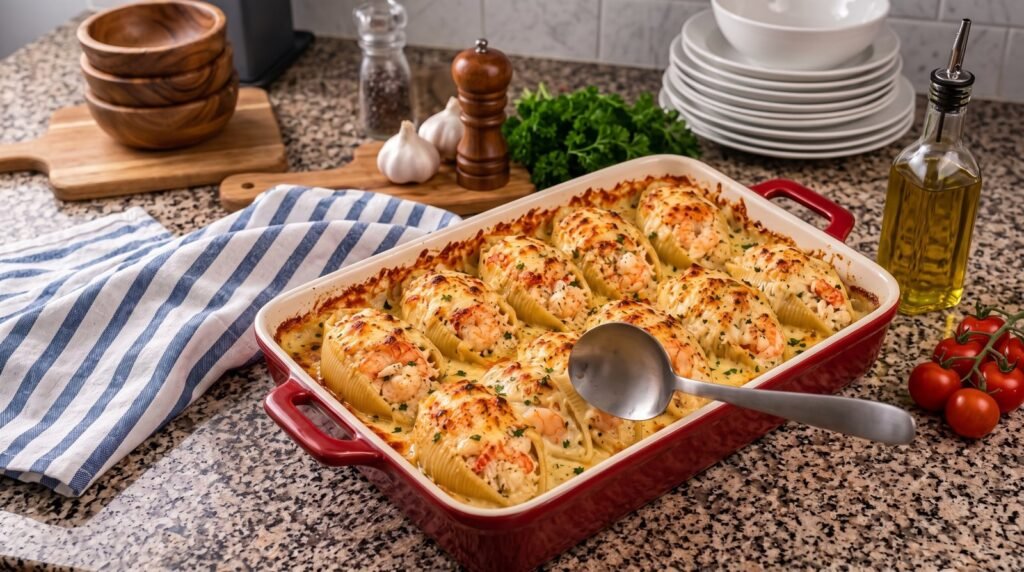
This dish is the ultimate comfort food crossover. It takes the familiar, cozy format of Italian-American baked pasta and elevates it with sweet lump crabmeat, tender shrimp, and a velvety garlic cream sauce that will make you want to lick the baking dish clean. Over the years, I have made this recipe dozens of times, tweaking the ratios, experimenting with different cheeses, and learning a few hard lessons along the way. Today, I am sharing all of my secrets so you can skip the trial-and-error phase and make perfect seafood stuffed shells on your very first try.
The Secret to Perfect Shell Pasta
Let us start with the foundation of the dish: the jumbo pasta shells. When I first started making stuffed shells, I assumed cooking pasta was the easiest part. I was wrong.
My first mistake was boiling the jumbo shells exactly according to the box instructions. The package said twelve minutes for al dente, so I did twelve minutes. By the time I went to stuff them, half of the shells had ripped apart, and the ones that survived were so soft and floppy that trying to get the filling inside was like trying to pack a wet sleeping bag into a tiny sack. To make matters worse, after baking in the oven for thirty minutes, those overcooked shells turned into mush.
Here is what you need to do instead. Boil your jumbo shells in a massive pot of heavily salted water for exactly two minutes less than the lowest time recommended on the box. If the box says nine to eleven minutes, pull them out at seven minutes. They should still have a very distinct bite to them, holding their shape perfectly.
As soon as you drain the shells, run cold water over them immediately. This stops the cooking process instantly and cools them down so you can handle them with your bare hands. Once they are cool, lay them out in a single layer on a clean baking sheet lined with parchment paper or a clean kitchen towel. If you stack them in a bowl while they are wet, they will stick together and tear when you try to pull them apart. This little extra step saves so much frustration.
Always boil the entire twelve-ounce box of pasta, even though this recipe only requires about twenty to twenty-four individual shells. You will inevitably have a few shells that break in the boiling process, and having a surplus of perfect backup shells is great peace of mind.
Selecting Your Seafood
When it comes to the seafood, quality matters, but you do not need to break the bank. I like to use a combination of sweet lump crabmeat and tender, wild-caught shrimp.
For the crabmeat, try to get wild-caught lump crabmeat from the seafood counter. It has a beautiful, sweet flavor and a lovely texture that holds up well inside the pasta. If lump crab is out of your budget, claw crabmeat is an excellent alternative. It is slightly darker and has a more pronounced crab flavor, but it is incredibly sweet and usually about half the price. Please avoid imitation crabmeat for this specific recipe if you can. Imitation crab is made of processed white fish and contains a lot of binders and sugars, which can make the filling taste strangely sweet and give it a rubbery texture when baked.
For the shrimp, I prefer medium-sized wild-caught shrimp. Since we are going to chop them up anyway, you do not need to spend extra money on massive colossal shrimp. In fact, smaller shrimp are often easier to chop into uniform, bite-sized pieces.
One of my biggest lessons learned was how to handle the shrimp before stuffing. In my early attempts, I cooked the chopped shrimp completely in a skillet with butter and garlic before mixing them into the cheese. It tasted delicious, but after baking in the oven, those twice-cooked shrimp turned rubbery and tough.
The secret to perfectly tender shrimp in your stuffed shells is to start with raw chopped shrimp. Because the shells bake in a hot oven for thirty minutes, the raw, finely chopped shrimp will cook perfectly inside the warm cheese mixture. They stay incredibly juicy, sweet, and tender. Just make sure you pat the raw shrimp completely dry with paper towels after chopping them to prevent any excess water from diluting your filling.
The Filling: Getting the Cheese Right
The filling is where the magic happens. A classic stuffed shell relies on ricotta cheese, but ricotta can be notoriously watery. If you buy a tub of standard grocery store ricotta and dump it straight into your mixing bowl, your stuffed shells will likely end up sitting in a puddle of watery liquid at the bottom of your baking dish.
To prevent this, you have two options. The best option is to strain your ricotta. Place a fine-mesh sieve over a bowl, line it with a few layers of cheesecloth or a paper towel, scoop the ricotta inside, and let it drain in the fridge for at least two hours or even overnight. You will be amazed at how much water drains out.
If you are short on time, you can swap out half of the ricotta for cream cheese or mascarpone. Mascarpone is an Italian cream cheese that is incredibly rich, thick, and velvety. Mixing equal parts mascarpone and high-quality ricotta gives you a filling that is thick, luxurious, and completely puddle-free.
To bind the filling together so it does not ooze out of the shells when you cut into them, we use one large egg. I also like to add a generous amount of freshly grated parmesan cheese for that sharp, salty kick, and plenty of shredded low-moisture mozzarella for that classic, gooey cheese pull.
The absolute game-changer for the filling is fresh lemon zest. Seafood and cheese can easily become overwhelmingly heavy and rich. Grating the zest of one fresh lemon directly into the cheese mixture cuts through that richness beautifully, adding a bright, sunny pop of flavor that elevates the entire dish.
Master the Garlic Parmesan Cream Sauce
While some people like to bake seafood shells in a marinara sauce, I am a firm believer that seafood and white cream sauce are a match made in heaven. This is not a heavy, floury alfredo sauce that sits like a brick in your stomach. It is a light, velvety garlic cream sauce made with butter, fresh garlic, a splash of dry white wine, chicken broth, heavy cream, and freshly grated parmesan.
When making the sauce, use real garlic cloves rather than the pre-minced stuff in a jar. Jarred garlic has a bitter, metallic aftertaste that can easily ruin a delicate cream sauce. Take the extra two minutes to mince four or five fresh garlic cloves, or use a microplane grater to grate them directly into your pan.
For the white wine, choose something dry and crisp that you would actually enjoy drinking. A Sauvignon Blanc, Pinot Grigio, or an unheavily oaked Chardonnay works beautifully. Avoid cooking wine from the grocery store aisle; it is loaded with sodium and artificial preservatives that will make your sauce taste overly salty and cheap. If you prefer to cook without alcohol, simply swap the wine for an equal amount of clam juice or low-sodium chicken broth mixed with a squeeze of fresh lemon juice to provide that necessary acidity.
Ingredients for Seafood Stuffed Shells
Here is your master shopping list. Keep in mind that using high-quality ingredients, particularly when it comes to the cheese and seafood, will yield the absolute best results.
| Ingredient | Quantity | Notes |
|---|---|---|
| Jumbo pasta shells | 12 ounces | Boil the whole box to account for broken shells |
| Lump crabmeat | 8 ounces | Wild-caught, picked over for shells |
| Raw medium shrimp | 8 ounces | Peeled, deveined, and finely chopped |
| Whole milk ricotta cheese | 15 ounces | Strained to remove excess moisture |
| Low-moisture mozzarella cheese | 2 cups | Shredded, divided use |
| Parmigiano-Reggiano cheese | 1 cup | Freshly grated, divided use |
| Large egg | 1 | Lightly beaten to bind the filling |
| Fresh lemon | 1 | Zested for the filling, juiced for the sauce |
| Unsalted butter | 4 tablespoons | Divided use (for sauce and baking dish) |
| Garlic cloves | 5 | Finely minced or grated |
| Dry white wine | 1/2 cup | Sauvignon Blanc or Pinot Grigio |
| All-purpose flour | 2 tablespoons | To thicken the sauce slightly |
| Low-sodium chicken or seafood broth | 1 cup | High-quality store-bought or homemade |
| Heavy whipping cream | 1 cup | Do not substitute with milk |
| Fresh flat-leaf parsley | 1/4 cup | Finely chopped for garnish |
| Kosher salt and black pepper | To taste | Adjust as you go |
| Old Bay seasoning | 1/2 teaspoon | Adds a beautiful warmth to the seafood filling |
Step-by-Step Cooking Guide
Now that we have our ingredients ready, let us walk through the process step-by-step. Put on some music, pour yourself a glass of that white wine, and let us get cooking.
Step 1: Cook and Cool the Shells
Bring a large pot of water to a rolling boil. Add a generous tablespoon of kosher salt. Do not skip salting the water; this is your only chance to season the pasta dough itself.
Add the jumbo shells to the boiling water. Stir them gently for the first minute to make sure they do not stick to the bottom of the pot. Cook for seven to eight minutes, testing one at seven minutes to ensure it is still quite firm in the center.
Drain the pasta into a large colander and immediately run cold tap water over the shells until they are completely cool to the touch. Gently shake out any water trapped inside the shells and lay them out in a single layer on a parchment-lined baking sheet. Set them aside.
Step 2: Prepare the Seafood
If your crabmeat is fresh or canned, empty it onto a paper towel-lined plate. Gently run your fingers through the crabmeat to check for any tiny, hard cartilage or shell pieces. Be gentle so you do not break up those beautiful lumps of crab too much.
Peel and devein your shrimp, removing the tails. Chop the raw shrimp into small, bite-sized pieces, roughly the size of a green pea. Place the chopped shrimp on a plate lined with paper towels and pat them dry to remove any excess water.
Step 3: Mix the Filling
In a large mixing bowl, combine the strained ricotta cheese, one cup of the shredded mozzarella, half a cup of the freshly grated parmesan, and the lightly beaten egg.
Add the fresh lemon zest, half a teaspoon of Old Bay seasoning, half a teaspoon of kosher salt, and a generous grind of fresh black pepper. Stir this mixture until it is completely smooth and well combined.
Gently fold in the chopped raw shrimp and the checked crabmeat. Use a rubber spatula and a light hand here so you do not completely pulverize the crab lumps. Once mixed, place the bowl in the refrigerator while you prepare your garlic cream sauce. Keeping the filling cold makes the shells much easier to stuff.
Step 4: Make the Velvety Garlic Cream Sauce
Place a large skillet or saucepan over medium heat and melt three tablespoons of the unsalted butter.
Add the minced garlic and sauté for about one minute. Keep a close eye on it; you want the garlic to become fragrant and soft, but not brown or burnt. Burnt garlic tastes incredibly bitter and will ruin your sauce.
Sprinkle the two tablespoons of all-purpose flour over the melted butter and garlic. Stir constantly with a whisk for about one to two minutes. This cooks out the raw flour taste and creates a light roux.
Slowly pour in the dry white wine while whisking vigorously to prevent any lumps from forming. Let the wine simmer for about two minutes until it has reduced by half.
Gradually whisk in the chicken broth and heavy whipping cream. Bring the mixture to a gentle simmer. Reduce the heat to low and let the sauce simmer gently for about five to seven minutes, stirring occasionally, until it has thickened enough to coat the back of a spoon.
Remove the sauce from the heat. Whisk in the remaining half cup of grated parmesan cheese until it is completely melted and smooth. Stir in a squeeze of fresh lemon juice (about one tablespoon) and season with salt and pepper to taste.
Step 5: Assemble the Dish
Preheat your oven to 375 degrees Fahrenheit.
Take your remaining tablespoon of butter and grease the bottom and sides of a 9×13-inch baking dish.
Pour about one cup of your prepared garlic cream sauce into the bottom of the greased baking dish, spreading it out into a thin, even layer. This creates a non-stick barrier and keeps the bottom of your pasta shells tender and moist during the baking process.
Retrieve your seafood cheese filling from the fridge. To stuff the shells, you can use a small spoon, but my favorite trick is to use a large zip-top freezer bag. Spoon the filling into the bag, push it all to one corner, and snip about an inch off the corner tip. Now you have a makeshift piping bag.
Hold a cooled pasta shell in one hand, gently open it up with your fingers, and squeeze a generous amount of filling inside. You want each shell to be plump and fully stuffed.
Place the stuffed shell, open-side up, into the prepared baking dish. Repeat this process until your baking dish is tightly packed with beautiful, stuffed shells. They should sit snuggly next to each other so they do not fall over or lose their filling.
Step 6: Sauce, Cheese, and Bake
Pour the remaining garlic cream sauce evenly over the top of the stuffed shells, making sure to get a little bit of sauce on any exposed edges of the pasta so they do not dry out and become crunchy in the oven.
Sprinkle the remaining one cup of shredded mozzarella cheese evenly over the top of the shells.
Tear a sheet of aluminum foil large enough to cover the baking dish. Spray the underside of the foil with a little non-stick cooking spray; this simple trick prevents the melting cheese from sticking to the foil when you pull it off later. Cover the baking dish tightly with the foil.
Bake in the preheated oven at 375 degrees Fahrenheit for twenty-five minutes. You should see the sauce bubbling actively around the edges of the dish.
Carefully remove the foil. Turn your oven to the broil setting (high) and cook for an additional three to four minutes. Watch it like a hawk during this step! Broilers are notoriously unpredictable, and you want to go from pale yellow to beautifully browned and bubbly, not charcoal black.
Once the cheese is golden-brown and bubbling, remove the dish from the oven. Let it rest on the counter for ten minutes before serving. This resting time is crucial; it allows the cheese filling to set slightly so the shells do not fall apart when you scoop them out.
Garnish with plenty of finely chopped fresh flat-leaf parsley right before serving to add a gorgeous contrast of color and a fresh, herbaceous finish.
Common Mistakes to Avoid
Even with a detailed guide, kitchen mishaps can happen. Here are the most common pitfalls people run into when making seafood stuffed shells, and exactly how to avoid them.
Overcooking the Pasta
I cannot stress this enough. If you boil the pasta until it is soft, your dish will be a soggy mess. The pasta continues to cook and absorb moisture while it bakes in the sauce in the oven. Keep those shells firm during the initial boil.
Using Pre-Shredded Cheese from a Bag
While buying pre-shredded mozzarella and parmesan in plastic bags is highly convenient, it is not ideal for this dish. Pre-shredded cheeses are coated with potato starch, cellulose, and anti-caking agents to prevent the cheese from clumping together in the bag. Unfortunately, these additives also prevent the cheese from melting smoothly, resulting in a slightly grainy, greasy topping. For the absolute best, ultra-creamy melt, buy a block of low-moisture mozzarella and a wedge of Parmigiano-Reggiano and grate them yourself. The difference in texture and flavor is night and day.
Forgetting to Pat the Seafood Dry
Both crabmeat and shrimp carry a surprising amount of excess water. If you dump them directly from the packaging into your cheese mixture, that water will release during the baking process, turning your rich cream sauce into a thin, watery liquid. Always spend a minute patting your chopped seafood dry with paper towels.
Rushing the Rest Time
I know how hard it is to wait when your kitchen smells like a high-end Italian restaurant, but do not skip the ten-minute rest after baking. If you serve them piping hot straight out of the oven, the hot cheese filling will run everywhere, and you will end up with a messy plate. Letting it sit allows everything to firm up beautifully, ensuring clean, picture-perfect scoops.
Make-Ahead and Freezing Instructions
One of the reasons this dish is my absolute favorite for entertaining is how beautifully it can be prepped in advance.
You can fully assemble the dish up to twenty-four hours ahead of time. Simply follow the recipe up to the point of adding the sauce and cheese on top. Cover the baking dish tightly with plastic wrap and store it in the refrigerator. When you are ready to bake, remove the plastic wrap, cover the dish with foil, and increase your initial baking time by about five to ten minutes to account for the chill from the fridge.
If you want to freeze this dish for an easy weeknight meal later, it freezes beautifully. I recommend freezing the assembled, unstuffed shells on a baking sheet first until they are rock-hard, then transferring them to a freezer-safe bag or container. When you are ready to eat, you can lay them in your baking dish, pour the fresh sauce over them, cover with cheese, and bake from frozen. Just add about fifteen to twenty minutes to your covered baking time.
Alternatively, you can freeze the entire assembled dish in a disposable aluminum baking pan. Wrap the unbaked dish tightly in a double layer of plastic wrap, followed by a layer of heavy-duty aluminum foil. It will keep beautifully in the freezer for up to three months. To bake, thaw the dish overnight in the refrigerator, then bake as directed in the recipe.
Elegant Variations to Try
Once you have mastered the classic garlic cream version, do not be afraid to experiment with different flavor profiles to suit your taste or what you have on hand in your kitchen.
Cajun Seafood Stuffed Shells
If you love a bit of heat and bold flavor, swap out the Old Bay seasoning in the cheese filling for your favorite Cajun spice blend. For the sauce, add a teaspoon of Cajun seasoning, a finely diced bell pepper, and a splash of hot sauce. The combination of sweet seafood, rich cream, and spicy Cajun heat is absolutely addictive.
Spinach and Artichoke Seafood Shells
To sneak some greens into this decadent dish, fold one cup of chopped, cooked, and thoroughly squeezed dry spinach and half a cup of chopped marinated artichoke hearts into your cheese and seafood mixture. It tastes like your favorite creamy spinach and artichoke dip met gourmet seafood pasta.
The Budget-Friendly Salmon Shells
If crab and shrimp are out of the question for a casual Tuesday night dinner, you can make an incredibly delicious, budget-friendly version using canned or leftover cooked salmon. Simply flake the salmon into the ricotta cheese mixture along with plenty of fresh dill and lemon zest. It is comforting, rich, and much lighter on the wallet.
Spicy Tomato Seafood Shells
If you prefer a red sauce over a white cream sauce, swap out the garlic cream sauce for a high-quality store-bought marinara or a homemade spicy arrabbiata sauce. The acidity of the tomatoes cuts through the rich cheese filling beautifully, and a pinch of crushed red pepper flakes adds a lovely warmth that pairs perfectly with the sweet crab and shrimp.
What to Serve Alongside Your Seafood Shells
Because this dish is incredibly rich, decadent, and carb-heavy, you want to keep your side dishes relatively light and crisp to balance out the meal.
A bright, acidic green salad is the perfect companion. I love a classic Caesar salad with a punchy, garlicky dressing, or a simple arugula salad tossed with fresh lemon juice, high-quality extra virgin olive oil, and shaved parmesan. The peppery bite of arugula and the zesty lemon dressing cut through the creamy richness of the shells beautifully.
For vegetables, simple roasted asparagus spears or charred broccolini tossed with garlic and lemon zest are fantastic options. They add a beautiful green color to the table and keep the meal feeling fresh and balanced.
And, of course, no baked pasta dinner is complete without bread. A warm loaf of crusty sourdough bread or classic garlic bread is perfect for wiping up any leftover garlic cream sauce from your plate.
When it comes to wine pairings, stick with the dry white wine you used to make the sauce. A chilled glass of Sauvignon Blanc, Pinot Grigio, or a light, crisp Vermentino pairs beautifully with the sweet seafood and rich cream, cleansing your palate between bites.
There is something truly special about taking the time to cook a meal like this from scratch. It is not a quick ten-minute stir-fry, but the process of stuffing each shell, watching the sauce bubble up in the oven, and sitting down to share a beautiful, indulgent meal with the people you love is incredibly rewarding.
I hope this guide gives you the confidence to conquer seafood stuffed shells in your own kitchen. Keep your pasta firm, strain your ricotta, buy the best seafood you can find, and do not forget that fresh lemon zest. Your family and friends are going to be absolutely blown away. Happy cooking!