
We have all been there. You open the refrigerator door, move aside the half-used jar of marinara sauce, and there it is: a sad, slightly translucent plastic takeout container. Inside sits a block of cold, dried-out white rice. It is stiff, clumpy, and looks about as appetizing as a pile of packing peanuts.
In the past, you might have automatically resorted to making a quick batch of fried rice. Do not get me wrong, a good vegetable fried rice is a weeknight lifter of burdens. But sometimes, you just do not want a bowl of loose grains. You want texture. You want drama. You want something with an audible crunch that makes your mouth water before you even take a bite.
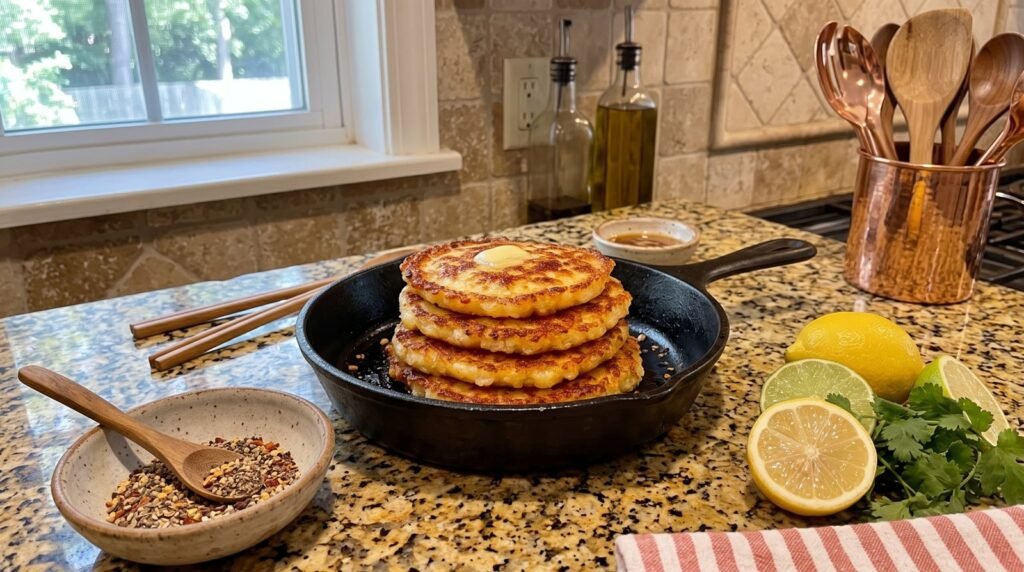
That is where these crispy leftover rice pancakes come into play. The first time I made these, it was purely out of desperation. My pantry was bare, my stomach was growling, and all I had was a container of two-day-old jasmine rice, a solitary egg, and a block of cheddar cheese. I threw them together, patted them into patties, and fried them in a hot cast-iron skillet with a generous pat of butter.
What came out of that pan changed my lazy-day cooking forever. It was golden brown, shatteringly crispy on the outside, and wonderfully tender and cheesy on the inside. It tasted like a cross between a potato latke, a premium hash brown, and a Japanese grilled rice ball. Since that fateful afternoon, I have perfected the technique, made countless mistakes, and learned exactly what it takes to get the ultimate, non-crumbling rice pancake. Let me walk you through everything you need to know to master this simple kitchen trick.
The Secret Science of Cold Leftover Rice
Before we heat up the stove, we need to talk about why fresh rice is your worst enemy for this recipe. If you try to make these pancakes with warm, freshly cooked rice, you will end up with a gummy, sticky, scrambled mess.
When rice cooks, the starch molecules absorb water and swell up, making the grains soft and sticky. But as that rice sits in the refrigerator, a process called starch retrogradation occurs. The starch molecules cool down and begin to crystallize and realign themselves. This process expels excess moisture and makes the rice grains firm, dry, and distinct from one another.
This dry texture is exactly what we want. Because the surface of the rice grains is dry, they are primed to absorb the binder we add and, more importantly, they will crisp up beautifully when they hit the hot fat in our pan. If there is too much moisture in the rice, that moisture will turn into steam as it heats, preventing the exterior from getting that deep, caramelized crunch.
So, if you are planning to make these, make sure your rice has spent at least twelve hours in the fridge. If you are in a pinch and only have freshly cooked rice, spread it out on a baking sheet in a thin layer and pop it into the freezer for fifteen to twenty minutes to dry it out and cool it down rapidly.
Short Grain vs. Long Grain: Which Rice Wins?
Not all rice is created equal, and the type of rice sitting in your fridge will behave differently in the pan.
Short-grain and medium-grain rice, like sushi rice or Arborio, contain a high amount of a starch called amylopectin. This starch is sticky, which means these types of rice naturally want to cling together. If you are using leftover short-grain rice, your pancakes will hold their shape easily and have a lovely, chewy, mochi-like texture in the center.
Long-grain rice, such as Jasmine or Basmati, contains more amylose starch. This makes the grains fluffy and prone to separating. If you are using long-grain rice, you will need a slightly stronger hand with your binders to make sure your pancakes do not shatter into a million individual fried grains when you try to flip them.
Both types work wonderfully, but knowing what you have in your container helps you adjust your ingredients for the perfect bind.
The Great Binder Debate: Egg vs. Cheese vs. Starch
Since cold rice is dry and crumbly, we need a culinary glue to hold our pancakes together. Through trial and error, I have tested several binders, and each brings something unique to the table.
An egg is the classic choice. It provides structure, richness, and moisture. As the egg cooks, its proteins coagulate, trapping the rice grains in a solid network. However, using too much egg can make the pancake taste spongy or like a frittata. We want a rice pancake with egg, not an egg pancake with rice.
Cheese is my favorite secret weapon. When shredded cheddar, parmesan, or mozzarella melts in the hot pan, it creates a crispy lace pattern, often called a frico. This cheese crust not only adds an incredible savory flavor but also acts as an structural support beam for the pancake.
A tablespoon of cornstarch, potato starch, or all-purpose flour helps absorb any residual surface moisture and forms a thin, crispy batter around the rice. If you want to keep the recipe gluten-free, potato starch is an absolute champion for getting that light, airy crunch.
The Essential Ingredients
To make the base version of these crispy rice pancakes, you only need a handful of basic ingredients that you likely already have in your kitchen. Here is a handy breakdown of what you will need.
| Ingredient | Amount | Purpose |
|---|---|---|
| Cold leftover rice | 2 cups | The star of the show; must be dry and cold |
| Large egg | 1 piece | Binds the ingredients together |
| Shredded cheddar or parmesan | 0.5 cup | Adds flavor, moisture, and a crispy cheese crust |
| Green onions | 2 stalks | Adds freshness, color, and a mild onion bite |
| Garlic powder | 0.5 teaspoon | Provides a quick savory base flavor |
| Salt and black pepper | To taste | Enhances all the other flavors |
| Unsalted butter | 1 tablespoon | For rich flavor and beautiful browning |
| Neutral cooking oil | 1 tablespoon | Raises the smoke point so the butter does not burn |
Step-by-Step Guide to Crispy Perfection
Now that you have gathered your ingredients, let us get cooking. Grab a large mixing bowl and your favorite frying pan.
First, prepare your rice. Dump the cold rice into your mixing bowl. Use a fork or clean hands to break up any large clumps. You want individual, free-flowing grains of rice so that the binder can coat everything evenly.
Second, add your mix-ins. Crack your egg into a small cup, whisk it briefly, and pour it over the rice. Add your shredded cheese, finely sliced green onions, garlic powder, salt, and freshly cracked black pepper.
Third, mix thoroughly. Use a spatula to fold the ingredients together until every single grain of rice is coated in a thin layer of egg and seasoned goodness. If the mixture looks a little too wet, you can sprinkle in a tablespoon of flour or cornstarch. If it feels too dry and crumbly to hold its shape when squeezed, add a tiny splash of milk or another whisked egg.
Fourth, shape your patties. Scoop up a portion of the rice mixture (about a third of a cup works best) and compress it firmly between your hands, shaping it into a round patty about half an inch thick. Making them too thick will result in a cold, mushy center, while making them too thin might cause them to fall apart during the flip. Set the shaped patties on a plate.
Fifth, heat your pan. Place a heavy-bottomed skillet, preferably cast iron, over medium heat. Add your neutral cooking oil and your butter. Let the butter melt and foam. The combination of oil and butter is crucial here. Butter provides unmatched flavor and milk solids that caramelize into a gorgeous golden color, while the oil prevents the butter from burning over the medium-high heat.
Sixth, fry the pancakes. Carefully slide your patties into the hot pan. You should hear a gentle, steady sizzle. Do not crowd the pan; leave at least an inch of space between each pancake so they can fry instead of steaming.
Seventh, practice patience. This is where most people mess up. Do not touch, move, or poke the pancakes for at least three to four minutes. They need time to build up that solid, crispy crust on the bottom. If you try to move them too early, they will stick to the pan and tear apart. Watch the edges; once you see the bottom perimeter turning a deep golden brown, it is time to flip.
Eighth, the flip. Slide a thin, wide spatula completely under the pancake in one quick, confident motion. Flip it over gently. Press down lightly with the back of your spatula to ensure even contact with the pan. Fry the second side for another three minutes until it is equally golden and crispy.
Ninth, drain and serve. Transfer the finished pancakes to a wire cooling rack or a plate lined with paper towels to drain any excess oil. Serve them hot, topped with a little extra butter, a sprinkle of sea salt, or your favorite dipping sauce.
Why Your Pan Choice Matters
I cannot stress this enough: the pan you choose will make or break this recipe.
A cast-iron skillet is the undisputed heavyweight champion for frying rice pancakes. Cast iron has high thermal mass, meaning it holds onto heat beautifully. When you place cold rice patties into a preheated cast-iron pan, the pan's temperature does not drop. This instant, sustained heat sears the exterior of the pancake immediately, locking in the structure and creating a thick, crunchy crust.
A carbon steel skillet or a heavy stainless-steel pan will also do an excellent job. Just make sure you preheat them thoroughly and use enough fat to prevent sticking.
If you must use a non-stick pan, go for the heaviest one you own. Lightweight non-stick pans do not distribute heat evenly, which can lead to patchy browning and soggy centers. You also cannot get non-stick pans as hot as cast iron without damaging the coating, meaning your crunch might be a bit more delicate.
Four Flavor Variations to Shake Things Up
Once you have mastered the basic recipe, you can treat it as a blank canvas. Here are four of my favorite flavor profiles to keep things exciting.
The Kimchi and Gochujang Pancake:
If you love bold, spicy, savory flavors, this version is for you. Finely chop half a cup of well-fermented kimchi and squeeze out the excess moisture. Mix it into your rice along with a tablespoon of gochujang (Korean chili paste), a splash of toasted sesame oil, and some toasted sesame seeds. This variation pairs beautifully with a drizzle of spicy mayo or a fried egg on top.
The Loaded Baked Potato Style:
To recreate the ultimate comfort food experience, mix crispy crumbled bacon, shredded sharp cheddar cheese, sour cream, and plenty of fresh chives into your rice mixture. The bacon grease melts into the rice as it fries, giving it an incredibly rich, smoky flavor. Serve these with a dollop of cold sour cream on top.
The Cheesy Garlic Herb Pancake:
For a Mediterranean twist, use shredded parmesan or pecorino cheese, minced fresh garlic, a pinch of dried oregano, and finely chopped fresh parsley. Fry these pancakes in olive oil instead of butter and vegetable oil. They smell absolutely incredible as they cook and taste like a gourmet garlic bread in pancake form.
The Sweet Cinnamon Breakfast Pancake:
Yes, you can go sweet! If you have leftover plain white rice, skip the garlic, onions, and cheese. Instead, mix your rice with an egg, a tablespoon of sugar, a splash of vanilla extract, and a heavy pinch of ground cinnamon. Fry them in butter until crispy, and serve them hot drizzled with maple syrup or topped with fresh berries. It is a fantastic, unexpected alternative to French toast.
Common Mistakes That Will Ruin Your Pancakes
Even with a simple recipe, things can go wrong. Here are the most common pitfalls I have encountered in my kitchen, and how to avoid them.
Mistake 1: Using wet, freshly cooked rice.
As mentioned earlier, fresh rice contains too much steam and moisture. It will turn your pancake batter into a soft, mushy paste that refuses to crisp up. Always stick to dried, refrigerated rice.
Mistake 2: Moving the pancakes too soon.
It is tempting to check on the underside of your pancake after a minute. Resist the urge! The starches and proteins need undisturbed contact with the hot pan to set and form a crust. If you try to lift them before that crust forms, the pancake will tear, leaving half of your crispy rice stuck to the bottom of the pan.
Mistake 3: Not using enough fat.
This is not the time to count calories. The rice grains need to fry in a shallow pool of hot fat to get that uniform, shatteringly crispy texture. If your pan looks dry, add another splash of oil or a small knob of butter. The rice will absorb a bit of it, and the rest will work its magic on the crust.
Mistake 4: Shaping the patties too thick.
If your patties are thicker than half an inch, the heat will not reach the center by the time the exterior is browned. You will end up with a pancake that is hot and crunchy on the outside but lukewarm and clumpy on the inside. Keep them relatively thin and uniform.
Mistake 5: Crowding the frying pan.
If you pack too many patties into your skillet at once, they will trap the rising steam beneath them. Instead of frying into a crisp, they will steam each other, resulting in a soggy, soft texture. Cook in batches if necessary, keeping the cooked pancakes warm in a low oven.
The Ultimate Dipping Sauce Pairings
While these pancakes are delicious on their own, a great dipping sauce takes them to a whole new level. Here are three quick sauces you can whip up while your pancakes are frying.
The Sweet and Savory Soy Dip:
Mix two tablespoons of soy sauce, one tablespoon of rice vinegar, a teaspoon of maple syrup or honey, a dash of toasted sesame oil, and a pinch of red pepper flakes. This light, tangy sauce cuts through the richness of the fried rice and cheese beautifully.
The Creamy Sriracha Mayo:
Combine three tablespoons of mayonnaise, one tablespoon of sriracha, a squeeze of fresh lime juice, and a tiny pinch of garlic powder. This creamy, spicy sauce is the perfect companion for the kimchi or classic cheesy versions of the pancake.
The Herbed Garlic Sour Cream:
Stir together half a cup of sour cream or Greek yogurt, a squeeze of lemon juice, a finely minced garlic clove, and a handful of chopped fresh dill, chives, and parsley. This cool, refreshing dip contrasts wonderfully with the hot, crunchy pancake.
How to Store and Reheat Your Leftovers
If you happen to have leftover cooked pancakes, do not throw them away. They store surprisingly well, though they will lose their crunch as they cool in the fridge.
To store them, let them cool completely on a wire rack. Layer them between sheets of parchment paper in an airtight container to keep them from sticking together. They will keep in the refrigerator for up to three days.
When it comes to reheating, step away from the microwave. Microwaving will turn your beautifully crispy pancakes into a rubbery, damp mess. Instead, use one of these three methods to restore their original glory.
The Air Fryer Method:
Preheat your air fryer to 375 degrees Fahrenheit. Place the cold pancakes in a single layer in the basket and heat for four to five minutes. They will come out incredibly hot and just as crispy as the day you made them. This is by far the fastest and most efficient way to reheat them.
The Oven Method:
Preheat your oven to 400 degrees Fahrenheit. Place the pancakes on a wire rack set inside a baking sheet. Bake for eight to ten minutes until warmed through and sizzling. The wire rack allows hot air to circulate all around the pancake, ensuring the bottom stays crispy.
The Skillet Method:
Place a dry skillet over medium-low heat. Add your cold pancakes and cover the pan with a lid. Let them heat through for about three minutes per side. The cover helps melt any cheese inside, while the dry pan recrisps the outer surface.
Final Kitchen Thoughts
Kitchen scraps do not have to be boring, and they certainly do not have to go to waste. Learning to look at a container of cold, unappealing leftover rice as a golden opportunity for culinary creativity is a game-changer.
These crispy rice pancakes prove that with a little understanding of starch, a hot cast-iron skillet, and a few pantry staples, you can turn humble leftovers into a restaurant-worthy dish. The next time you find yourself staring at that sad plastic container in the back of your fridge, do not hesitate. Grab your egg, shred your cheese, heat up your pan, and treat yourself to the ultimate crispy, comforting breakfast, lunch, or midnight snack. Your tastebuds, and your grocery budget, will thank you.