
I used to think the only way to cook sweet corn was in a giant pot of boiling salted water. That is how my grandmother did it, how my mom did it, and how I did it for years. But one humid July afternoon, when my stovetop was already crowded with boiling potatoes and simmering pasta sauce, I ran out of burner space. I had ten ears of fresh sweet corn sitting on my counter, and a hungry backyard crowd arriving in less than an hour.
In a moment of pure desperation, I chopped the cobs in half, threw them onto a sheet pan lined with aluminum foil, slathered them in a hasty mix of butter and spices, and shoved them into a screaming hot oven. The result was absolutely life-changing.
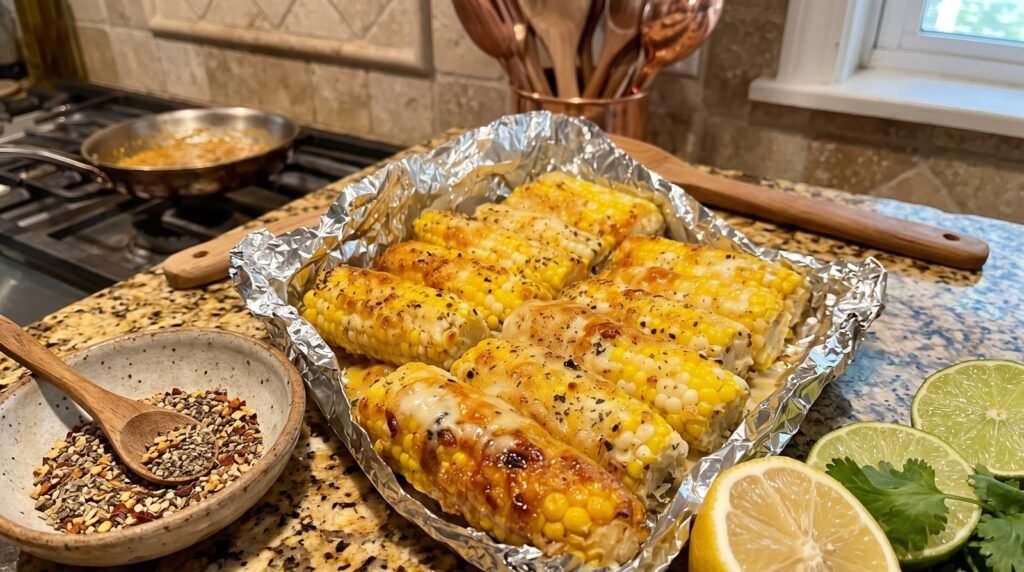
What came out of the oven was not the soggy, water-logged corn I was used to. Instead, I pulled out a tray of deeply caramelized, buttery, intensely sweet corn on the cob. The kernels were plump and bursting with juice, the edges were beautifully charred, and the garlic herb aroma filled my entire kitchen. Since that day, I have never boiled an ear of corn again. This oven-roasting method is now my absolute go-to, and today I am sharing every little trick, tip, and mistake I made along the way so you can get perfect results on your very first try.
Why Oven Roasting Beats Boiling Every Single Time
When you boil corn, a lot of that precious sweetness leaches out into the cooking water. You can smell the corn in the steam rising from the pot, which means the flavor is literally leaving the vegetable and going into the drain. Oven roasting does the exact opposite. It concentrates the natural sugars in the corn.
As the heat cooks the corn from the outside in, the water content inside the kernels evaporates slightly, intensifying the corn flavor. When you introduce fat, like butter or oil, to the high heat of the oven, you trigger the Maillard reaction. This is the scientific process behind browning, and it is what gives roasted corn those sweet, savory, and complex caramelized notes that boiling simply cannot achieve.
Another massive benefit is convenience. Boiling a massive pot of water takes a long time, heats up your kitchen, and leaves you with a heavy, boiling-hot pot to drain. With the sheet pan method, you line your pan with aluminum foil, roast the corn, and when you are done, you simply fold up the foil and throw it away. Your cleanup time goes from ten minutes of scrubbing to about thirty seconds.
How to Choose the Best Sweet Corn
Your recipe is only as good as your starting ingredients, and this is especially true for sweet corn. If you start with starchy, old corn, no amount of garlic butter will save it.
When you are at the grocery store or local farm stand, look for husks that are bright green, damp, and wrapped tightly around the ear. If the husk looks dry, yellowed, or loose, the corn is old and has likely lost its sweetness.
Feel the kernels through the husk without peeling it back completely. You want to feel plump, even rows from the very bottom all the way to the tip. Avoid ears that have obvious soft spots or empty gaps.
If you want to be absolutely sure, pull back the very tip of the husk slightly to inspect the kernels. They should look shiny, full, and tightly packed. The silks at the top should be sticky and brown. If they are completely dry and black, or wet and mushy, move on to the next ear.
Keep in mind that sweet corn starts converting its sugars into starch the moment it is harvested. To get the sweetest, most tender results, try to cook your corn the same day you buy it. If you have to wait, store it in the refrigerator with the husks still on to slow down that starch conversion process.
The Recipe Ingredients
Here is exactly what you need to make this incredible garlic butter roasted corn. This recipe serves about four to six people, but you can easily scale it up or down depending on your crowd.
| Ingredient | Amount | Notes |
|---|---|---|
| Sweet Corn | 6 ears | Husked, silk removed, and cut in half |
| Butter | 1/2 cup (1 stick) | Unsalted and softened to room temperature |
| Garlic Powder | 1 tablespoon | Gives a rich, even flavor without burning |
| Smoked Paprika | 1 teaspoon | Adds a beautiful smoky undertone and color |
| Fine Sea Salt | 1 teaspoon | Adjust to your taste preferences |
| Black Pepper | 1/2 teaspoon | Freshly cracked for a nice little bite |
| Parmesan Cheese | 1/4 cup | Finely grated to sprinkle on hot out of the oven |
| Lemon Wedges | 1 whole lemon | Squeezed fresh over the hot corn right before serving |
| Fresh Cilantro or Parsley | 2 tablespoons | Finely chopped for a pop of color and freshness |
Step-by-Step Instructions
Now, let us walk through the process together. It is incredibly simple, but paying attention to a few small details will elevate this dish from a basic side to the star of the table.
Step 1: Prep the Oven and the Sheet Pan
First, preheat your oven to 400 degrees Fahrenheit. You want the oven to be completely preheated before the corn goes in so that the butter begins roasting the corn immediately rather than slowly melting off.
Line a large, rimmed baking sheet with a heavy-duty sheet of aluminum foil. Make sure the foil goes up the sides of the pan slightly. This will catch any butter that drips off during cooking, making your cleanup incredibly easy.
Step 2: Clean and Cut the Corn
Remove the husks and all of the sticky silk from your corn. A quick way to get rid of stubborn silk is to run a clean, damp paper towel down the ear of corn from top to bottom. The silks will cling to the paper towel and pull right off.
Once your corn is clean, it is time to cut them in half. Cutting round, rolling objects can be a kitchen hazard if you are not careful. To do this safely, cut a thin slice off the flat stalk end of the corn first to create a stable base. Stand the corn upright on its flat end on your cutting board.
Place your chef's knife directly across the center of the cob, then push down firmly. If the cob is tough, you can carefully tap the top spine of your knife with the heel of your hand or a meat mallet to help guide it through. Cutting them into smaller halves makes them much easier to handle, coat, and eat.
Step 3: Make the Seasoned Butter Paste
In a small mixing bowl, combine your softened butter, garlic powder, smoked paprika, salt, and black pepper. Use a fork or a small spatula to mash everything together until it forms a smooth, fragrant paste.
Using softened butter instead of melted butter is one of the biggest keys to success here. If you use melted butter, it will instantly run off the sweet corn and pool on the bottom of your baking sheet. A softened butter paste acts like a spackling paste, clinging to every nook and cranny between the sweet kernels, ensuring that the flavor stays exactly where you want it.
Step 4: Slather and Arrange the Corn
Place your cut corn halves onto your prepared, foil-lined baking sheet. Using a pastry brush or clean hands, coat each piece of corn generously with the seasoned butter paste. Make sure you cover all sides of the corn.
Once coated, arrange the corn in a single layer on the baking sheet. Leave a little bit of space between each piece. If you crowd them too closely together, they will steam instead of roast, and you will miss out on those delicious browned, caramelized edges.
Step 5: Roast to Perfection
Slide the baking pan into your preheated oven and bake for about 20 to 25 minutes. At the halfway mark, around 12 minutes, use a pair of tongs to carefully turn each piece of corn over. This ensures that all sides get equal exposure to the hot pan and cook evenly.
You will know the corn is done when the kernels look plump, slightly translucent, and you see beautiful golden-brown patches developing on the tips of the kernels.
Step 6: The Secret Broiler Step
Once the corn is tender, turn your oven broiler to high. Keep a very close eye on the oven during this step because broilers can burn food in a matter of seconds.
Broil the corn for about 2 to 3 minutes, just until you get some deep brown and black charred spots on the top edges of the kernels. This mimics the flavor of grilled corn and adds an incredible smoky complexity to the dish.
Step 7: Finish and Serve
Carefully remove the baking sheet from the oven. Immediately, while the corn is still sizzling hot, sprinkle your finely grated Parmesan cheese over the top. The residual heat will melt the cheese into the seasoned butter, creating a savory crust.
Squeeze a fresh lemon wedge over the entire tray of corn. The bright acidity of the fresh lemon juice cuts through the rich, heavy butter and garlic, balancing the flavors beautifully. Finish with a sprinkle of fresh chopped parsley or cilantro, and serve immediately.
Critical Mistakes I Made (So You Do Not Have To)
I have made this dish dozens of times, and along the way, I made a few errors that taught me valuable lessons.
My first major mistake was using fresh minced garlic instead of garlic powder. I love fresh garlic, so I figured it would make the dish even better. However, fresh garlic burns very easily at high roasting temperatures.
After 20 minutes in a 400-degree oven, the minced garlic on top of the corn turned into bitter, black charcoal flakes. It ruined the entire batch. Garlic powder, on the other hand, distributes evenly, blends seamlessly into the butter, and roasts beautifully without burning.
Another mistake I made early on was wrapping the corn completely in aluminum foil packets. While this does make the corn incredibly tender, it traps all the moisture inside. The corn essentially steams in its own juices, meaning you get zero caramelization, zero browning, and zero crispy edges. For the best flavor, keep the foil on the bottom of the pan only, leaving the top of the corn completely exposed to the hot circulating air of the oven.
Finally, do not skimp on the salt. Corn is naturally very sweet, and it requires a decent amount of salt to balance that sweetness and bring out the savory notes of the garlic butter. If your finished corn tastes a little flat or too sweet, a tiny extra pinch of flaky sea salt right before serving will usually fix it instantly.
Delicious Flavor Variations to Try
Once you master the basic garlic butter method, you can start experimenting with different flavor profiles. Here are a few of my favorite variations that I make regularly for my family.
The Spicy Cajun Kick
If you love bold, spicy flavors, swap out the garlic powder and smoked paprika for a tablespoon of your favorite Cajun seasoning blend. Reduce the salt in the recipe, as most pre-made Cajun seasonings already contain a lot of salt.
Combine the Cajun seasoning with the softened butter, and roast as directed. The result is a spicy, savory corn that pairs incredibly well with boiled seafood, fried chicken, or a backyard shrimp boil.
Mexican Street Corn (Elote Style)
To make a simplified oven version of classic Mexican street corn, roast your corn with simple salted butter. Once it comes out of the oven with those beautiful charred spots, brush it with a thin layer of Mexican crema or mayonnaise.
Generously sprinkle the corn with crumbled Cotija cheese or crumbled feta, and dust with chili powder or Tajin seasoning. Finish with a heavy squeeze of fresh lime juice and lots of fresh chopped cilantro. It is incredibly rich, tangy, and absolutely addictive.
Sweet Honey Herb Butter
If you prefer to lean into the natural sweetness of the corn, try a honey herb version. Mix your softened butter with a tablespoon of honey, a teaspoon of fresh chopped thyme, and a teaspoon of fresh chopped rosemary.
Roast the corn as directed, and finish with a sprinkle of flaky sea salt. The combination of sweet honey, earthy herbs, and salty finish is sophisticated and perfect for autumn dinners.
How to Store and Reheat Leftovers
If you happen to have any leftover corn, do not let it go to waste. Store the cooled corn halves in an airtight container in the refrigerator for up to 4 days.
To reheat them, avoid the microwave if you can. Microwaving sweet corn can make the kernels tough and rubbery. Instead, place them back on a baking sheet, cover them loosely with a piece of foil to keep them from drying out, and heat them in a 350-degree oven for about 10 minutes until warmed through.
Alternatively, you can slice the leftover roasted kernels off the cob and use them to elevate other dishes. I love tossing the cold roasted kernels into a summer pasta salad, mixing them into a black bean salsa, or stirring them into a warm bowl of chicken chowder. The roasted garlic butter flavor carries over beautifully into whatever dish you add them to.
Final Thoughts
There is something incredibly comforting about a platter of warm, buttery corn on the cob. It brings a sense of summer and joy to any meal, whether you are hosting a festive backyard barbecue or just trying to get a quick weekday dinner on the table.
This oven-roasted garlic butter method has completely transformed how I cook this classic vegetable, and I hope it does the same for you. It is simple, mess-free, and delivers a level of flavor that boiling simply cannot touch. Give this recipe a try, experiment with your favorite seasonings, and enjoy the delicious results.