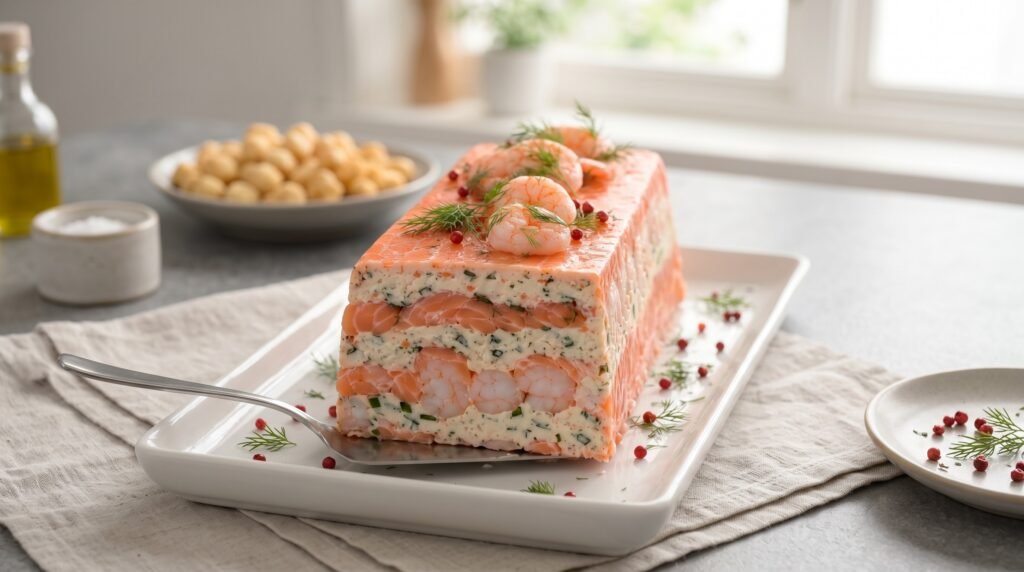

The first time I ever attempted to host a formal dinner party, I made a massive mistake. I tried to cook a complex, hot main course that required me to stand over a searing pan while my guests sat in the living room, awkwardly listening to the sound of me smoke-logging my kitchen. I was sweaty, stressed, and completely absent from my own party. That night, I made a vow to myself: from that moment on, my star dishes would be cold, elegant, and fully prepared at least twenty-four hours before my guests ever knocked on my front door.
That vow is what led me to the art of the cold seafood terrine. If you have ever wanted to make an entrance at a dinner table, this is the dish that does it. The sheer visual impact of a sliced, layered salmon and shrimp terrine is unmatched. It looks like something pulled straight from the window of an upscale Parisian delicatessen, with its vibrant pink ribbons of smoked salmon, plump, perfectly nested shrimp, and creamy, herb-flecked mousse.
Yet, despite its intimidating, sculptural appearance, it is surprisingly approachable once you understand the basic mechanics of how a cold terrine is structured. You do not need a culinary degree, nor do you need to bake anything in a scary water bath. This is a no-bake, cold-set terrine that relies on simple, smart prep work and a little bit of patience while it sets in the fridge. Let me walk you through my personal, tried-and-true approach to crafting this spectacular centerpiece, sharing the hard-won lessons I have learned along the way.
Understanding the Anatomy of a Great Seafood Terrine
Before we pick up a knife, we need to understand what makes a terrine successful. A great terrine is a study in contrasting textures. If it is too soft, it will collapse into an unappealing pile of cream cheese when sliced. If it is too firm, it will feel rubbery and processed, like school cafeteria lunchmeat.
The goal is to achieve a velvety, melt-in-the-mouth texture for the cream base, interspersed with the dense, meaty bite of poached salmon and the snappy, firm crunch of fresh shrimp. Wrapping the entire creation in thin sheets of buttery smoked salmon serves two purposes: it seals in the moisture so the filling does not dry out in the fridge, and it acts as a structural skin that makes slicing incredibly clean and easy.
To make this dish, you will need a standard metal or ceramic loaf pan. Personally, I highly recommend using a thin metal loaf pan rather than a thick ceramic or stoneware one. Metal conducts the cold of your refrigerator much faster, which helps the gelatin set rapidly and evenly.
The Ingredients You Will Need
Sourcing ingredients for a dish like this is where the magic happens. Because there is no heavy cooking or roasting to mask subpar ingredients, the quality of your seafood will make or break the final flavor. Do not buy pre-frozen, pre-cooked shrimp if you can avoid it; they tend to be watery, tough, and lacking in sweet, natural flavor. Go to your local fishmonger and get raw, wild-caught shrimp.
| Ingredient | Amount | Notes |
|---|---|---|
| Smoked salmon | 12 to 14 ounces | Sliced thin, cold-smoked, and flexible |
| Fresh raw shrimp | 1 pound | Medium-sized, peeled, and deveined |
| Fresh salmon fillet | 8 ounces | Skinless, pin-bones removed |
| Cream cheese | 12 ounces | Full-fat, completely softened to room temp |
| Crème fraîche | 1/2 cup | Or sour cream for a pleasant tang |
| Heavy whipping cream | 1/2 cup | Whipped to soft peaks for lightness |
| Gelatin powder | 1.5 tablespoons | Unflavored, high-quality gelatin |
| Lemon juice | 2 tablespoons | Freshly squeezed |
| Lemon zest | 1 teaspoon | Finely grated on a microplane |
| Fresh dill | 1/2 cup | Finely chopped, extra sprigs for decorating |
| Fresh chives | 1/4 cup | Finely minced |
| Pink peppercorns | 2 tablespoons | For garnish and subtle floral heat |
| Sea salt | To taste | Go easy, as smoked salmon is very salty |
| White pepper | 1/4 teaspoon | Ground finely to keep the mousse pristine |
The Golden Rules of Gelatin: My Biggest Kitchen Lessons
If there is one ingredient that strikes fear into the hearts of home cooks, it is gelatin. I used to be terrified of it. My early attempts at using gelatin resulted in either lumpy, stringy messes or terrines that could double as bouncy balls.
Here is what I learned through trial and error: you must bloom your gelatin properly, and you must never, ever add hot gelatin directly to ice-cold ingredients.
To bloom gelatin, you sprinkle the powder over a small amount of cold liquid (in this case, we use a mix of lemon juice and a splash of water) and let it sit undisturbed for about five minutes. It will absorb the liquid and swell, turning into a thick, spongy paste. Once bloomed, you gently heat it over low heat (or in the microwave for ten seconds at a time) just until it liquifies. It should be warm and clear, not boiling hot.
If you pour this warm liquid gelatin directly into cold cream cheese straight from the fridge, the gelatin will instantly freeze upon contact. It will form tough, rubbery little threads throughout your filling, completely ruining the texture. To prevent this, make sure your cream cheese and crème fraîche are at true room temperature. Before adding the gelatin to the main batch of cream, mix a couple of spoonfuls of the room-temperature cream cheese into the warm gelatin first. This tempers the mixture, raising the temperature of the gelatin and lowering the temperature of the cream so they marry together seamlessly without any clumping.
Step-by-Step Guide to Crafting the Terrine
Now that we have our ingredients and our game plan, let us dive into the actual assembly process. Give yourself plenty of counter space and clear out a flat, level spot in your refrigerator before you begin.
Step 1: Prepping the Mold (The Water Droplet Trick)
Grab your loaf pan. To make sure you can get your terrine out of the pan easily once it is set, you need to line it with plastic wrap. But plastic wrap loves to cling to itself and slide around on dry metal, which can create ugly, deep wrinkles in your finished terrine.
Here is my secret food-stylist trick: lightly splash or spray the inside of your empty loaf pan with a few drops of water. Do not dry it. Now, lay a large sheet of plastic wrap over the pan and press it down. The water droplets act like a temporary adhesive, allowing the plastic wrap to cling smoothly to the flat surfaces and corners of the pan with zero air bubbles.
Make sure you leave at least three to four inches of plastic wrap hanging over the long sides of the pan. We will use these overhanging flaps to fold over the top of the terrine later, compressing it as it sets.
Step 2: Lining the Pan with Smoked Salmon
Open your packages of smoked salmon. Inspect the slices; you want to use the widest, most even slices for the outer wrap.
Carefully drape the smoked salmon slices inside the lined loaf pan. Start from the bottom, pressing the salmon gently into the corners, and let the slices run up the sides of the pan, leaving an inch or two hanging over the edges. Overlap each slice by about a quarter of an inch. This overlap is crucial; as the terrine sets and is eventually sliced, those overlapping edges prevent the creamy filling from squeezing out between the seams.
Keep a few smaller, less perfect scraps of smoked salmon to the side. We will use those to patch any small holes or to cover the very bottom of the terrine (which will eventually become the base when we flip it over). Once your pan is fully lined with a continuous, beautiful pink coat of smoked salmon, set it in the fridge to keep cold while you work on the fillings.
Step 3: Gently Poaching the Salmon and Shrimp
We want our internal seafood layers to be incredibly tender. The best way to achieve this is a very gentle, low-temperature poach.
Fill a medium saucepan with water. To make it flavorful, add a pinch of salt, a slice of lemon, a few whole peppercorns, and maybe a sprig of dill. Bring the water to a very gentle simmer, then turn the heat down to low. You do not want boiling water, which will violently tear the delicate fish apart and make the shrimp rubbery.
Add the fresh salmon fillet to the water first. Poach it gently for about six to eight minutes, depending on the thickness, just until it is barely cooked through and flakes easily. Remove it with a slotted spatula and place it on a plate lined with paper towels.
Next, drop your raw, peeled shrimp into the same poaching liquid. Cook them for only two to three minutes. As soon as they turn pink and curl into loose C-shapes, pull them out immediately. Overcooked shrimp turn tough and stringy, which ruins the bite of the terrine. Transfer them to paper towels alongside the salmon.
Let all the poached seafood cool down completely to room temperature. Once the salmon is cool, gently flake it into bite-sized chunks using your fingers, discarding any dark grey flesh from the underside of the fish, which can taste overly oily and fishy. Pat the shrimp completely dry with paper towels. Any excess surface moisture on the shrimp will create slippery wet pockets inside your terrine, causing the layers to slide apart when sliced.
Step 4: Making the Herb-Cream Binder
In a large mixing bowl, combine your fully softened cream cheese and crème fraîche. Use a hand mixer or a sturdy silicone spatula to beat them together until absolutely smooth, creamy, and free of lumps.
Stir in the finely chopped dill, minced chives, lemon zest, white pepper, and a tiny pinch of salt. Remember that smoked salmon is naturally very salty, so keep your added salt minimal here. Taste the mixture; it should be bright, herbaceous, and creamy.
In a separate bowl, whip your heavy cream until it reaches soft peaks. This whipped cream is our secret weapon; it injects air into the dense cream cheese, giving the final terrine a luxurious, mousse-like texture that feels light on the tongue.
Now, prepare your gelatin. Pour two tablespoons of lemon juice and one tablespoon of cold water into a small, heatproof cup. Sprinkle the gelatin powder over the top and let it bloom for five minutes. Once it looks like thick applesauce, microwave it for ten to fifteen seconds until it melt into a clear, runny liquid.
Take two generous tablespoons of your cream cheese mixture and stir them directly into the warm gelatin cup. Once blended, pour this tempered gelatin mixture back into the main bowl of cream cheese and stir vigorously to combine. Finally, gently fold in your whipped cream and the flaked poached salmon chunks, using a delicate hand so you do not completely smash the salmon flakes into paste.
Step 5: The Geometry of Layering
This is the most satisfying part of the entire process. Pull your lined loaf pan out of the fridge.
Spread a layer of your herb-cream mixture (about a third of the total batch) into the bottom of the pan. Use the back of a spoon or an offset spatula to smooth it out, pressing it gently into the bottom corners to ensure there are no trapped air pockets.
Now, arrange a neat row of your poached, dried shrimp directly on top of the cream layer. To get a beautiful cross-section when sliced, place the shrimp side-by-side in a tight, interlocking pattern running down the length of the pan. I like to alternate the direction of the shrimp (one tail pointing left, the next pointing right) so they nestle together snugly.
Spoon another third of the cream mixture over the top of the shrimp, filling in any gaps between them. Smooth the surface.
If you have any leftover smoked salmon scraps or flaked fresh salmon, create a thin, solid pink layer here. Then, add your final layer of poached shrimp, pressing them down gently into the cream.
Top with the remaining herb-cream mixture, smoothing it out so it is perfectly level with the top edge of your loaf pan.
Step 6: Sealing and Chilling
Take the overhanging flaps of smoked salmon from the sides of the pan and fold them snugly over the top of the cream filling, creating a neat, completely enclosed parcel. If you have any gaps where the filling is showing through, patch them with any remaining pieces of smoked salmon.
Finally, pull up the overhanging plastic wrap and fold it over the top, wrapping the terrine tightly.
To ensure the terrine sets with a perfectly flat, dense structure, I like to place a light weight on top. You can cut a piece of cardboard to the exact dimensions of the top of your loaf pan, wrap it in aluminum foil, place it on top of the wrapped terrine, and weigh it down with two small cans of food (like tomato paste or tuna). This gentle, even pressure forces out any microscopic air pockets and bonds the layers together.
Place the weighted terrine in the refrigerator for at least eight hours, though overnight is much better. Do not try to rush this process. The gelatin needs time to form a solid, structural matrix, and the flavors need time to mingle and mature.
How to Get That Picture-Perfect Presentation
When the big day arrives and your guests are gathered, it is time to unveil your masterpiece. Do not unmold the terrine until about thirty minutes before you plan to serve it. It handles much better when it is ice-cold from the fridge.
To unmold, fold back the top layers of plastic wrap. Place a flat, rectangular serving platter upside down over the top of the loaf pan. Holding both the pan and the platter securely together, quickly and confidently flip them both over.
Gently lift the loaf pan straight up. Thanks to our plastic wrap, the terrine should slide out effortlessly. Carefully peel away the plastic wrap, revealing the stunning, glossy, pink exterior of the smoked salmon wrapper.
To recreate the gorgeous look shown in my photograph, garnish the top of the terrine with a line of plump, reserved poached shrimp, fresh, feathery sprigs of dill, and a scatter of bright pink peppercorns. The pink peppercorns are not just for show; they offer a mild, sweet, almost fruity heat that cuts through the rich creaminess of the salmon perfectly.
Crucial Mistakes I Made So You Do Not Have To
I have had my fair share of kitchen disasters with this recipe, and I want to save you from experiencing them. Here are the most common pitfalls and how to avoid them:
- Cutting with a dull, dry knife: If you try to cut this terrine with a regular kitchen knife, you will squash it, dragging the cream filling across the clean layers of salmon. To get those beautiful, crisp, distinct layers visible in my photos, you must use a very sharp, thin-bladed utility or carving knife. Dip the blade into a jug of hot water, wipe it completely dry with a clean towel, and make your slice in one smooth, confident stroke. Repeat the dip-and-wipe process for every single slice. It takes an extra minute, but the results are pristine.
- Skipping the paper towels: As mentioned earlier, moisture is the enemy of structure. Poached salmon and boiled shrimp carry a lot of water on their surfaces. If you do not dry them meticulously, that water will pool inside the terrine as it sits, creating wet barriers that prevent the cream cheese from sticking to the seafood. Your slices will fall apart the second they hit the plate.
- Using low-fat dairy: Please do not try to make a healthy, low-fat version of this dish using light cream cheese or low-fat sour cream. Low-fat dairy products contain a much higher percentage of water and chemical stabilizers. They do not set firmly, and they lack the rich, velvety mouthfeel required to balance the salty, smoky fish. Go for the good stuff; your guests will thank you.
- Adding too much gelatin: If you are worried about your terrine setting, your instinct might be to toss in an extra packet of gelatin. Resist this urge. Too much gelatin will turn your creamy herb mousse into a rubbery, bouncy block of savory jello. Stick to the measurements provided; the natural fat in the cream cheese and heavy cream works alongside the gelatin to create a firm yet spreadable texture.
Elevating the Experience: Pairings and Sides
While this terrine is stunning enough to stand alone, serving it with the right accompaniments elevates it from a simple appetizer to an unforgettable dining experience.
Because the terrine is incredibly rich and creamy, you want to serve it with something that offers a sharp, crunchy contrast. I love serving thick slices of toasted pumpernickel or rye bread, rustic sourdough crisps, or delicate endive leaves that guests can use to scoop up the creamy layers.
On the side, a simple salad of shaved fennel, celery, and radishes tossed in a light, lemony vinaigrette provides a clean, watery crunch that cleanses the palate between bites.
For beverages, look for high-acid, crisp drinks that can cut through the luxurious fat of the salmon and cream. A dry Champagne, a mineral-driven Chablis, or a bright, herbaceous Sauvignon Blanc are perfect matches. If you prefer non-alcoholic options, a sparkling apple cider or a cucumber-mint tonic water works beautifully.
Simple Variations for the Creative Home Cook
Once you have mastered the basic technique of layering this terrine, you can start experimenting with different flavor profiles to match the season or your personal preferences:
- The Avocado-Lime Twist: Replace the dill and chives with fresh cilantro, lime zest, and a thin layer of perfectly ripe, sliced avocado right in the center. The bright green of the avocado looks stunning against the pink salmon.
- The Luxury Lobster Upgrade: For a truly decadent holiday version, swap out the shrimp for chunks of sweet, poached lobster claw meat and add a splash of cognac or dry sherry to the cream cheese base.
- The Cucumber Crusted Terrine: If you want an alternative to the smoked salmon wrapper, you can line your mold with paper-thin slices of English cucumber overlapped like fish scales. This gives the terrine a vibrant green, ultra-fresh exterior that is perfect for hot summer luncheons.
Making a layered seafood terrine is a labor of love, but the payoff is unmatched. It is a dish that shows your guests you care enough to spend time crafting something beautiful for them, while secretly allowing you to relax, pour yourself a glass of wine, and enjoy your own party without ever having to touch a hot stove. Give it a try for your next gathering, take your time with the prep, and watch the looks of absolute awe around your dinner table when you bring out the first slice.