
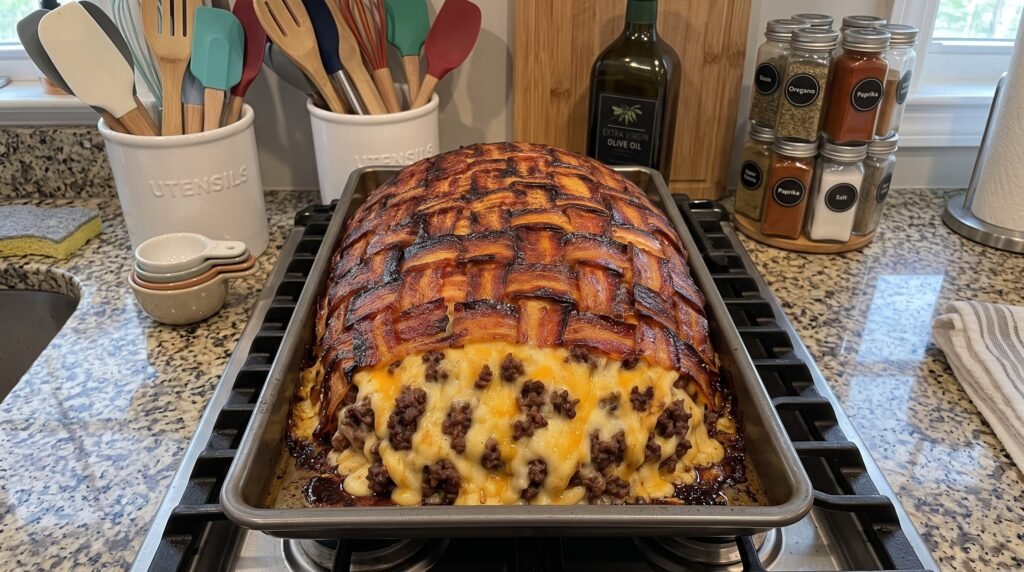

There is a specific kind of magic that happens in a kitchen when you decide to throw caution, calorie counts, and culinary tradition completely out the window. It usually starts on a chilly Sunday afternoon when the wind is rattling the windowpanes, the television is murmuring some sports game in the background, and your stomach demands something more than a simple sandwich or a standard bowl of soup.
A few years ago, I found myself in exactly this spot. I had a crowd of hungry friends coming over, and I wanted to make something that would cause a genuine sensation when placed on the dining table. I wanted a dish that would make people stop talking, pull out their phones, and stare in absolute disbelief.
My mind immediately went to the legendary bacon explosion, a dish that took the internet by storm years ago. But I wanted to take it a step further. What if I combined three of the greatest comfort foods known to humanity: a perfectly seasoned meatloaf, a rich and creamy macaroni and cheese, and a flawless, crispy weave of smoked bacon?
The first time I tried to make this beast, it was an absolute catastrophe. I used thick-cut bacon, which did not crisp up at the same rate the meat cooked. I stuffed it with a runny, box-mix mac and cheese that immediately boiled over inside the meat, causing the entire loaf to rupture like an angry volcano. Halfway through the bake, a river of processed orange cheese and rendered grease escaped the meat barrier, dripping onto the bottom of my oven and triggering my smoke alarms. My guests arrived to a house smelling of burnt cheese and despair, and we ended up ordering pizza.
But I am not someone who gives up easily. I spent the next two winters tweaking the ratios, testing different bacon thicknesses, adjusting the cheese sauce viscosity, and mastering the structural engineering required to keep this culinary masterpiece intact. Today, I am sharing the ultimate guide to creating a flawless bacon-wrapped, mac-and-cheese-stuffed meatloaf. If you follow these hard-won lessons, you will bypass my kitchen disasters and head straight to comfort food glory.
The Physics of the Bacon Weave
Before we even talk about the meat or the cheese, we have to talk about the outer armor of this dish: the bacon weave. The weave is not just for looks, though it does look spectacular. It serves a vital structural purpose. It acts as a tight, woven net that holds the meatloaf together as the fat renders and the meat contracts. Without a tight weave, your meatloaf will expand, crack, and leak its precious cargo of cheese.
Through trial and error, I learned that bacon selection is critical. Do not buy thick-cut bacon for this recipe. While thick-cut bacon is wonderful for breakfast, it is too stiff to weave tightly, and it takes far too long to render its fat. By the time thick-cut bacon gets crispy on the outside of a meatloaf, the ground beef inside will be overcooked, dry, and gray.
On the flip side, do not buy the cheapest, paper-thin bacon either. Super-thin bacon will stretch, tear, and disintegrate during the assembly and baking process. You want standard, regular-cut bacon. Hickory or applewood smoked varieties add a wonderful backyard barbecue flavor to the final dish.
To construct the weave, you will need a large sheet of parchment paper. Do not attempt to build this directly on your counter or cutting board. The parchment paper is your best friend; it allows you to lift, roll, and manipulate the entire assembly without touching the raw meat or messing up your beautiful weave.
Start by laying out five to six strips of bacon vertically on the parchment paper, side by side, with almost no gaps between them. Next, fold back every other vertical strip (strips one, three, and five) about halfway up. Lay a new strip of bacon horizontally across the unfolded vertical strips. Unfold the bent strips so they lay flat over the new horizontal piece.
Now, fold back the opposite vertical strips (strips two, four, and six). Lay another horizontal strip of bacon down, and unfold the vertical strips back over it. Repeat this process, working your way up and then down, until you have a perfectly woven square of bacon. It should look like a beautiful, rustic checkerboard. Once your weave is complete, gently press down on it with your palms to help the strips adhere to one another, then set it aside while you prepare the meat.
Crafting the Meat Wrapper
The meat layer of this dish needs to be flavorful, tender, and structurally sound. If your meat mixture is too wet, it will slip and slide around inside the bacon weave. If it is too dry, it will crumble when you try to slice it.
When choosing your meat, I highly recommend a blend of eighty percent lean ground chuck and twenty percent ground pork. The ground chuck provides a deep, beefy flavor and excellent structure, while the pork adds moisture, tenderness, and a sweetness that pairs beautifully with the bacon. If you use beef that is too lean, like ninety percent lean sirloin, the meatloaf will turn out dense and dry.
To bind the meat together, we use a classic mixture of fine breadcrumbs, eggs, and a splash of Worcestershire sauce. For seasoning, skip the basic salt and pepper. We want this to taste like a high-end barbecue dish. I like to use a combination of garlic powder, onion powder, smoked paprika, brown sugar, and a tablespoon of my favorite dry barbecue rub.
When mixing your meat, treat it gently. Do not overwork it. Overworking ground meat squeezes out the pockets of air and fat, resulting in a tough, rubbery texture. Use your hands to gently toss and fold the ingredients together just until they are combined.
Once your meat mixture is ready, place it on a separate sheet of parchment paper and pat it out into a uniform rectangle. You want this rectangle to be slightly smaller than your bacon weave, leaving about a one-inch border of bacon all the way around. The meat layer should be about half an inch thick. Keep it even; if one side is thicker than the other, the loaf will cook unevenly, and you will end up with dry edges and an undercooked center.
The Secret to Stuffable Mac and Cheese
Now we come to the star of the show: the macaroni and cheese filling. This is where most people go wrong. If you use a standard mac and cheese recipe that is rich, loose, and saucy, it will liquefy in the oven. The high heat will break the cheese emulsion, leaving you with greasy oil puddling at the bottom of the loaf and dry, sad noodles inside.
To prevent this, we have to make a highly stabilized, extra-thick mac and cheese. We do this by creating a classic roux-based cheese sauce, also known as a Mornay sauce, and keeping the liquid content relatively low.
When boiling your elbow macaroni, cook it for at least two to three minutes less than the package instructions. The pasta should still have a distinct bite to it, a stage past al dente that Italians might call undercooked. Remember, this pasta is going to bake inside a hot meatloaf for over an hour. If you put fully cooked pasta into the loaf, it will absorb the juices from the meat and turn into a mushy, unrecognizable paste.
For the cheese sauce, shred your own cheese from a block. Do not buy pre-shredded cheese in bags. Bagged cheese is coated in potato starch and cellulose to keep the shreds from sticking together. This starch prevents the cheese from melting smoothly and results in a gritty, chalky sauce. I like to use a combination of sharp yellow cheddar for flavor, Monterey Jack for meltability, and a block of cream cheese to add thickness and stability.
To make the stuffing even more incredible, I like to brown a small amount of extra-lean ground beef on the side, season it with a pinch of taco seasoning or barbecue rub, and fold those cooked meat clumps directly into the finished mac and cheese along with a handful of extra shredded cheddar. This creates a gorgeous, variegated filling of gooey cheese, hearty pasta, and savory beef clumps that look stunning when you slice into the finished loaf.
Once your mac and cheese is assembled, let it cool down significantly before stuffing the meat. If you put hot mac and cheese onto raw ground meat, it will start to melt the fat in the meat, making the assembly process incredibly greasy and difficult. I like to spread my mac and cheese out on a plate and pop it into the fridge for fifteen minutes to firm up before assembly.
The Recipe Ingredients
Here is exactly what you will need to recreate this showstopping dish in your own kitchen.
| Ingredient | Amount | Notes |
|---|---|---|
| Standard-cut bacon | 16 to 18 slices | Avoid thick-cut or paper-thin varieties |
| Ground chuck (80/20) | 1.5 pounds | Provides flavor and structure |
| Ground pork | 0.5 pounds | Adds moisture and tenderness |
| Plain breadcrumbs | 0.5 cups | Acts as the binder |
| Large eggs | 2 units | Whisked lightly |
| Worcestershire sauce | 2 tablespoons | Adds a deep savory umami flavor |
| Barbecue rub | 2 tablespoons | Use your favorite store-bought or homemade rub |
| Garlic powder | 1 teaspoon | For the meat seasonings |
| Onion powder | 1 teaspoon | For the meat seasonings |
| Elbow macaroni | 8 ounces | Cooked extremely al dente |
| Unsalted butter | 2 tablespoons | For the cheese sauce base |
| All-purpose flour | 2 tablespoons | To create the roux |
| Whole milk | 1 cup | Warm milk prevents clumping |
| Sharp cheddar cheese | 8 ounces | Freshly grated from a block |
| Monterey Jack cheese | 4 ounces | Freshly grated |
| Cream cheese | 3 ounces | Softened to room temperature |
| Extra ground beef clumps | 0.5 cups | Cooked and seasoned, optional but recommended |
| Sweet barbecue sauce | 1 cup | For the final glaze |
Step-by-Step Assembly and Cooking Guide
Now that we have all of our components ready, it is time for the assembly. This is the part that requires a calm mind, a steady hand, and a little bit of confidence.
First, preheat your oven to 375 degrees Fahrenheit. While the oven is heating, prepare a large, rimmed baking sheet by lining it with aluminum foil and placing a wire cooling rack inside it. Elevating the meatloaf on a wire rack is a crucial step. It allows the hot air to circulate completely around the loaf, ensuring that the bacon on the bottom gets just as crispy as the bacon on the top. It also allows the rendering fat to drip away from the meat, preventing the loaf from boiling in its own grease.
Lay your prepared bacon weave, still on its parchment paper, on your clean work surface.
Gently transfer your prepared meatloaf rectangle and lay it directly on top of the bacon weave. Remember to leave that one-inch border of bacon showing around the edges of the meat.
Take your chilled, thickened mac and cheese mixture and shape it into a tight log or cylinder with your hands. Place this cheese log right down the center of your meat rectangle, leaving about an inch and a half of meat exposed on the top and bottom ends.
Now comes the roll. Grab the edge of the parchment paper closest to you and slowly lift it, using the paper to fold the meat and bacon over the mac and cheese filling. Gently peel the paper back as you roll, pressing down slightly to ensure the meat wraps tightly around the filling. Repeat this process from the other side until the two edges of the meat meet in the center, encasing the mac and cheese completely.
Use your fingers to pinch the seam of the meat closed. It is incredibly important to seal the ends of the loaf as well. Fold the exposed flaps of meat over the exposed macaroni filling at each end, patting and pinching them until you have a solid, seamless log of meat. Any tiny gap or crack will become an escape hatch for melting cheese later on.
Once the meat is sealed, wrap the remaining flaps of the bacon weave tightly around the meat log. You want the bacon to hug the meat as snugly as possible.
To transfer the loaf to your prepared wire rack, place the rack directly on top of your raw bacon-wrapped log. Grabbing both the parchment paper underneath and the wire rack, swiftly and confidently flip the entire thing over. Peel away the parchment paper. Your meatloaf should now be sitting seam-side down on the wire rack, with the gorgeous, unbroken bacon weave facing upward.
Place the baking sheet into the preheated oven on the middle rack. Bake the meatloaf for approximately one hour and fifteen minutes.
While the meatloaf is baking, prepare your glaze. In a small bowl, combine your favorite sweet barbecue sauce with a splash of apple cider vinegar or maple syrup if you like a bit of extra tang and sweetness.
At the one-hour mark, check the internal temperature of the meatloaf using an instant-read digital meat thermometer inserted into the meat portion, avoiding the cheesy center. You are looking for an internal temperature of 155 degrees Fahrenheit.
Once the meat reaches this temperature, use a pastry brush to paint a generous layer of the barbecue glaze all over the bacon weave. Pop the meatloaf back into the oven for another ten to fifteen minutes. The high heat will caramelize the sugars in the barbecue sauce, turning the bacon into a sticky, sweet, smoky, and incredibly crispy crust.
The Absolute Rules of Resting
When the timer finally goes off and you pull this magnificent creation out of the oven, your kitchen will smell like a world-class barbecue joint. Your friends will likely be hovering around the counter, plates in hand, begging you to cut into it immediately.
Do not do it.
If you cut into this meatloaf right out of the oven, you will ruin hours of hard work in a matter of seconds. Inside the loaf, the cheese sauce is still boiling hot and highly liquid. The proteins in the ground meat are tight and tense from the heat, holding onto hot juices under high pressure. If you slice it now, the meat will release all its moisture, and the melted cheese will pour out onto your cutting board like lava, leaving you with an empty casing of dry meat and soggy noodles.
You must let the meatloaf rest on your counter, undisturbed, for at least fifteen to twenty minutes.
As the meatloaf rests, several magical things happen. The meat fibers relax, allowing them to reabsorb the delicious juices. The cheese sauce cools down slightly, transitioning from a runny liquid back into a thick, velvety, sliceable cream.
Use this time to gather your side dishes, pour some drinks, and build up the anticipation. When the resting time is up, use a very sharp, long serrated bread knife to slice the loaf. A serrated knife is essential here; it will saw cleanly through the crispy bacon weave without squishing the tender meat and soft filling underneath. Cut the loaf into thick slices, about an inch to an inch and a half wide, to ensure each slice holds its beautiful, layered structure on the plate.
Common Pitfalls to Avoid
Even with a detailed recipe, there are a few classic mistakes that can turn your culinary triumph into a soggy mess. Keep these warnings in mind as you cook.
First, do not skip the rimmed baking sheet. A standard flat cookie sheet has shallow sides that cannot handle the amount of fat that renders out of eighteen slices of bacon and two pounds of ground meat. You need a sheet pan with sides at least one inch deep to prevent grease from spilling onto your burner flame and causing an oven fire.
Second, resist the urge to use foil instead of a wire rack. If you place the meatloaf directly on a foil-lined sheet, the bottom half of the loaf will sit in a pool of rendered fat throughout the entire cook time. The bacon on the bottom will become soggy, pale, and greasy, completely ruining the texture of the dish.
Third, watch your glaze timing. Do not apply the barbecue glaze at the very beginning of the cook. Barbecue sauces contain high amounts of sugar, whether from molasses, honey, or high-fructose corn syrup. If sugar sits in a hot oven for over an hour, it will burn to a bitter, black ash long before the meat is cooked through. Only apply the glaze during the last ten to fifteen minutes of baking.
Finally, do not overstuff the loaf. It is incredibly tempting to pile as much macaroni and cheese as humanly possible onto that meat rectangle. But if the filling is too large, you will not be able to wrap the meat completely around it. A thin wall of meat will easily crack during baking, leading to a massive cheese blowout. Keep the filling to a reasonable, manageable cylinder.
What to Serve with This Beast
Because this bacon-weave meatloaf is incredibly rich, savory, and heavy, you want to pair it with side dishes that offer some contrast. Heavy starch-on-starch pairings like mashed potatoes or french fries will leave your guests feeling sluggish and overly full.
Instead, look for sides that offer brightness, acidity, and crisp textures. A classic, tangy coleslaw made with a vinegar-based dressing rather than a heavy mayonnaise base is the perfect partner. The sharp vinegar cuts through the richness of the bacon and cheese, cleansing your palate between bites.
A simple green salad tossed with a bright lemon vinaigrette works wonders. You could also roast some fresh green beans or asparagus spears with a squeeze of fresh lemon juice and a sprinkle of sea salt. The charred, green flavors provide a lovely balance to the smoky barbecue profile of the meatloaf.
For drinks, a cold, hoppy India Pale Ale (IPA) is a fantastic pairing, as the citrusy hops slice right through the fat of the dish. If you prefer wine, a bold, jammy Zinfandel or a smoky Syrah pairs beautifully with the rich beef and caramelized barbecue glaze. For non-alcoholic options, an ice-cold sweet tea with plenty of lemon wedges is a southern classic that fits the mood perfectly.
Leftovers and Reheating Magic
If you somehow find yourself with leftovers, you are in luck. This meatloaf actually tastes incredible the next day, as the flavors have had time to meld and deepen in the refrigerator.
Do not, under any circumstances, reheat this meatloaf in the microwave. The microwave will turn the bacon soggy and rubbery, and it will cause the cheese sauce to split, leaving you with greasy noodles and dry beef.
Instead, reheat your slices in the oven or a skillet. To reheat in the oven, place the slices on a foil-lined baking sheet, cover them loosely with foil to prevent the meat from drying out, and bake at 325 degrees Fahrenheit for about fifteen minutes until warmed through. For the last two minutes, remove the foil to let the bacon crisp up again.
My absolute favorite way to enjoy leftovers is to make bacon-weave meatloaf sliders. Heat a slice of the leftover loaf in a cast-iron skillet over medium heat, searing both cut sides until they develop a gorgeous, crispy crust. Place the seared slice onto a toasted brioche slider bun, top it with an extra drizzle of warm barbecue sauce and a spoonful of cold coleslaw, and enjoy the best sandwich of your life.


