
We have all been there. You are sitting at a coastal taco stand, the salt air is blowing through your hair, and you take a bite of a seafood wrap that completely redefines your understanding of street food. It is hot, cool, crunchy, creamy, spicy, and tangy all at once. For years, I tried to recreate that exact magic in my own kitchen, only to end up with soggy tortillas, rubbery shrimp, or a bland sauce that tasted more like plain mayonnaise than the vibrant crema of my dreams.
After dozens of soggy dinners and countless adjustments to my spice blends and cooking techniques, I finally cracked the code. The secret to a legendary shrimp burrito is not just about seasoning the seafood; it is about managing textures and temperatures. You need a structural barrier against sogginess, a perfectly balanced sauce, and a final sear in a hot pan to lock everything together.
Today, I am sharing my absolute go-to recipe for crispy grilled shrimp burritos. I will walk you through the exact steps, the common pitfalls to avoid, and the kitchen secrets that will make your homemade wraps taste like they came straight out of a high-end Baja beach shack. Grab your skillet, prep your appetite, and let us get cooking.
The Secret to Perfect Shrimp Texture
Before we even look at a flour tortilla, we need to talk about the star of the show: the shrimp. The biggest mistake people make when cooking shrimp for burritos is letting them get watery. If your shrimp release too much liquid in the pan, they will steam instead of sear. This leaves you with a rubbery texture and a puddle of juice that will instantly compromise your tortilla.
To avoid this, always start by buying the right shrimp. I prefer wild-caught, raw shrimp in the 21 to 25 count per pound range. This size is large enough to stay juicy during a high-heat sear, but small enough that they fit comfortably inside a burrito fold without needing to be chopped into tiny, unrecognizable pieces.
If you are using frozen shrimp, thaw them completely in the refrigerator overnight. Never run them under warm water, as this begins to cook the delicate outer flesh and ruins their texture. Once thawed, peel and devein them, and then perform the most critical step of all: pat them bone-dry with paper towels. Press down firmly to squeeze out any lingering surface moisture. When the shrimp are dry, the seasoning sticks better, and they develop that gorgeous, caramelized outer crust the second they hit the hot pan.
The Crisp Factor: Why Lettuce is the Enemy
When you build a burrito with hot fillings, any delicate green like romaine or iceberg lettuce is going to wilt within seconds. By the time you sit down to eat, that fresh green crunch has transformed into a warm, wet mush.
The solution is simple: cabbage. A vibrant, quick-pickled cabbage slaw is the ultimate structural element for a hot wrap. Cabbage is tough enough to withstand the heat of the freshly seared shrimp without losing its bite. It provides a sweet, earthy crunch that cuts through the rich, creamy elements of the dish.
For this recipe, I like to use a mix of shredded red and green cabbage along with some julienned carrots. The colors are beautiful, and the variety of textures keeps every bite interesting. To keep things bright, we toss the cabbage with fresh lime juice, a pinch of salt, and plenty of chopped cilantro. This creates a natural acid barrier that balances out the savory spices on the shrimp.
Crafting the Creamy Baja Sauce
A dry burrito is a sad burrito, but we also do not want a dripping mess that falls apart in your hands. The sauce needs to be thick, tangy, and rich enough to cling to the ingredients.
Many restaurants use a straight mayonnaise base for their seafood sauces, which can feel heavy and greasy after a few bites. I prefer a fifty-fifty blend of sour cream and mayonnaise. The sour cream provides a clean, tangy finish, while the mayonnaise gives it that luxurious, velvety mouthfeel.
To take the sauce to the next level, we blend in fresh lime juice, grated garlic, smoked paprika, a pinch of cumin, and a splash of chipotle pepper sauce or sriracha. The result is a gorgeous, pale-orange crema that is smoky, slightly spicy, and incredibly refreshing. Make a double batch of this sauce; you will want to dip your chips, fries, and maybe even your fingers in it.
The Master Ingredients List
Here is everything you will need to create four substantial, restaurant-quality burritos. Make sure to have your ingredients prepped and organized before you turn on the stove, as the actual cooking process moves very quickly.
| Ingredient | Amount | Prep Note |
|---|---|---|
| Raw shrimp (21/25 count) | 1 pound | Peeled, deveined, and dried |
| Avocado oil or vegetable oil | 2 tablespoons | High smoke point for searing |
| Chili powder | 1 teaspoon | For deep, earthy color |
| Smoked paprika | 1 teaspoon | Adds a beautiful smoky undertone |
| Garlic powder | 1/2 teaspoon | Essential for savory depth |
| Ground cumin | 1/2 teaspoon | Gives a warm, classic flavor |
| Onion powder | 1/2 teaspoon | Rounds out the spice blend |
| Cayenne pepper | 1/4 teaspoon | Adjust for your preferred heat level |
| Kosher salt | 1 teaspoon | Divided between shrimp and slaw |
| Shredded red cabbage | 1.5 cups | Sliced very thin |
| Shredded green cabbage | 1.5 cups | Sliced very thin |
| Shredded carrots | 1/2 cup | Sweetness and color contrast |
| Fresh cilantro | 1/2 cup | Finely chopped |
| Lime juice | 3 tablespoons | Freshly squeezed, divided |
| Mayonnaise | 1/2 cup | Use a high-quality brand |
| Sour cream | 1/2 cup | Full fat yields the best texture |
| Chipotle in adobo sauce | 1 teaspoon | Finely minced, or use hot sauce |
| Burrito-size flour tortillas | 4 large | Must be soft and pliable |
| Monterey Jack cheese | 1.5 cups | Shredded, melts beautifully |
| Fresh chives | 2 tablespoons | Finely chopped for garnish |
Step 1: Seasoning the Shrimp
In a medium bowl, combine your dried shrimp with one tablespoon of oil, the chili powder, smoked paprika, garlic powder, cumin, onion powder, cayenne pepper, and half a teaspoon of kosher salt. Use your hands or a spatula to toss everything together until every single shrimp is evenly coated in the fragrant spice paste.
Letting the shrimp sit in this spice rub at room temperature for about ten to fifteen minutes allows the flavors to penetrate the meat. Do not let them marinate too much longer than that if you have added any lime juice to the shrimp themselves, as the acid will begin to cure the shrimp and turn them mushy before they ever hit the pan.
Step 2: Mixing the Slaw and the Sauce
While the shrimp are absorbing those spices, let us build our cold components. In a large bowl, toss together the shredded red cabbage, green cabbage, carrots, chopped cilantro, one tablespoon of fresh lime juice, and a pinch of salt. Massage the cabbage lightly with your fingers for about thirty seconds. This helps soften the fibrous texture slightly while keeping it incredibly crisp. Set this aside.
In a smaller bowl, whisk together the mayonnaise, sour cream, remaining lime juice, minced chipotle in adobo, and a pinch of salt. Taste it as you go. If you like more heat, add a bit more chipotle. If you want it brighter, squeeze in another splash of lime. Put the sauce in the refrigerator to chill while you cook; this helps the flavors marry together and thickens the texture.
Step 3: Searing the Shrimp to Perfection
Place a large, heavy skillet, preferably cast iron, over medium-high heat. You want the pan to be hot enough that a drop of water flicked onto the surface sizzles and evaporates instantly. Add the remaining tablespoon of oil and swirl it around to coat the bottom of the pan.
Carefully lay the seasoned shrimp into the hot skillet in a single, even layer. If your pan is not large enough to hold all the shrimp without crowding them, cook them in two batches. Crowding the pan drops the temperature instantly and causes the shrimp to steam in their own juices.
Let the shrimp sear undisturbed for two full minutes. You want to see a deep, caramelized brown crust forming on the underside. Flip the shrimp over and cook for another sixty to ninety seconds on the other side.
As soon as the shrimp curl into a loose C shape and are opaque all the way through, transfer them immediately to a clean plate. If they curl into a tight, closed circle, they are overcooked and will be rubbery. Remember, they will continue to heat up slightly when we grill the assembled burritos, so err on the side of just barely cooked through.
Step 4: The Art of Burrito Assembly
Now comes the fun part, and the step where many home cooks lose their way. How do we roll a burrito that stays together, does not leak, and has a balanced distribution of ingredients in every bite?
First, you must warm your flour tortillas. A cold tortilla is stiff and will crack or tear when you try to fold it. To make them stretchy and pliable, heat each tortilla on a dry skillet over medium heat for about fifteen seconds on each side, or wrap the whole stack in damp paper towels and microwave them for thirty seconds.
Lay a warm tortilla flat on a clean cutting board. Spread a generous tablespoon of the creamy Baja sauce right down the center of the tortilla, leaving about two inches of space on the sides.
Next, sprinkle a handful of the shredded Monterey Jack cheese over the sauce. Placing the cheese on the bottom ensures that it melts directly against the warm tortilla and acts as a delicious, gooey glue that helps hold the structure together.
Add a generous layer of the seasoned shrimp on top of the cheese. I like to lay them out in a neat line so that every bite of the finished burrito has a uniform amount of seafood.
Top the shrimp with a big handful of your bright, crunchy cabbage slaw. Feel free to drizzle a little extra Baja sauce right over the slaw. Finish with a sprinkle of fresh chives.
Step 5: How to Roll Like a Pro
Do not overfill your burrito. It is incredibly tempting to pile on the ingredients, but an overstuffed burrito will inevitably burst during the rolling or searing process. Keep your fillings concentrated in the center third of the tortilla.
Fold the short sides of the tortilla in over the filling. These will act as the ends of your burrito, keeping all the juices locked inside.
Using your thumbs, grab the edge of the tortilla closest to you and fold it up and over the filling, tucking it snugly under the ingredients. Gently pull the entire package back toward you to compress the fillings into a tight log.
Roll the burrito forward away from you, keeping the side folds tucked in, until you reach the end of the tortilla. Place the assembled burrito seam-side down on your cutting board. This seam-side down placement is crucial; the moisture from the filling will help seal the flap of the tortilla shut. Repeat this process for the remaining three burritos.
Step 6: The Golden Crispy Sear
To transform these from simple wraps into spectacular, restaurant-quality crispy burritos, we need to grill them. This steps melts the cheese, heats the interior through, and creates a crispy, golden-brown crust on the outside of the tortilla that provides an incredible textural contrast.
Clean out your skillet and place it back over medium heat. Do not use high heat for this step; we want to give the heat enough time to penetrate to the center and melt the cheese without burning the outside of the tortilla.
Brush the bottom of the skillet with a very light layer of oil or a tiny pat of butter. Place the burritos seam-side down into the hot pan. You will hear a gentle sizzle.
Let them cook undisturbed for about two to three minutes. Use a spatula to press down gently on the tops of the burritos to ensure even contact with the pan. Once the bottom is a deep, golden brown and the seam is sealed shut, carefully flip them over to sear the other side for another two minutes.
If you want to be extra thorough, you can use tongs to hold the burritos upright and sear the sides and ends as well. Once they are golden and crispy all around, transfer them to a platter.
Serving and Garnishing
Allow the burritos to rest for about two minutes before cutting into them. This gives the melted cheese and sauces a chance to settle, preventing them from running out all over your plate when you take your first slice.
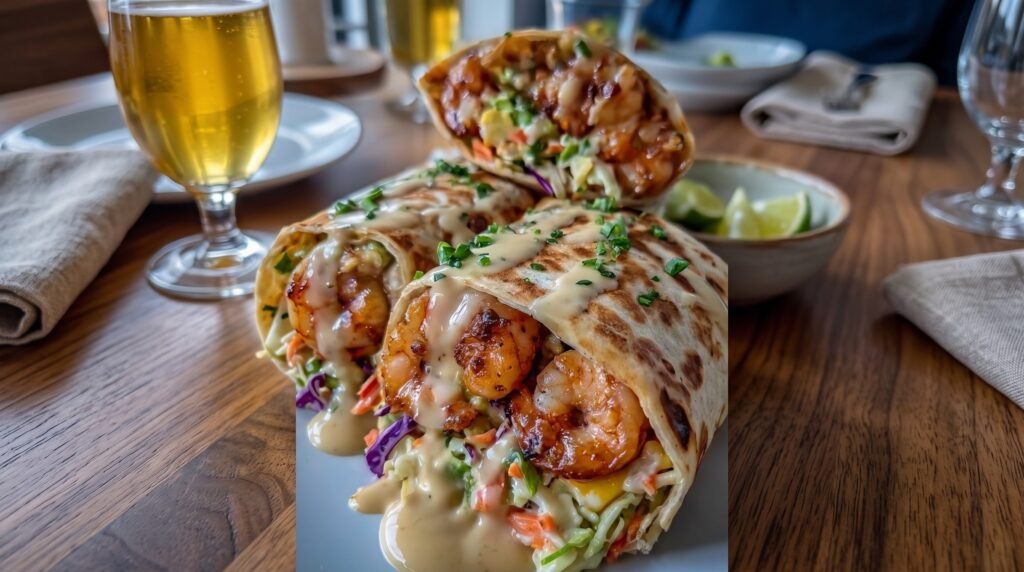
I love to cut these diagonally down the center to show off the beautiful internal layers: the bright purples and greens of the cabbage, the golden-orange of the seasoned shrimp, and the creamy white of the melted cheese and Baja sauce.
Garnish the tops with an extra drizzle of the creamy Baja sauce and a generous sprinkle of finely chopped fresh chives, just like you see in the photo. Serve them alongside a bowl of fresh tortilla chips, your favorite salsa, and a few lime wedges for squeezing.
Common Mistakes to Avoid
Even with a detailed guide, it is easy to make a few slip-ups if you are new to making seared seafood burritos. Here are the most common mistakes I made when I was perfecting this recipe, and how you can avoid them.
Using wet cabbage: If you wash your cabbage right before shredding it, make sure to run it through a salad spinner or dry it thoroughly with towels. Any excess water on the cabbage will dilute your sauce and turn your crispy burrito soggy from the inside out.
Skipping the warm-up: I cannot stress this enough; cold tortillas will tear. Take those thirty seconds to warm your tortillas, and your rolling experience will be stress-free.
Using pre-shredded cheese: Pre-packaged shredded cheese is coated in starch to prevent the shreds from sticking together in the bag. This starch prevents the cheese from melting into that smooth, gooey texture we want. Buy a block of Monterey Jack and shred it yourself; the difference in meltability is night and day.
Overheating the pan during the final sear: If your pan is smoking hot when you put the assembled burritos in, the outside of the tortilla will burn before the heat has a chance to reach the cold cabbage and cheese on the inside. Keep the heat at a steady medium and let the process happen gradually.
Flavor Variations to Try
Once you have mastered the classic recipe, you can start experimenting with different ingredients to make these burritos your own. Here are a few of my favorite variations.
The Avocado Cream Variation: If you love avocado, you can blend a ripe avocado directly into your Baja sauce. This creates a beautifully green, ultra-creamy sauce that pairs wonderfully with the smoky spices on the shrimp. Alternatively, you can add fresh avocado slices directly inside the burrito alongside the cabbage.
The Rice and Beans Addition: If you prefer a heavier, more filling burrito, you can add a thin layer of seasoned black beans or cilantro lime rice on top of the cheese. Just remember to reduce the amount of cabbage and shrimp slightly so you can still roll the burrito easily.
The Spicy Mango Salsa Twist: For a sweet and spicy contrast, swap out the simple lime juice on the cabbage slaw for a few spoonfuls of fresh mango salsa. The sweetness of the mango pairs incredibly well with the charred flavor of the grilled shrimp.
Storing and Reheating Tips
While these burritos are absolutely best enjoyed fresh out of the pan, you can prepare the individual components ahead of time to make weeknight assembly a breeze.
The cabbage slaw and the creamy Baja sauce can both be made up to two days in advance. Keep them in airtight containers in the refrigerator. In fact, the sauce actually tastes better after sitting in the fridge overnight as the garlic and spices have more time to infuse into the cream.
If you have leftover assembled burritos, do not microwave them to reheat. The microwave will steam the tortilla, turning it soft and rubbery, and it will overcook the shrimp inside.
Instead, reheat your leftover burritos in an oven or an air fryer. Preheat your oven to 350 degrees Fahrenheit, wrap the burrito loosely in aluminum foil, and bake for fifteen minutes until heated through. For the ultimate crispy texture, pop the burrito into an air fryer at 350 degrees for six to eight minutes. It will taste almost as good as the day you made it.
Final Thoughts
There is something deeply satisfying about making restaurant-quality food in your own kitchen. It takes a little bit of patience, a few steps of prep work, and an eye for detail, but once you take that first bite through the crispy, toasted shell into the juicy, seasoned shrimp and cool, tangy slaw, you will realize it was worth every single second.
This recipe has become a staple in my household, bringing those sunny, coastal vibes to our dinner table no matter what the weather looks like outside. It is casual enough for a quick Friday night dinner, yet impressive enough to serve to guests at a backyard gathering. Put on some music, prep your ingredients, and enjoy the process of crafting the perfect crispy grilled shrimp burrito. Happy cooking!