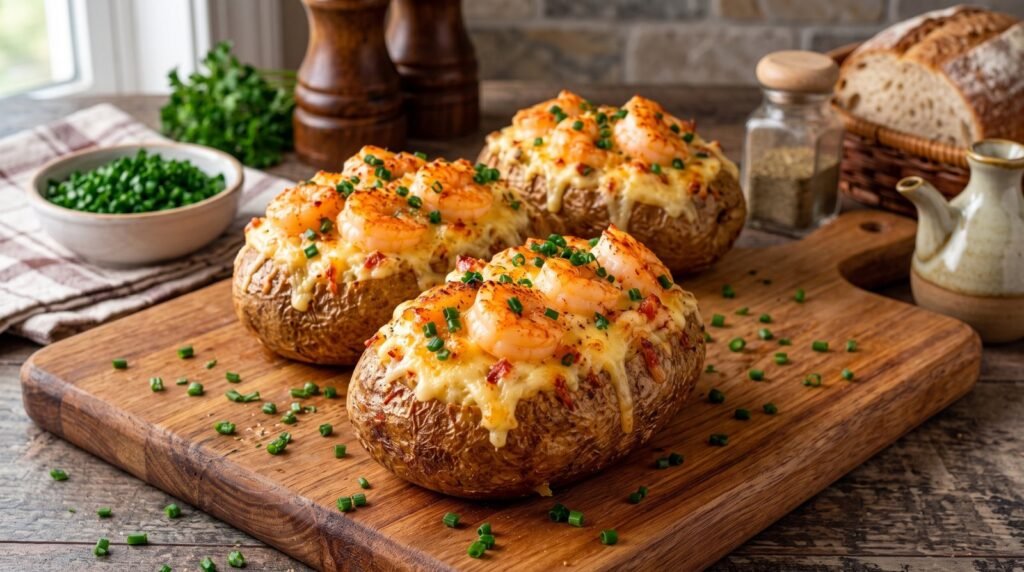

It was a cold, rainy Tuesday evening when I realized I had absolutely nothing planned for dinner, a half-empty bag of russet potatoes staring at me from the pantry, and a bag of frozen wild-caught shrimp sitting in the back of my freezer. I was tired, craved something incredibly comforting, but also wanted to feel like I was eating a meal at a high-end steakhouse without paying the fifty-dollar bill. That was the night my obsession with loaded seafood potatoes truly began.
Let me tell you, my first attempt at this dish was an absolute disaster. I made every classic mistake in the book. I wrapped the potatoes in aluminum foil, which steamed the skins into a soggy, wet mess. I threw the shrimp into the potato filling raw, hoping they would cook through in the oven, which resulted in watery pockets of mush and rubbery, overcooked seafood. I also used pre-shredded cheese from a plastic bag, which melted into a weird, greasy plastic-like layer that slid right off the potato.
But I did not give up. I spent the next few months tweaking the temperatures, testing different cheese blends, and perfecting the shrimp cooking technique. Today, I am sharing the exact, foolproof method I developed so you can skip the trial-and-error and head straight to potato paradise. This recipe combines the crispy, salty skin of a perfectly baked potato with a rich, fluffy whipped potato filling, topped with succulent garlic butter shrimp and a molten blanket of freshly grated cheese. It is decadent, comforting, and surprisingly easy once you know the secrets.
Why This Recipe Works
The magic of a great twice-baked potato lies entirely in the contrast of textures and temperatures. You want a outer shell that is crispy enough to hold its shape when you pick it up, a filling that is as light and fluffy as a cloud, and toppings that bring a punch of savory, garlicky flavor.
By baking the potatoes directly on the oven rack, we allow the moisture to escape, leaving the skin delightfully crisp. Whipping the potato flesh with warm dairy ensures a velvety texture without making it gluey. Finally, quick-searing the shrimp in garlic butter before adding them to the potato ensures they stay plump, juicy, and bursting with flavor instead of turning into rubbery little erasers.
The Ingredients You Need
Before you head to the grocery store, let us talk about ingredients. You do not need anything overly fancy, but quality makes a huge difference here.
| Ingredient | Amount | Notes |
|---|---|---|
| Russet Potatoes | 4 large | Choose potatoes that are uniform in size for even baking |
| Olive Oil | 2 tablespoons | For rubbing on the potato skins to get them crispy |
| Kosher Salt | 1 tablespoon | Coarse salt works best for crusting the skins |
| Medium Shrimp | 1 pound | Peeled, deveined, and tails removed (31/40 count is ideal) |
| Unsalted Butter | 6 tablespoons | Melted, divided between the filling and the shrimp skillet |
| Sour Cream | 1/2 cup | Full-fat sour cream gives the best texture and tang |
| Cream Cheese | 2 tablespoons | Softened, this adds structure so the filling does not collapse |
| Garlic | 4 cloves | Minced fresh, avoid the pre-jarred stuff if possible |
| Sharp Cheddar Cheese | 1 cup | Freshly grated from a block |
| Gruyere or Fontina Cheese | 1 cup | Freshly grated, for that ultimate cheese pull |
| Cooked Bacon | 4 slices | Crumbled into small pieces |
| Fresh Chives | 3 tablespoons | Finely chopped for garnish |
| Smoked Paprika | 1/2 teaspoon | Adds a beautiful color and a hint of smoky depth |
| Black Pepper | To taste | Freshly cracked is always best |
Selecting the Right Potato
Let us talk about the potato itself because it is the vessel for all this deliciousness. You want to use Russet potatoes, often sold as Idaho potatoes. Do not try to use Yukon Golds or red potatoes for this recipe. Waxy potatoes do not have enough starch to create that fluffy, mashed-potato texture we need for the filling. Russets are high in starch and low in moisture, which is exactly what makes them bake up so light and dry.
When you are at the store, look for potatoes that are relatively clean, free of soft spots or green patches, and roughly the same size. If you have one giant potato and three small ones, they will bake at completely different rates, leaving you with some burnt skins and some raw centers. I like to aim for potatoes that are about the size of a fist.
The Golden Rules of Baking the Perfect Potato
Many people think baking a potato is as simple as throwing it in a hot oven and walking away. While it is not rocket science, a few small details will take your potatoes from mediocre to spectacular.
First, wash your potatoes thoroughly. Since they grow in the dirt, they often have fine grit hiding in their skin. Use a stiff vegetable brush under cold running water to scrub them clean. Once washed, dry them completely with a clean kitchen towel. If you put wet potatoes into the oven, they will steam instead of bake.
Second, poke them. Take a fork and pierce each potato four or five times all over. This creates tiny vents that allow steam to escape. If you skip this step, the steam buildup inside the potato can actually cause it to explode in your oven. It does not happen every time, but clean-up is a nightmare when it does.
Third, lose the foil. I cannot stress this enough. Wrapping potatoes in foil traps the escaping steam, which cooks the potato but leaves the skin wet, wrinkly, and soggy. For a twice-baked potato, we need the skin to act as a sturdy bowl. Baking them directly on the oven rack gives you a crispy, salty, delicious skin that holds its shape beautifully.
Step-by-Step Instructions
Now that we have our ingredients and our kitchen strategy ready, let us get cooking. Give yourself about two hours from start to finish. Most of this time is completely hands-off while the potatoes bake, leaving you plenty of time to prep your toppings, grate your cheese, and pour yourself a glass of wine.
Step One: The First Bake
Preheat your oven to 400 degrees Fahrenheit. While the oven is heating up, prep your scrubbed and dried potatoes.
Pour the olive oil into a small bowl. Using your hands or a pastry brush, coat the entire exterior of each potato with a thin layer of oil. You want them to be shiny but not dripping.
Sprinkle the coarse kosher salt generously over the oiled skins. The oil helps the salt stick, creating a seasoned crust that makes the skins taste just as good as the filling.
Place the potatoes directly on the middle rack of your preheated oven. To catch any drips of oil or salt, you can place a baking sheet lined with foil on the rack below them. Bake for about 60 to 75 minutes. You will know they are done when a sharp paring knife slips easily into the center of the potato with no resistance.
Step Two: The Art of the Scoop
Once the potatoes are done, remove them from the oven and let them cool on a cutting board for about 10 minutes. Do not let them cool completely; you want them to be hot when you scoop them out because hot potatoes mash much easier and absorb butter and dairy far better than cold ones. If they are too hot to handle, use a clean kitchen towel or an oven mitt to hold them steady.
Using a sharp chef's knife, slice off the top third of each potato lengthwise. Think of this as creating a lid.
Using a spoon, carefully scoop out the hot potato flesh from both the lid and the main body of the potato, transferring it into a large mixing bowl.
Be extremely careful not to scoop too close to the skin. You want to leave a border of potato about one-quarter inch thick all the way around the edges and the bottom. This border acts as a retaining wall, keeping your potato shells sturdy and preventing them from collapsing when you stuff them later. Place the hollowed-out shells back onto a parchment-lined baking sheet.
Step Three: Whipping the Filling
Now we are going to turn that plain potato flesh into a rich, velvety filling.
Add four tablespoons of the unsalted butter, the sour cream, the softened cream cheese, half of the grated cheddar, half of the grated gruyere, and half of the crumbled bacon to the warm potato flesh in your bowl.
Using a potato masher or a sturdy fork, mash everything together until the ingredients are well incorporated. If you want an ultra-smooth, cloud-like filling, you can use a hand mixer on low speed for about 30 seconds.
However, be very careful not to over-mix the potatoes. Over-working potato starch causes the cells to break down, releasing starch that turns the mixture gummy, heavy, and glue-like. Mix just until combined.
Taste the filling. This is the most important step! Potatoes are natural salt-sponges, meaning they require a good amount of seasoning to taste their best. Add a generous pinch of kosher salt, some freshly cracked black pepper, and half of the smoked paprika. Mix gently and taste again. It should taste incredibly savory, rich, and delicious on its own.
Using a spoon, fill the hollowed-out potato shells with the potato mixture. Divide it evenly among the four shells. You want them to be piled high, slightly mounding over the top edges of the skins.
Step Four: Searing the Garlic Butter Shrimp
This is where we elevate this dish from a standard side dish to a spectacular main course.
Pat your shrimp dry with paper towels. Just like the potatoes, wet shrimp will steam in the pan instead of getting a beautiful sear. Season the shrimp with the remaining smoked paprika, a pinch of salt, and some black pepper.
In a medium skillet, melt the remaining two tablespoons of butter over medium-high heat. Once the butter is melted and foaming, add the minced garlic. Stir constantly for about 30 seconds until the garlic is fragrant, being careful not to let it burn.
Add the seasoned shrimp to the skillet in a single layer. Let them sear undisturbed for about one to two minutes on the first side until they develop a beautiful pink color. Flip them over and cook for another minute.
Remember, we are going to bake these potatoes again, so you want to undercook the shrimp slightly in the skillet. They should be just barely pink and starting to curl, but still tender. Remove the skillet from the heat immediately so the residual heat does not overcook them.
Step Five: The Final Assembly and Bake
Nestle the garlic butter shrimp gently into the top of the stuffed potatoes, pressing them slightly into the whipped filling so they stay put. If any garlic butter is left in the skillet, drizzle it right over the top of the potatoes.
Mix the remaining cheddar and gruyere cheeses together in a small bowl. Sprinkle this cheese mixture generously over the top of the shrimp, covering them like a cozy blanket. Sprinkle the remaining crumbled bacon over the cheese.
Return the stuffed potatoes to the oven. Bake at 400 degrees Fahrenheit for another 15 minutes, or until the cheese is completely melted, bubbling, and starting to turn golden brown around the edges. If you love a crispy cheese crust, you can turn on the broiler for the last two minutes of cooking, but watch them like a hawk so they do not burn.
Remove the potatoes from the oven and let them cool for five minutes. Sprinkle the freshly chopped chives over the top just before serving. The heat from the potatoes will slightly wilt the chives, releasing their delicate onion aroma.
Five Mistakes to Avoid
To make sure your dinner is a roaring success, let us review the most common pitfalls home cooks face when making twice-baked potatoes.
First, using cold ingredients for the filling. Cold butter, cold sour cream, and cold cream cheese will instantly cool down your hot potato flesh. This makes the starch seize up, resulting in a lumpy, cold filling that is hard to mix. Always let your dairy sit on the counter to reach room temperature before you begin, or gently warm your butter and sour cream in the microwave for a few seconds before adding them to the potatoes.
Second, over-baking the shrimp. Shrimp cook incredibly fast. If you cook them completely in the skillet and then bake them for another fifteen minutes in the oven, they will shrink into dry, rubbery, flavorless nuggets. Sear them just enough to get some color and infuse them with garlic butter, then let the oven finish the job gently.
Third, skipping the salt on the skins. Many people discard the potato skins, but a crispy, salted skin is one of the best parts of a twice-baked potato. Don't be afraid to season the outside of the potato before it goes into the oven.
Fourth, scooping out too much potato flesh. It can be tempting to try to get every last bit of potato out of the shell, but if you leave the skins paper-thin, they will tear, collapse, or spill their filling all over your baking sheet. Leave a solid quarter-inch wall of potato to ensure your shells stay structurally sound.
Fifth, using pre-bagged shredded cheese. I know it is convenient, but pre-shredded cheese is coated with powdered cellulose and potato starch to keep the shreds from sticking together in the bag. This coating prevents the cheese from melting into a smooth, gooey, cohesive layer. Buy a block of cheese and grate it yourself using a box grater. It takes two minutes, melts ten times better, and tastes far fresher.
Customizing Your Loaded Potatoes
One of the reasons I love this recipe so much is how easy it is to customize based on what you have in your fridge or what flavors you are craving. Here are a few of my favorite variations.
If you love spicy food, try making Cajun Shrimp Twice-Baked Potatoes. Swap out the smoked paprika for a tablespoon of your favorite Cajun seasoning blend. Use Pepper Jack cheese instead of Gruyere, and toss some finely diced pickled jalapeños into the potato filling for an extra kick.
For an ultra-luxurious version, you can make a Seafood Medley Potato. Combine the shrimp with some lump crab meat or chopped lobster meat. Fold the crab or lobster directly into the whipped potato filling, and top the potato with the garlic butter shrimp. This is an incredible dish to serve for special occasions like anniversaries, birthdays, or holiday dinners.
If you want to sneak some greens into your meal, broccoli and cheddar are a classic pairing for potatoes. Steam some small broccoli florets until tender, chop them finely, and fold them into the potato filling before stuffing the shells. The combination of broccoli, sharp cheddar, and garlic butter shrimp is absolutely delicious and feels like a complete meal in a single potato shell.
What to Serve with Loaded Potatoes
Because these twice-baked potatoes are so rich, hearty, and packed with protein, they easily stand alone as a main course. However, if you are hosting a dinner party or want to round out the meal, I recommend serving them with something light, bright, and acidic to balance out the richness of the butter, cheese, and sour cream.
A simple green salad tossed with a zesty lemon-herb vinaigrette is the perfect accompaniment. The bright acidity of the lemon cuts through the rich dairy, refreshing your palate between bites of potato.
Roasted green vegetables also work beautifully. Try roasting some fresh asparagus spears with a drizzle of olive oil, salt, pepper, and a squeeze of fresh lemon juice. Or, quickly sauté some green beans with sliced almonds and garlic.
If you are serving this as part of a larger steakhouse-style feast, these potatoes make an unforgettable side dish alongside a perfectly seared ribeye steak, a juicy filet mignon, or a rack of roasted lamb.
Make-Ahead and Storage Instructions
If you are planning a dinner party and want to minimize your kitchen stress on the day of the event, you will be happy to know that twice-baked potatoes are incredibly make-ahead friendly.
You can fully assemble the potatoes up to twenty-four hours in advance. Bake the potatoes, scoop them, whip the filling, stuff them, and top them with the cheese and bacon. Store them on a baking sheet, covered tightly with plastic wrap, in your refrigerator.
Do not cook or add the shrimp yet. Store the raw, peeled shrimp in a separate container in the fridge.
When you are ready to serve, cook the garlic butter shrimp in your skillet as directed. Remove the potatoes from the fridge, press the cooked shrimp into the filling, top with the remaining cheese, and bake at 375 degrees Fahrenheit for about 20 to 25 minutes until the filling is heated all the way through and the cheese is melted and bubbling. Because the potatoes are cold from the fridge, they will need a few extra minutes in the oven to heat up completely.
If you have leftovers, store them in an airtight container in the refrigerator for up to three days. To reheat them, avoid the microwave if possible, as it can make the potato skins soggy and turn the shrimp rubbery. Instead, reheat them in a 350-degree oven or an air fryer for 10 to 12 minutes until heated through. The air fryer is especially great for restoring that crispy, salty skin texture to the leftovers.
Cooking is all about creating memories, experimenting with flavors, and sharing delicious food with the people you love. The next time you want to treat yourself or your family to a restaurant-quality meal at home, grab some russet potatoes, some fresh garlic, and a handful of shrimp, and make these loaded potatoes. Your kitchen will smell like garlic-butter heaven, and your family will be begging for seconds. Have fun in the kitchen, and enjoy every single bite.