
There is a specific kind of magic that happens in a kitchen when you let something simmer for hours. It is the kind of cooking that cannot be rushed, bribed, or bypassed with a high-tech kitchen gadget. I learned this lesson the hard way several years ago during a chilly October weekend. I had invited my family over for a Sunday dinner, and in a fit of overconfidence, I decided to make a braised beef brisket. I started too late, panicked as the clock ticked down, and tried to crank the oven up to four hundred degrees to speed things along.
The result was a tragedy. What should have been a tender, yielding masterpiece turned into a block of wood. It was dry, stringy, and required a serrated knife and a lot of jaw strength to consume. My father, trying to be polite, chewed a single bite for what felt like five minutes before swallowing and saying, well, the gravy is lovely.
That kitchen disaster set me on a quest to truly understand the art of braising. I spent the next two years experimenting with different cuts of beef, varying liquid ratios, oven temperatures, resting times, and slicing techniques. What I discovered is that braising is not just a cooking method; it is a relationship between meat, heat, and time.
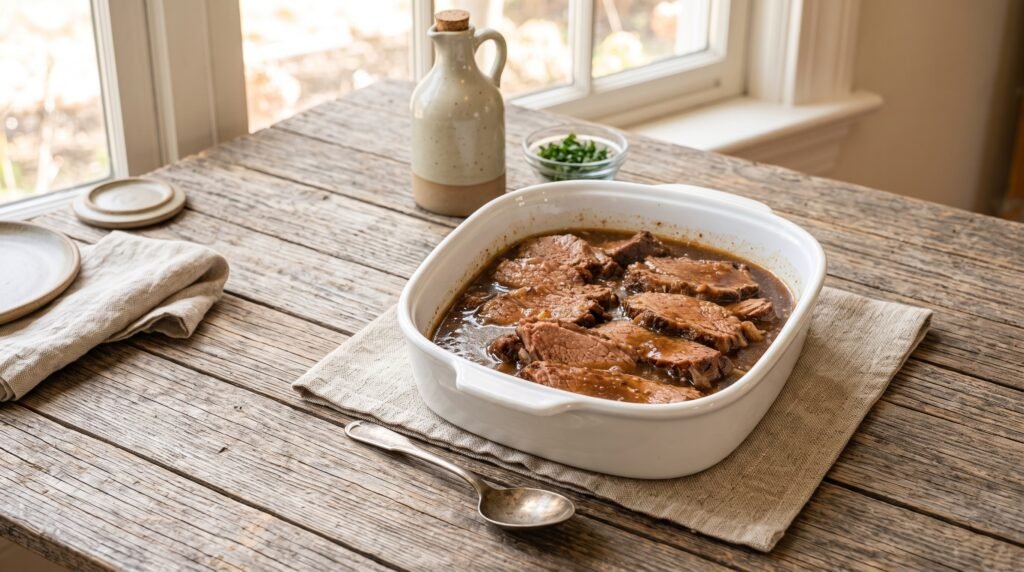
Today, I am sharing my foolproof recipe for the ultimate slow-braised beef brisket with a rich onion gravy. This is the exact dish you see in the photo: deeply caramelized beef slices bathed in a glossy, savory gravy that tastes like it took a lifetime to develop. If you follow these steps, you will never serve dry, tough beef again.
Understanding the Cut: Why Brisket?
Before we even turn on the stove, we need to talk about the meat. If you walk up to the butcher counter, you will likely see a few different cuts labeled for braising. You will see chuck roast, round roast, and brisket.
Brisket comes from the breast area of the cow. Because this muscle supports a lot of the animal's weight, it is packed with connective tissue and collagen. If you try to grill a brisket like a steak, it will be completely inedible. But if you cook it slowly in liquid, that tough collagen melts down into rich, silky gelatin. This gelatin coats the muscle fibers, which is what gives the meat its incredibly juicy, melt-in-your-mouth texture.
When buying brisket, you will usually have two choices: the flat cut or the point cut. The flat cut is leaner and has a uniform shape, making it very easy to slice into neat, beautiful pieces like the ones in my photo. The point cut is much more marbled with fat and has an irregular shape. It is incredibly flavorful but harder to slice cleanly. For this elegant, family-style presentation, I highly recommend using a flat-cut brisket with a decent fat cap on top. Do not let the butcher trim all the fat off; that fat is going to baste the meat as it cooks and keep it succulent.
The Ingredients You Will Need
To make this dish truly spectacular, you do not need fancy ingredients. You need humble, high-quality pantry staples that work together to build layers of flavor. Here is what you need to gather.
| Ingredient | Amount | Notes |
|---|---|---|
| Beef Brisket | 4 to 5 pounds | Flat cut, with a thin layer of fat cap intact |
| Kosher Salt | 2 tablespoons | Coarse salt is best for drawing out moisture and seasoning deeply |
| Black Pepper | 1 tablespoon | Freshly cracked coarse black pepper |
| Olive Oil | 2 tablespoons | For searing the beef |
| Yellow Onions | 3 large | Sliced thin; these will melt down into the gravy |
| Garlic | 6 cloves | Smashed and minced |
| Tomato Paste | 2 tablespoons | For depth of color and rich umami flavor |
| Dry Red Wine | 1.5 cups | Cabernet Sauvignon, Pinot Noir, or Merlot work beautifully |
| Beef Bone Broth | 3 cups | Use high-quality low-sodium broth or stock |
| Worcestershire Sauce | 2 tablespoons | For a punch of savory acidity |
| Fresh Rosemary | 2 sprigs | Left whole so they can be easily removed later |
| Fresh Thyme | 4 sprigs | Left whole |
| Bay Leaves | 2 pieces | Dried bay leaves |
| Cornstarch | 1 tablespoon | Mixed with 1 tablespoon of cold water (optional, for thickening) |
The Golden Rules of Braising
Through my many trials and errors, I have boiled successful braising down to four golden rules. If you memorize these, you can braise almost anything successfully.
Rule one: Dry the meat before searing. If your brisket is wet when it hits the hot oil, it will steam instead of brown. Steaming prevents the Maillard reaction, which is the chemical process that creates those deeply flavorful, caramelized crusts. Take your time with paper towels and pat every single inch of that brisket dry.
Rule two: Do not crowd the pan. If you are cooking a massive piece of meat, make sure your pot is large enough to accommodate it. If the meat is pressed tightly against the sides of the pan, moisture will pool, and again, you will end up steaming the meat instead of searing it.
Rule three: Keep the heat low. Once the brisket goes into the oven, the liquid should be at a gentle, barely-there simmer. If the liquid is boiling rapidly, the heat is too high, and the muscle fibers in the meat will contract and squeeze out all their moisture, leaving you with dry beef.
Rule four: Rest the meat before slicing. This is where most people fail. If you pull a hot brisket out of the oven and slice it immediately, all the precious juices will run out onto your cutting board, and your beef will instantly turn dry. You must let it rest so the muscle fibers can relax and reabsorb those juices.
Step-by-Step Instructions
Now, let us walk through the process of making this dish together. Grab a heavy-duty, enameled cast-iron Dutch oven. This is the absolute best vessel for braising because it distributes heat evenly and has a heavy lid that prevents moisture from escaping.
Step one: Seasoning and prepping. Take your brisket out of the refrigerator about thirty to forty-five minutes before you plan to cook it. You want to bring it close to room temperature. If you put a freezing cold piece of meat into a hot pan, it will drop the pan's temperature instantly and won't sear properly. Once it has warmed up slightly, pat it completely dry with paper towels. Season it generously on all sides with the kosher salt and freshly cracked black pepper. Do not be shy here; this is a thick cut of meat, and it needs a lot of seasoning to penetrate to the center.
Step two: The perfect sear. Place your Dutch oven over medium-high heat and add the olive oil. Wait until the oil is shimmering and just starting to smoke. Carefully lower the brisket into the pot, fat-side down first. You should hear a loud, satisfying sizzle. Leave it alone for six to eight minutes. Do not move it around, peek, or poke it. Let that beautiful crust form. Once it releases easily from the bottom of the pot, flip it over and sear the other side for another six minutes. Do not forget the narrow sides; use tongs to hold the brisket upright to sear the edges. Once browned all over, transfer the brisket to a large platter and set it aside.
Step three: Building the aromatic base. Lower the heat to medium. You will notice a dark layer of cooked bits stuck to the bottom of your pot. Do not clean this out; this is called fond, and it is concentrated flavor gold. Add the sliced yellow onions to the pot. Use a wooden spoon to stir them, using the moisture from the onions to help scrape up those browned bits from the bottom. Cook the onions for about ten to twelve minutes, stirring frequently, until they are soft, translucent, and starting to turn a rich golden-brown color. Add the minced garlic and tomato paste. Stir constantly for about two minutes. You want the tomato paste to darken in color and smell sweet, which removes its raw, metallic edge.
Step four: Deglazing the pot. Pour in the dry red wine. It will hiss and bubble furiously. Use your wooden spoon to scrape up any remaining brown bits from the bottom of the pot. Let the wine simmer and reduce by half, which should take about five to seven minutes. This cooks off the harsh alcohol taste and leaves behind a deep, complex flavor base.
Step five: Assembling the braise. Pour in the beef bone broth and Worcestershire sauce. Stir to combine. Nestle the seared brisket and any juices that collected on the platter back into the pot. The liquid should come about halfway up the sides of the brisket. It should not submerge the meat entirely; we are braising, not boiling. Tuck the fresh rosemary, thyme, and bay leaves into the liquid around the beef. Bring the liquid to a gentle simmer.
Step six: The slow braise. Cover the pot with its heavy lid. Transfer the pot to an oven preheated to three hundred degrees Fahrenheit. Now, your only job is to wait. Let it cook undisturbed for three and a half to four hours. At the three-hour mark, you can check it. Insert a fork into the center of the meat; it should slide in and out with absolutely no resistance. If there is tension, put the lid back on and give it another thirty to forty-five minutes.
Step seven: The crucial rest period. Once the meat is completely tender, carefully lift the brisket out of the pot and place it on a clean cutting board. Cover it loosely with aluminum foil and let it rest for at least twenty to thirty minutes.
Step eight: Perfecting the gravy. While the meat rests, let us finish the gravy. Discard the rosemary, thyme sprigs, and bay leaves from the pot. Skim off any excess fat floating on the surface of the cooking liquid. Bring the liquid to a simmer over medium heat on your stovetop. Taste it. It should be rich, savory, and deeply satisfying. If you want a thicker gravy like the glossy sauce in the photo, mix your cornstarch and water together in a small bowl to make a slurry. Pour the slurry into the simmering liquid, whisking constantly. Let it bubble for two minutes until it thickens into a gorgeous, spoon-coating gravy.
Step nine: Slicing and serving. Look closely at your rested brisket to find the direction of the muscle fibers. This is the grain. You must slice the brisket against the grain. If you slice parallel to the fibers, the meat will be stringy and tough to chew. Slicing across the fibers cuts them short, making the meat incredibly tender. Use a sharp carving knife to cut the beef into half-inch thick slices. Arrange the slices beautifully in a warm serving dish and pour that rich, hot onion gravy over the top.
Common Mistakes to Avoid
Even with the best intentions, things can go wrong in the kitchen. Here are the most common mistakes I see people make with braised beef, and how you can avoid them.
Skipping the sear: It can be tempting to throw all the ingredients into a pot or a slow cooker and walk away. But skipping the searing step means you lose out on the deep, caramelized flavors that define a great braise. That crust on the meat dissolves into the braising liquid, giving the gravy its dark color and savory complexity.
Rushing the cook time: Braising cannot be rushed by raising the oven temperature. If you try to cook a brisket at three hundred and seventy-five degrees to save time, the high heat will cause the proteins to contract tightly, squeezing out all their moisture. The meat will become tough, dry, and stringy. Keep the oven temperature low and let time do the work.
Slicing warm beef with a dull knife: If your knife is dull, it will tear the tender fibers of the meat instead of slicing them cleanly, resulting in a shredded mess. Make sure your carving knife is freshly sharpened.
Not degreasing the sauce: Brisket has a significant amount of fat. As it cooks, this fat melts into the liquid. If you do not skim the fat off the top before serving, your gravy will have a greasy, heavy mouthfeel that coats your tongue in an unpleasant way. Use a wide spoon to ladle off the clear fat layer that floats on top of the sauce, or use a fat separator cup if you have one.
The Science of Slicing: Why the Grain Matters
I cannot stress the importance of slicing against the grain enough. To understand why this matters, think of a muscle as a bundle of long, strong rubber bands. If you cut along the length of the rubber bands, you still have long, chewy rubber bands to contend with. But if you cut across them, you end up with tiny, short segments of rubber bands that fall apart easily.
When you look at a raw or cooked brisket, you will see distinct lines running across the surface. Those lines are the muscle fibers. Position your knife perpendicular to those lines, and make clean, decisive slices. If your brisket flat cut has a point attached, be aware that the grain runs in different directions on those two parts of the muscle. You may need to cut the brisket in half where the two muscles meet, re-orient your cutting board, and slice each section in its own correct direction.
Storing, Reheating, and Leftover Magic
One of the greatest things about braised beef brisket is that it actually tastes better the next day. As the beef sits in the refrigerator overnight, it continues to absorb the flavors of the gravy, and the gelatin in the meat sets, making it incredibly moist.
To store leftovers, let the beef and gravy cool to room temperature. Place the sliced beef in a container and pour the gravy over the top, making sure the meat is completely submerged. Cover and refrigerate for up to four days, or freeze for up to three months.
When you are ready to reheat, do not use the microwave. The microwave will heat the beef unevenly and can make it rubbery. Instead, place the beef and gravy in a baking dish, cover it tightly with foil to trap the steam, and warm it in a three hundred degree oven for about twenty minutes until it is hot throughout.
If you find yourself with leftover brisket, you are in luck. This meat is incredibly versatile. Here are a few of my favorite ways to use up leftovers:
The ultimate brisket sandwich: Toast a brioche bun, spread a little horseradish mayo on both sides, pile on warm slices of brisket, top with melted provolone cheese, and serve with a small bowl of the reheated gravy on the side for dipping.
Brisket tacos: Shred the cold beef and fry it in a hot pan with a little bit of the gravy until the edges get crispy. Serve in warm corn tortillas with chopped white onion, fresh cilantro, and a squeeze of lime juice.
Comforting beef ragu: Toss shredded brisket and gravy with hot pappardelle pasta, a splash of cream, and a generous grating of parmesan cheese for an instant, restaurant-quality Italian dinner.
Frequently Asked Questions
Can I make this in a slow cooker or Crockpot?
Yes, you absolutely can. Follow steps one through four on your stovetop to sear the meat, cook the onions, and deglaze the pan. Transfer the onions, liquid, and brisket into your slow cooker. Cover and cook on low for eight to nine hours, or on high for five to six hours, until the beef is fork-tender.
What kind of wine is best for this recipe?
You want to use a dry, medium-to-full-bodied red wine with good structure. I love using Cabernet Sauvignon because its bold fruit flavors and tannins hold up beautifully to the rich beef. Pinot Noir is also a great option if you prefer a lighter, more elegant gravy. Avoid using sweet red wines or wines labeled as cooking wine, which often contain added sodium and preservatives. A good rule of thumb is: if you wouldn't drink a glass of it with dinner, don't use it to cook.
Can I make this gluten-free?
Yes, this recipe is incredibly easy to adapt for a gluten-free diet. Simply ensure that your beef broth and Worcestershire sauce are certified gluten-free. The gravy is naturally thickened with cornstarch, which is gluten-free, so you do not need to make any changes there.
My gravy is too salty. How can I fix it?
If your gravy ends up too salty, do not panic. This can happen if your beef broth had more sodium than expected. To fix it, you can stir in a splash of water, unsalted beef broth, or even a touch of heavy cream to dilute the saltiness. Another classic chef trick is to peel a raw potato, cut it into thick slices, and simmer it in the gravy for ten minutes. The potato will absorb some of the excess salt like a sponge. Just remember to remove and discard the potato slices before serving.
What should I serve with this brisket?
Because the gravy is so rich and savory, you want to serve this dish with sides that can soak up that liquid gold. Creamy mashed potatoes, buttery polenta, or buttered egg noodles are my absolute favorites. For a vegetable side, roasted carrots, sautéed green beans, or a simple green salad with a bright vinaigrette provide a wonderful contrast to the rich meat.
How do I get clean, perfect slices like in the photo?
If you want pristine, restaurant-quality slices, here is a secret trick used by professional caterers: cook the brisket the day before. Once it is tender, let it cool completely, then wrap it tightly in plastic wrap and refrigerate it overnight. The next day, when the meat is cold, it will be firm and incredibly easy to slice into perfect, thin pieces without crumbling. Arrange the cold slices in your serving dish, pour the cold gravy over them, cover with foil, and reheat in the oven at three hundred degrees for thirty minutes. The beef will warm up beautifully and look absolutely stunning.
Final Thoughts
Braising is a slow, meditative process that reminds us of the value of taking our time. In our busy, fast-paced lives, there is something deeply grounding about spending an afternoon tending to a pot of bubbling beef. The reward is not just a delicious dinner; it is the warm, inviting aroma that fills every corner of your home, drawing people into the kitchen to see what is cooking.
The next time you have a free Sunday, I encourage you to buy a beautiful piece of brisket, pour yourself a glass of wine, and spend a few hours making this recipe. Your patience will be rewarded with a meal that brings comfort, joy, and a sense of connection to everyone gathered around your table.