
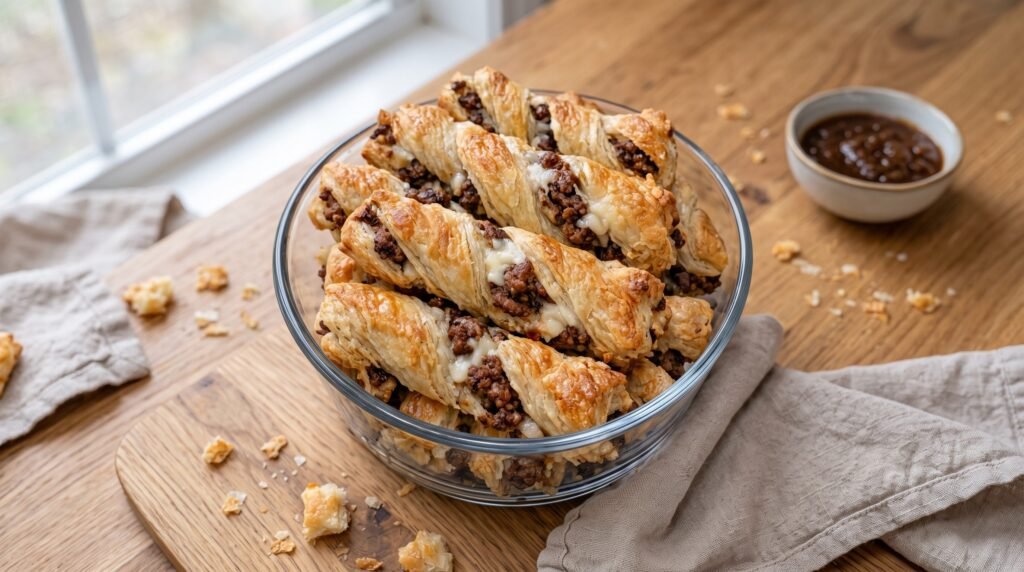

There is something incredibly satisfying about a finger food that delivers a loud, flaky crunch the second your teeth sink into it, followed immediately by a warm, savory rush of seasoned beef and melted cheese. For me, that perfect bite is a homemade puff pastry twist. They look like they came straight out of a high-end bakery window, yet they carry all the comforting, grease-on-your-fingers satisfaction of classic pub food.
However, getting to this point of pastry perfection was not an easy journey. My first attempt at making these was an absolute, unmitigated disaster that left my kitchen smelling like burnt cheese and my spirit thoroughly crushed.
I still remember the night clearly. It was a chilly Friday evening, and a group of friends was heading over to my place to watch a football game. I wanted to serve something more impressive than a standard bag of tortilla chips and jarred salsa, but I also did not want to spend the entire afternoon stuck over a hot stove while everyone else was enjoying the pre-game show. I had seen pictures of beautiful, golden-brown puff pastry twists online, and they looked deceptively simple. The recipe seemed to suggest you just roll out some store-bought dough, pile on your toppings, twist them up, and bake.
So, I bought a package of frozen puff pastry sheets, cooked up a pound of ground beef, seasoned it with some taco spices, and while it was still steaming hot, I piled it onto a sheet of cold, partially thawed puff pastry. I threw a massive handful of shredded cheddar on top, pressed another layer of pastry over it, and tried to cut it into strips.
That was my first big mistake. The intense heat from the freshly cooked beef immediately melted the delicate layers of butter inside the raw pastry dough. Within seconds, the cold dough transformed into a sticky, gummy, completely unworkable paste. When I tried to pick up the strips to twist them, the warm beef squished out of the sides like toothpaste from a tube, landing in wet clumps on my kitchen counter. I ended up panic-rolling the remaining sticky mess into a sad, lumpy log, throwing it onto a baking sheet, and praying for a miracle.
What came out of the oven was a greasy, flat, soggy puddle of dough with burnt cheese stuck to the edges. My friends, being the polite crowd they are, still ate every last crumb because melted cheese and spiced beef wrapped in any form of carb will always taste decent when you are hungry. But I was embarrassed. The bottom of the pastry was completely saturated with grease, and there was absolutely no flakiness to speak of.
I was determined to master the art of the savory pastry twist. Over the next few months, I went on a mission, experimenting with dough temperatures, filling moisture levels, cheese varieties, and twisting techniques. I tested different baking temperatures and even studied how professional bakers handle laminated doughs. Today, I am sharing every single secret, tip, and hard-earned lesson I learned along the way so you can skip the painful trial-and-error phase and make gorgeous, ultra-crispy, structurally sound Cheesy Beef Puff Pastry Twists on your very first try.
Understanding the Magic of Puff Pastry
To successfully work with puff pastry, you have to understand how it behaves. Puff pastry is a laminated dough, which means it consists of hundreds of alternating layers of flour dough and solid fat, usually butter. When you place the cold pastry into a hot oven, two magical things happen simultaneously. First, the water content inside the butter layers quickly heats up and turns into steam. This steam expands, physically pushing the thin layers of dough apart. Second, the heat bakes the dough layers into place, creating that signature light, airy, shatteringly crisp texture.
However, this process only works if the butter remains solid and cold up until the exact moment the pastry enters the hot oven. If the butter melts beforehand, either because your kitchen is too warm, you handled the dough too much with hot hands, or you topped it with warm filling, the layers of dough collapse and fuse together. Instead of rising into beautiful, delicate flakes, the pastry will bake up heavy, greasy, and dense.
Therefore, the golden rule of working with puff pastry is simple: keep it cold. If at any point during your preparation you feel the dough becoming soft, sticky, or difficult to handle, stop immediately, slide the pastry onto a baking sheet, and put it in the refrigerator or freezer for ten minutes to firm back up.
The Secret to the Perfect Beef Filling
The biggest culprit behind a soggy, deflated pastry twist is excess moisture and grease. Ground beef naturally releases a significant amount of fat and water as it cooks. If you spread a wet, greasy meat mixture directly onto raw pastry, the dough will absorb that moisture, preventing it from crisping up in the oven.
To prevent this, we need to take three specific steps with our beef filling.
First, use a lean cut of ground beef, such as 90/10 or 93/7. While fat adds flavor to burgers, we want to minimize excess oil here.
Second, after browning the meat with your spices and aromatics, you must drain it thoroughly. I do not just mean pouring the grease out of the pan. I actually transfer my cooked beef into a fine-mesh strainer set over a bowl and let it sit for a few minutes. Then, I spread the meat onto a plate lined with double layers of paper towels and press down firmly to blot away any remaining surface oil.
Third, and most importantly, you must let the filling cool down completely before it touches the pastry. I prefer to make my beef filling a few hours in advance, or even the night before, and store it in an airtight container in the fridge. Cold filling is much easier to spread, and it ensures your pastry butter stays perfectly solid during the assembly process.
Choosing the Right Cheese
When it comes to the cheese, your choice matters more than you think. Avoid high-moisture cheeses like fresh mozzarella, as they will release too much liquid as they melt, resulting in a soggy bake. Instead, opt for low-moisture, block cheeses that you grate yourself.
Pre-shredded bag cheeses are coated with anti-caking agents, like cellulose, which prevent the shreds from sticking together in the package. Unfortunately, these additives also prevent the cheese from melting into a smooth, cohesive layer, and they can sometimes leave a powdery residue on your pastry. Grating your own cheese takes an extra three minutes, but the superior melt and flavor are absolutely worth the effort.
I love using a combination of low-moisture part-skim mozzarella for that classic, gooey cheese pull, mixed with a sharp cheddar or pepper jack to provide a punch of bold, savory flavor.
Ingredients for the Ultimate Beef Pastry Twists
Before we dive into the step-by-step process, let us make sure you have all your ingredients gathered. This recipe makes about twelve to fourteen substantial twists, which is perfect for a small gathering.
| Ingredient | Amount | Notes |
|---|---|---|
| Frozen puff pastry sheets | 2 sheets (1 box) | Thawed in the refrigerator overnight |
| Lean ground beef | 1/2 pound | 90% lean or higher is preferred |
| Yellow onion | 1/2 medium | Finely minced to blend smoothly into the meat |
| Garlic cloves | 2 cloves | Minced or pressed |
| Chili powder | 1 teaspoon | For a warm, earthy base flavor |
| Ground cumin | 1/2 teaspoon | Adds a classic smoky aroma |
| Smoked paprika | 1/2 teaspoon | Gives a beautiful color and subtle woodsmoke flavor |
| Salt | 1/2 teaspoon | Adjust to taste |
| Black pepper | 1/4 teaspoon | Freshly cracked is best |
| Worcestershire sauce | 1 teaspoon | Adds a rich, savory umami depth |
| Low-moisture mozzarella | 1/2 cup | Freshly grated |
| Sharp cheddar cheese | 1/2 cup | Freshly grated |
| Large egg | 1 | Whisked with a tablespoon of water for the egg wash |
| Sesame seeds or flaky salt | 1 tablespoon | Optional, for topping the twists before baking |
Kitchen Tools You Will Need
Having the right tools on hand will make the assembly process incredibly smooth and stress-free.
- A large skillet for cooking the beef.
- A wooden spoon or spatula to break up the meat into very fine crumbles.
- A fine-mesh strainer or paper towels for draining the fat.
- A rolling pin for gently smoothing out the puff pastry seams.
- A sharp chef's knife, or even better, a rolling pizza cutter. A pizza cutter makes slicing the pastry strips incredibly easy without dragging or tearing the dough.
- Two large, rimmed baking sheets lined with parchment paper. Parchment paper is essential here to prevent the melted cheese from sticking to your pans.
- A pastry brush for applying the egg wash.
Step-by-Step Instructions
Now that you have your tools ready, your ingredients prepped, and your pastry safely thawing in the fridge, let us walk through the process of creating these gorgeous twists.
Step 1: Cook and Cool the Beef Filling
Place your skillet over medium heat and add the finely minced onion. Cook for three to four minutes, stirring frequently, until the onion becomes soft and translucent. Add the minced garlic and cook for another thirty seconds until you can smell that wonderful garlic aroma.
Add the ground beef to the skillet. Use your wooden spoon to break the meat apart into the smallest crumbles possible. We do not want large, chunky pieces of meat because they will fall out of the pastry when we try to twist it. The finer the crumble, the better the filling will adhere to the dough.
As the beef browns, sprinkle in the chili powder, cumin, smoked paprika, salt, black pepper, and Worcestershire sauce. Stir well to ensure the spices are evenly distributed throughout the meat. Cook until the beef is fully browned and no pink remains, which should take about five to seven minutes.
Remove the skillet from the heat. Transfer the beef mixture to your strainer or paper-towel-lined plate. Let all the excess oil drain away. Once drained, place the beef in a bowl and pop it into the refrigerator for at least thirty minutes to cool down completely.
Step 2: Prepare Your Worksurface and Pastry
When you are ready to assemble, preheat your oven to 400 degrees Fahrenheit (200 degrees Celsius). Line your two large baking sheets with sheets of parchment paper.
Lightly dust your clean kitchen counter or a large wooden cutting board with a pinch of flour. Take one sheet of thawed puff pastry out of the refrigerator and lay it flat on the floured surface. Keep the second sheet of pastry in the fridge for now so it stays cold.
If your puff pastry has fold lines, use your rolling pin to gently roll over the dough a few times. We are not trying to roll the pastry thin; we just want to smooth out those creases and create an even rectangle of about ten by twelve inches.
Step 3: Layer the Filling and Cheese
Take your cooled beef mixture out of the fridge. Evenly scatter the beef crumbles across the entire surface of the rolled-out puff pastry sheet, leaving a very small, half-inch border around the edges. Use the clean palms of your hands to gently press the meat down into the dough. This helps anchor the beef so it does not tumble out when we cut the strips.
Next, sprinkle your freshly grated mozzarella and sharp cheddar cheeses evenly over the top of the beef layer. Again, give it a gentle pat down with your hands.
Retrieve the second sheet of puff pastry from the refrigerator. Roll it out lightly on a floured surface to match the size of your first sheet. Carefully lift this second sheet and place it directly on top of the cheese-and-beef-topped first sheet, aligning the edges as closely as possible.
Use your rolling pin to gently roll over the entire double-layered pastry sandwich. Apply light, even pressure. This press-seals the top and bottom sheets of pastry together, trapping the beef and cheese filling securely in the middle.
Step 4: Slice into Strips
Using your rolling pizza cutter or a very sharp chef's knife, slice the pastry rectangle into long strips. I find that strips about one inch wide are the perfect size. If you cut them too thin, they will tear when you twist them. If you cut them too thick, they will be clumsy to handle and may not bake evenly in the middle. You should end up with twelve to fourteen long strips.
Step 5: Twist with Care
Now comes the fun, slightly messy, but incredibly rewarding part: the twisting technique.
Pick up one strip of pastry. Hold one end of the strip firmly in your left hand and the other end in your right hand. Gently twist your hands in opposite directions. You want to aim for about two to three full twists along the length of the strip.
As you twist, you will see the beautiful layers of pastry, golden beef, and white-and-yellow cheese spiral around each other. Do not worry if a few small crumbles of beef fall out onto your counter during this step; simply press them back into the folds of the pastry once you lay the twist down.
Carefully place the twisted strip onto your prepared parchment-lined baking sheet. Press the two ends of the twist down firmly onto the parchment paper. This anchors the ends and prevents the twist from slowly unfurling as it bakes in the oven.
Repeat this process with the remaining strips, leaving about an inch of space between each twist on the baking sheet so the hot oven air can circulate freely around them.
Step 6: The Magic Chill Trick
This is the absolute secret weapon step that separates amateur home bakers from professional pastry chefs. Do not put your beautiful twists straight into the hot oven yet.
Instead, place the entire baking sheet of assembled twists into your freezer for ten to fifteen minutes.
This rapid chill does two vital things. First, it completely firms up the butter in the pastry that may have softened while you were rolling and twisting. Second, it cools the cheese down, ensuring that the outer pastry layers have a chance to puff up and set in the hot oven before the cheese melts completely and runs everywhere.
Step 7: Apply Egg Wash and Bake
While your twists are chilling in the freezer, whisk your egg and one tablespoon of water together in a small bowl until smooth.
Remove the chilled twists from the freezer. Using your pastry brush, gently brush the top surfaces of the twists with the egg wash. Be careful not to let the egg wash pool in the crevices of the filling, as this can cause the egg to scramble in the oven. The egg wash is what gives the finished pastries that gorgeous, deep mahogany-gold sheen and an extra layer of crispy snap.
If you want to add a decorative touch, this is the perfect time to sprinkle the tops of the twists with sesame seeds, poppy seeds, or a light pinch of flaky sea salt.
Slide the baking sheets into the preheated oven. Bake at 400 degrees Fahrenheit for twenty to twenty-two minutes.
Keep a close eye on them during the last five minutes of baking. You are looking for a deep, golden-brown color on the pastry. If the pastry looks pale yellow, it is not done yet and will be soggy inside. Do not be afraid of a deep golden hue; that color represents caramelized flavor and maximum flakiness. Some of the cheese will have melted out onto the parchment paper and baked into crispy, lacy, golden crowns around the edges of the twists. This is actually a delicious bonus feature!
Step 8: Cool and Serve
Remove the baking sheets from the oven. Let the twists rest on the hot pans for about five minutes. This allows the melted cheese to firm up slightly, securing the filling inside the twists.
Carefully peel the twists off the parchment paper and transfer them to a wire rack to cool for another five minutes before serving. If you leave them on the baking sheets for too long, any escaped cheese will cool and harden, gluing the pastries to the pan.
Serve them warm, and listen to the beautiful, crackling sound they make as your guests take their first bites.
Creative Recipe Variations to Try
Once you have mastered the basic beef and cheese technique, the sky is the limit. Here are a few of my favorite flavor variations that I have developed over the years for different occasions.
The Spicy Jalapeno Popper Twist
If you love a bit of heat, this variation is an absolute game-changer. Mix a finely minced fresh jalapeno pepper (with the seeds removed if you want a milder heat) directly into your cooled beef filling. Instead of using a mozzarella-cheddar blend, spread a thin layer of softened, seasoned cream cheese onto the first sheet of puff pastry before adding the beef and a generous handful of pepper jack cheese. The combination of rich cream cheese, spicy jalapeno, and savory beef is addictive.
The Sweet and Savory Breakfast Twist
These are incredibly popular for Sunday brunches. Replace the ground beef with cooked, crumbled breakfast sausage seasoned with a pinch of sage and thyme. Spread a very thin layer of maple syrup or apple butter onto the bottom sheet of pastry, add the sausage, and top with sharp white cheddar. It is the perfect balance of sweet, salty, and savory.
The Vegetarian Mushroom and Spinach Twist
For a meatless option that still packs a massive savory punch, finely chop a mix of cremini and shiitake mushrooms. Saute them in butter with garlic and fresh thyme until they are deeply browned and all their moisture has evaporated. Toss in a few handfuls of fresh spinach and cook until wilted. Let this mixture cool completely, drain any excess liquid, and use it as your filling along with grated gruyere or swiss cheese.
The Pizza Parlor Twist
Swap out the spiced ground beef for finely chopped pepperoni and cooked Italian sausage. Use low-moisture mozzarella and a generous sprinkle of dried oregano and garlic powder. Serve these twists alongside a bowl of warm, rich marinara sauce for dipping. Kids and adults alike will go crazy for them.
Common Mistakes to Avoid
Even with the step-by-step guide, it is easy to slip up if you are rushing. Here are the most common pitfalls I see people encounter, and exactly how to avoid them.
- Thawing the pastry too quickly: Do not try to speed up the thawing process by microwaving your puff pastry or putting it near a warm oven. This will melt the butter layers immediately. Plan ahead and let it thaw slowly in the refrigerator overnight.
- Overfilling the pastry: It is incredibly tempting to pile on twice as much meat and cheese as the recipe calls for. Resist this urge. If you overfill the twists, you will not be able to twist them properly, the pastry will tear, and the filling will spill out onto your baking sheet, burning before the pastry can cook through. Keep the layers thin and even.
- Skipping the freezer chill: I know it is tempting to skip the ten-minute chill step when you are hungry and want to get them into the oven. Please do not do this. Skipping the chill is the number one reason twists lose their beautiful shape and flatten out during the bake.
- Baking at too low a temperature: If your oven temperature is too low, say 350 degrees Fahrenheit, the butter inside the pastry will slowly melt and run out onto the pan instead of turning to steam and puffing up the dough. You need that high, initial blast of 400-degree heat to create the steam pocket reaction.
How to Make These Ahead of Time
One of the reasons I love this recipe so much for entertaining is that it is incredibly freezer-friendly. You can do ninety percent of the work days or even weeks in advance, leaving you with zero kitchen stress on the day of your party.
To freeze them raw, assemble and twist the pastries as directed in the recipe. Place them onto a parchment-lined baking sheet and place the entire sheet into your freezer for about two hours until the twists are frozen rock-solid.
Once frozen, carefully transfer the twists into a heavy-duty, zip-top freezer bag, placing sheets of parchment paper between the layers to prevent them from sticking together. They will keep beautifully in the freezer for up to one month.
When you are ready to serve, do not thaw them. Simply place the frozen twists onto a parchment-lined baking sheet, brush them with your egg wash, and pop them straight into a 400-degree oven. You will just need to add about three to five minutes to the total baking time to compensate for them starting from a frozen state.
Reheating Leftovers for Maximum Crispiness
If you happen to have any leftover twists, do not let them go to waste. However, whatever you do, please do not heat them up in the microwave. The microwave will turn that beautiful, flaky, crispy pastry into a soft, rubbery, chewy disappointment.
To reheat leftover twists and restore them to their original crispy glory, place them on a wire rack set inside a baking sheet. Pop them into a 350-degree Fahrenheit oven for about eight to ten minutes. The hot air will circulate around the twists, melting the cheese inside and recrisping the outer layers of pastry perfectly.
Elevate the Experience with Homemade Dipping Sauces
While these twists are absolutely delicious on their own, serving them with a complementary dipping sauce takes them to a whole new level. Here are three quick and easy sauces you can whip up in minutes.
Smoky Garlic Aioli
Mix a half-cup of good-quality mayonnaise with one grated clove of garlic, a teaspoon of fresh lemon juice, a half-teaspoon of smoked paprika, and a pinch of salt. This creamy, smoky sauce cuts through the rich butteriness of the pastry beautifully.
Zesty Honey Mustard
Combine a quarter-cup of Dijon mustard, a quarter-cup of yellow mustard, two tablespoons of honey, and a splash of apple cider vinegar. The sweet-and-tangy profile of this sauce pairs wonderfully with the savory cheddar and beef filling.
Spicy Tomato Dip
Simmer a can of crushed tomatoes with a pinch of red pepper flakes, dried oregano, salt, and a splash of balsamic vinegar for fifteen minutes until thick and rich. This warm, acidic dip provides a beautiful, bright contrast to the rich pastry.
Final Thoughts from My Kitchen to Yours
Making pastry twists at home can feel intimidating at first, but once you understand how the dough behaves and respect the temperature of your ingredients, it becomes an incredibly fun and creative process. There is a wonderful, tactile joy in rolling out the dough, scattering the colorful fillings, and watching them puff up into golden, crispy spirals in the oven.
The next time you are hosting a game day, planning a movie night with your family, or just looking to treat yourself to a spectacular weekend snack, give this recipe a try. Be patient with the cooling and chilling steps, keep your work surface cool, and get ready to enjoy the most satisfying crunch you have ever created in your own kitchen. Happy baking!


