
It was a miserable, gray Tuesday in November when I finally cracked the code on slow cooker chicken and dumplings. My kids were tracking mud through the kitchen, the dog was shivering by the radiator, and my own hands were so cold I could barely grip my favorite wooden spoon. I wanted comfort. I wanted that thick, velvety, deeply savory chicken stew topped with pillowy clouds of steamed dough that my grandmother used to make.
But grandmother had all day to stand over a hot stove, stirring a heavy cast-iron Dutch oven, carefully monitoring the simmer so her delicate, handmade dumplings did not dissolve into floury sludge. I did not have that kind of time. What I did have was a trusty, slightly scratched slow cooker sitting on my countertop, promising convenience but historically delivering mixed results when it came to starch.
If you have ever tried making chicken and dumplings in a crockpot before, you probably know the exact heartbreak I am talking about. You open the lid after a long day, expecting beautiful, airy dumplings, only to find a layer of grey, slimy, gluey dough balls that are raw in the middle and tastes like wet flour. It is a culinary tragedy.
After three consecutive winter seasons of trial, error, and some genuinely terrible, gummy meals that ended up in the trash, I finally figured out the physics of the slow cooker dumpling. The secret does not lie in some fancy, expensive ingredient. It lies in temperature control, dough moisture, and resisting the absolute urge to peek. Today, I am sharing my foolproof method, complete with my favorite scratch-made buttermilk dough recipe, so you can skip the trial-and-error phase and go straight to comfort food heaven.
The Secret to Perfect Slow Cooker Dumplings
Before we look at the ingredients, we need to talk about why slow cooker dumplings often fail, and how we are going to fix it.
Traditional dumplings cook on a stove in a bubbling pot of broth. The intense heat boils the water in the dough, turning it to steam, which expands the pockets of air created by your leavening agent (usually baking powder). This is what makes them rise and become light.
In a slow cooker, the heat is much more gentle and indirect. If you just drop raw dough into lukewarm liquid, the dough will slowly absorb the liquid before it has a chance to rise. It becomes waterlogged, heavy, and gummy.
To prevent this, we do two key things. First, we turn the slow cooker to high heat at the very end of the cooking process, ensuring the liquid is hot enough to steam the dough. Second, we make a dough that has the perfect balance of fat and flour, creating a barrier that keeps the wet stew from soaking into the heart of the dumpling before it can cook through.
The Ingredient Breakdown
Every ingredient in this recipe serves a purpose. Here is exactly what you need to gather on your kitchen counter, along with why each item matters.
| Ingredient | Amount | Purpose |
|---|---|---|
| Boneless skinless chicken thighs | 2 pounds | Fat content keeps them juicy over long cook times |
| Carrots | 3 medium | Sliced into half-moons for sweetness and color |
| Celery stalks | 3 medium | Chopped for classic aromatic base flavor |
| Yellow onion | 1 large | Diced fine to melt into the gravy |
| Garlic cloves | 4 cloves | Minced to add depth and warmth |
| Low-sodium chicken broth | 4 cups | The flavorful liquid base of our stew |
| Dried thyme | 1 teaspoon | Classic herb pairing for poultry |
| Dried rosemary | 0.5 teaspoon | Earthy note that pairs beautifully with thyme |
| Bay leaves | 2 whole | Adds a subtle, background herbal tea-like complexity |
| All-purpose flour | 2 cups | The base of our homemade dumplings |
| Baking powder | 1 tablespoon | The leavening agent that makes the dumplings puff up |
| Salt | 1.5 teaspoons | Divided between the stew base and the dough |
| Black pepper | 1 teaspoon | Freshly cracked is always best |
| Unsalted butter | 4 tablespoons | Cold and cubed for the dumpling dough |
| Buttermilk | 0.75 cup | The acid reacts with the baking powder for maximum fluff |
| Heavy cream | 0.5 cup | Stirred in at the end for a luxurious finish |
| Frozen peas | 1 cup | Added at the very end for bright green color and pop |
| Fresh parsley | 0.25 cup | Chopped fine for a fresh garnish |
Why Chicken Thighs are Non-Negotiable
You might be tempted to use chicken breasts for this recipe because they seem healthier or easier. I strongly advise against this. I have tried this recipe with chicken breasts, and by the time the carrots are tender and the dumplings are cooked, the breast meat has dried out into woody, stringy threads that stick in your teeth.
Chicken thighs contain more connective tissue and intramuscular fat. As they cook slowly over several hours, that collagen breaks down into gelatin, which not only keeps the meat incredibly tender and melt-in-your-mouth soft, but also naturally thickens and enriches the surrounding broth. Trust me on this one: go with the thighs.
Step-by-Step Cooking Guide
Now, let us walk through the process together. Put on some music, pour yourself a cup of coffee or a glass of wine, and let us get cooking.
Step 1: Building the Base
Start by prepping your vegetables. Try to cut your carrots and celery into uniform, bite-sized pieces so they cook at the same rate.
Place your diced onion, sliced carrots, celery, and minced garlic directly into the bottom of your slow cooker insert.
Lay your boneless, skinless chicken thighs directly on top of the vegetables. Season everything generously with salt, black pepper, dried thyme, and dried rosemary. Toss in your two bay leaves.
Pour the four cups of low-sodium chicken broth over the top of the chicken and vegetables. Do not worry if the chicken is not completely submerged; as the vegetables cook down, they will release their own juices and create a beautiful, rich broth.
Cover your slow cooker with the lid. Set it to cook on LOW for six to seven hours, or on HIGH for three to four hours. Personally, I prefer the low-and-slow method. It gives the chicken thighs time to get so tender they practically shred themselves.
Step 2: The Shred and Thicken Phase
Once your cook time is up, your kitchen should smell amazing. Open the lid and use a pair of tongs to transfer the chicken thighs to a clean cutting board or a large shallow bowl. They should be incredibly tender.
Use two forks to shred the chicken into bite-sized pieces. I like to leave some larger chunks because it gives the final dish a rustic, hearty feel, but you can shred it as finely as you like. Remove and discard the two bay leaves from the slow cooker.
Before we return the chicken to the pot, we want to thicken our broth so it turns into a rich, velvety gravy rather than a thin soup. Take half a cup of your heavy cream and whisk it together with two tablespoons of all-purpose flour in a small bowl until completely smooth.
Pour this cream and flour mixture directly into the hot slow cooker broth, stirring constantly. The residual heat will activate the flour and begin to thicken the liquid. Return the shredded chicken to the pot and stir everything to combine.
Now, turn your slow cooker setting to HIGH. We need that liquid bubbling hot before we introduce our dumplings.
Step 3: Crafting the Perfect Dumplings
While the slow cooker is heating up on high, it is time to make the dumpling dough. Do not make this dough too far in advance; once the liquid buttermilk hits the dry baking powder, the chemical reaction starts, and we want that expansion to happen inside the slow cooker, not on your counter.
In a large mixing bowl, whisk together your two cups of all-purpose flour, one tablespoon of baking powder, and half a teaspoon of salt.
Take your four tablespoons of cold, unsalted butter and cut it into small cubes. Drop the butter cubes into the flour mixture. Using your clean fingertips or a pastry cutter, rub the butter into the flour. You want to work quickly so the heat of your hands does not melt the butter. Keep working it until the mixture looks like coarse sand with a few pea-sized lumps of butter remaining. Those tiny pockets of cold butter will steam as they cook, creating flaky, tender layers inside your dumplings.
Pour in your three-quarters of a cup of cold buttermilk. Stir the mixture with a fork just until the flour is moistened and a soft, sticky dough forms.
Here is the most important rule of dumpling making: DO NOT OVERMIX. If you stir this dough until it is perfectly smooth, you will develop the gluten in the flour, and your dumplings will turn into dense, rubbery hockey pucks. A few streaks of dry flour are perfectly fine. Stop stirring as soon as it holds together.
Step 4: The Steaming Phase
Take off the slow cooker lid. Your chicken and vegetable mixture should be steaming hot.
Using a cookie scoop or a large spoon, drop golf-ball-sized mounds of dough directly onto the surface of the hot chicken stew. Try to space them out slightly so they have room to expand. Do not submerge them completely; they should sit on top of the liquid like little islands, cooking from the steam trapped inside the pot.
Scatter your cup of frozen peas in the spaces between the dumplings. The peas will cook perfectly in the steam without turning mushy.
Now, place a clean, dry kitchen towel or a double layer of paper towels over the top of the slow cooker insert, then press the lid down firmly over the towel.
Why do we do this? This is my favorite kitchen hack. As the stew heats, steam rises to the underside of the glass lid, condenses into water droplets, and drips back down onto the food. Usually, that is fine, but those cold water droplets hitting your rising dumplings will make them soggy and heavy. The towel acts as a canopy, catching that condensation and keeping your dumplings perfectly dry, light, and fluffy.
Let the dumplings steam on HIGH for exactly forty to forty-five minutes. Do not lift the lid even once during this time. I know it is tempting. You will want to look. But every time you break that seal, you let out all the hot steam, dropping the temperature instantly and ruining your chances of getting fluffy dumplings. Have faith in the process and leave the lid alone.
Step 5: The Reveal and Garnish
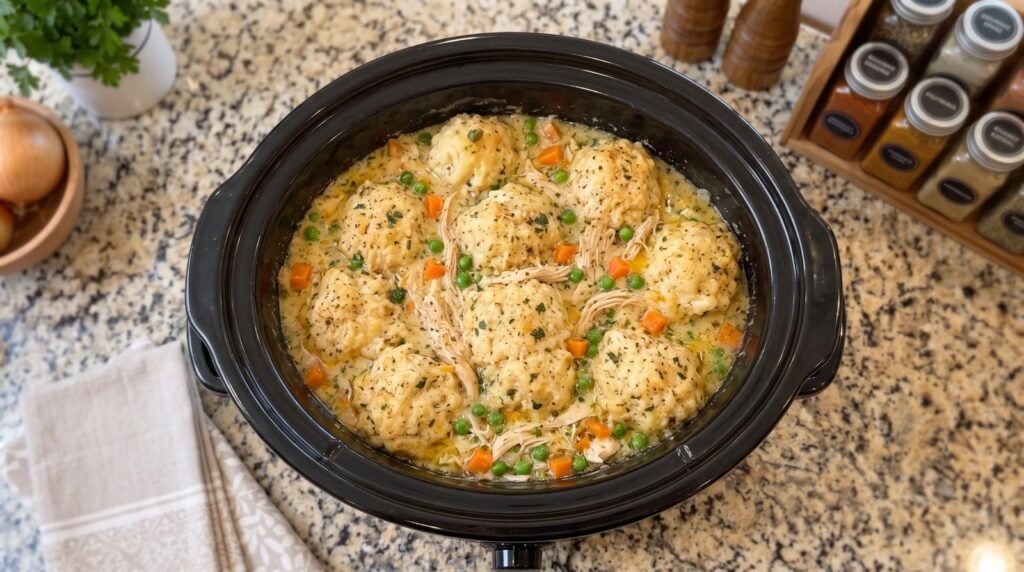
After forty-five minutes, carefully remove the lid and the damp towel. Your dumplings should have doubled in size, looking puffed, dry on the surface, and beautifully set.
To test for doneness, gently insert a toothpick or a skewer into the center of the largest dumpling. It should come out clean, without any wet dough clinging to it.
Sprinkle the top of your beautiful creation with freshly chopped parsley and a grind of fresh black pepper.
To serve, use a large spoon to scoop up a generous portion of the rich, chicken-and-vegetable gravy along with one or two fluffy dumplings. Serve it hot in deep bowls.
Common Mistakes to Avoid
Even with a great recipe, a few common slip-ups can turn your dinner into a disappointment. Here is what to watch out for based on my own past kitchen disasters.
Using low-fat dairy. If you try to swap the buttermilk for skim milk, or the heavy cream for half-and-half, your gravy will be thin and watery, and your dumplings will lack that rich, melt-in-your-mouth tenderness. The fat in the dairy is essential for both flavor and texture here.
Making the dumplings too large. If you scoop out giant, baseball-sized portions of dough, the outsides will cook and become soggy before the heat can penetrate to the center, leaving you with raw, doughy middles. Stick to small, golf-ball-sized scoops.
Leaving the slow cooker on low. Your slow cooker must be on the HIGH setting when you add the dumplings. The gentle warmth of the low setting simply does not generate enough steam to cook the dough properly, resulting in dissolved flour mush.
Overworking the dough. I cannot emphasize this enough. Treat your dumpling dough gently. Think of it like biscuit dough; the less you handle it, the lighter and fluffier the end result will be.
Creative Variations to Try
Once you have mastered the classic version, you can start experimenting with different flavors to suit your family's preferences. Here are a few variations that have worked wonderfully in my own kitchen.
If you love a bit of smoke and warmth, try adding half a cup of chopped, cooked bacon along with the chicken at the beginning of the cook. You can also add a pinch of smoked paprika to your flour mixture when making the dumplings. The subtle smoky flavor cuts through the richness of the cream beautifully.
For an herby, bright twist, stir a tablespoon of fresh, chopped dill into your dumpling dough along with the buttermilk. Lemon and dill are classic partners for chicken, and the dill in the dumplings adds a beautiful green speckled look and a fresh, summery pop of flavor to an otherwise heavy winter dish.
If you are cooking for someone who cannot eat gluten, you can still enjoy this comfort food classic. Swap the all-purpose flour in both the gravy thickener and the dumpling recipe for a high-quality, cup-for-cup gluten-free baking blend that contains xanthan gum. You may need to add an extra tablespoon or two of buttermilk to the dough, as gluten-free flours tend to absorb more moisture. The dumplings will be slightly denser than the wheat version, but still absolutely delicious.
To sneak more vegetables into your family's diet, you can easily add diced parsnips, butternut squash, or sweet potatoes to the slow cooker base at the start of the cook. They hold up beautifully over long cooking times and add a lovely, natural sweetness to the gravy.
What to Serve with This Dish
Because slow cooker chicken and dumplings is such a rich, hearty, and carb-heavy meal, you do not need much to go with it. In fact, it is practically a one-pot meal on its own.
However, to balance out the richness of the heavy cream and the buttery dough, I highly recommend serving it alongside something bright, acidic, and crisp.
A simple green salad tossed with a sharp, lemony vinaigrette is my favorite side dish. The clean, acidic dressing cuts through the savory fat of the stew, resetting your palate between bites of rich dumpling.
Alternatively, a side of roasted broccoli or Brussels sprouts tossed with a splash of balsamic vinegar provides a nice, roasted bitterness and textural contrast to the soft, comforting textures of the main dish.
Storing and Reheating Leftovers
If you are lucky enough to have leftovers, they will keep beautifully in an airtight container in the refrigerator for up to three days.
However, keep in mind that the dumplings will continue to act like little sponges, absorbing the delicious gravy as they sit in the fridge overnight. When you open the container the next day, you might find that your stew has become incredibly thick.
To reheat, transfer the leftovers to a small saucepan over low heat. Add a splash of chicken broth or water to thin out the gravy, then cover the pan with a lid. Heat gently, stirring occasionally, until the chicken and gravy are hot and the dumplings are warmed through to the center.
Do not reheat them on high heat, or you will burn the bottom of the gravy before the center of the dumplings gets warm.
I do not recommend freezing chicken and dumplings once the dough has been cooked. The freezing and thawing process breaks down the delicate starch structure of the steamed dumplings, turning them incredibly mushy and waterlogged when reheated. If you want to freeze this meal, freeze the chicken and vegetable stew base on its own, then thaw, reheat to a boil, and steam a fresh batch of dumplings right before serving.
Frequently Asked Questions
Can I use canned biscuits instead of scratch-made dough?
Yes, you can. If you are in a pinch and need to save time, you can use a tube of refrigerated biscuit dough. Cut each raw biscuit into four pieces and drop them into the hot stew just like you would with the homemade dough. Use the same paper towel trick under the lid and cook on high for about forty minutes. However, keep in mind that canned biscuits often contain preservatives and artificial flavors that can give the gravy a slightly metallic or overly salty taste, and they tend to dissolve more easily than homemade dough.
How do I know when the dumplings are done cooking?
The best way to tell is by visual cues and the toothpick test. When done, the dumplings should look dry, puffed, and slightly dull on top, not wet or shiny. If you gently press one with your finger, it should feel springy, not squishy or sticky. If you are still unsure, cut one of the larger dumplings in half with a spoon; the inside should look fluffy and bread-like, without any wet, shiny dough in the middle.
Why did my dumplings dissolve into the liquid?
This usually happens for one of two reasons: either your liquid was not hot enough when you added the dough, or you stirred the pot after adding them. Make sure your slow cooker is set to high and steaming hot before dropping the dough on top, and once they are in, do not stir the pot at all until the cooking time is completely finished.
Can I make this in an Instant Pot instead?
You can, but the method is slightly different. You would cook the chicken and vegetable base under high pressure for fifteen minutes, quick release the steam, shred the chicken, and then turn on the sauté function to bring the liquid to a boil. Drop your dumpling dough in, then place the glass lid on top (not the pressure cooking lid) and steam on the sauté medium setting for about fifteen to twenty minutes.
My gravy is too thin, how do I fix it?
If you prefer a much thicker gravy, you can make a quick slurry by mixing equal parts cornstarch and cold water (about one tablespoon of each) and stirring it into the bubbling stew before you add the dumplings. Let it cook for a couple of minutes to thicken up, then proceed with the dumpling step.
Is it normal for the dumplings to be pale?
Yes, absolutely. Because the dumplings are steamed rather than baked or fried, they will not develop a golden-brown crust. They will remain a pale, creamy white color, which is exactly how they are supposed to look. The rich flavor comes from the butter and buttermilk in the dough and the savory steam from the chicken broth below.