
There is a specific kind of magic that happens in a kitchen when you let something cook slowly all day. It is the kind of magic that starts with a cold, gray Sunday morning and ends with a home that smells like a five-star rustic Italian trattoria. For years, I was intimidated by beef short ribs. They always looked so perfect in restaurants, resting beautifully on a bed of creamy polenta, glistening under a dark, rich sauce that tasted like it took a lifetime to develop. When I tried to recreate them at home during my early years of cooking, I made the classic rookie mistake: I tried to rush them. I bought a pack of gorgeous English-cut ribs, threw them in a heavy pot on the stove, cranked up the heat, and expected dinner to be ready in ninety minutes. The result was a tragic, chewy, expensive disaster that tasted like shoe leather.
That failure sent me on a quest to understand what makes this tough, fat-marbled cut of meat tick. I realized that short ribs do not care about your busy schedule. They demand time, patience, and a gentle, consistent heat to break down their intense network of connective tissue. That was when I turned to my trusty slow cooker. By combining the slow cooker's steady, low heat with a few essential classic culinary techniques, I unlocked a foolproof method that delivers incredibly tender, fall-off-the-bone beef short ribs every single time.
If you have ever been scared of ruining an expensive cut of meat, or if you are looking for that ultimate comfort food recipe to impress your family or dinner guests, you are in the right place. Let me walk you through everything I have learned through years of trial, error, and messy aprons so you can master this dish on your very first try.
Understanding the Cut: What to Look For at the Butcher Counter
Before we even turn on the slow cooker, we need to talk about the meat itself. If you walk into a grocery store unprepared, you might see a few different things labeled as short ribs, and picking the wrong one can completely change your results.
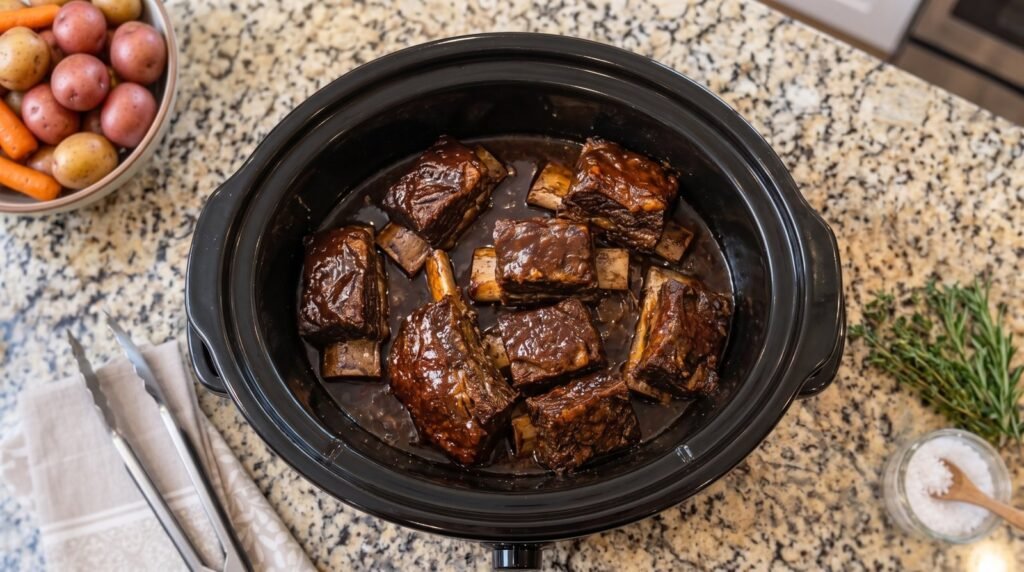
First, let us look at the two main ways short ribs are cut: English cut and Flanken cut. English-cut short ribs are sliced parallel to the bone. This leaves you with a thick, beautiful block of meat sitting on top of a single, flat bone segment. This is exactly what you see in classic restaurant dishes and in the photo of our slow cooker. Flanken-cut short ribs, on the other hand, are sliced across the bones. This results in a thin strip of meat containing several small cross-sections of bone, which is the classic cut used for Korean BBQ (LA Galbi) and is meant for quick grilling. For this slow cooker recipe, you absolutely want English-cut short ribs.
When you are standing at the meat counter, do not just grab the first package you see. Take a close look at the marbling and the meat-to-bone ratio. You want ribs that have a thick, generous portion of meat on top of the bone. Some cheaper packages are almost entirely bone with just a sliver of meat attached. Avoid those.
Look for deep red meat with plenty of white flecks distributed throughout. This is intramuscular fat, also known as marbling, and it is what will keep the meat incredibly juicy and flavorful during the long cooking process. You also want to look at the fat cap on top. A thin layer of fat is great for flavor, but if there is a massive, thick slab of solid white fat on top of the meat, you will want to trim some of it off or ask your butcher to do it. Otherwise, that fat will melt directly into your slow cooker, leaving you with a very greasy sauce that requires a lot of extra work to skim later.
The Science of Slow Cooking Beef Short Ribs
To truly appreciate this recipe, it helps to understand what is actually happening inside your slow cooker over those long eight hours. Beef short ribs come from the chuck, plate, or rib areas of the beef. Because these muscles do a lot of work supporting the animal, they are packed with tough connective tissue made of collagen.
If you cook a short rib quickly over high heat, the muscle fibers contract and squeeze out all their moisture, leaving you with dry, tough meat. But when you subject that same cut of meat to a low, moist heat environment (between 180 and 200 degrees Fahrenheit) for several hours, something beautiful happens. The tough collagen slowly melts and transforms into gelatin.
Gelatin is a home cook's best friend. It does not dry out; instead, it coats the individual muscle fibers of the beef, giving the meat a rich, luxurious, melt-in-your-mouth texture. This transformation takes time. You cannot rush it by turning your slow cooker to high and trying to finish in four hours. While you can technically cook them on high, the texture will never be as silky and tender as it is when cooked on the low setting for a full eight hours. Trust me on this one: patience is your secret ingredient.
The Recipe Ingredients
Here is a breakdown of the simple, high-quality ingredients you will need to create this masterpiece. Each one plays a specific role in balancing the richness of the beef.
| Ingredient | Amount | Purpose |
|---|---|---|
| Bone-in English-cut beef short ribs | 3 to 4 pounds | The star of the show, well-marbled and trimmed |
| Kosher salt and freshly cracked black pepper | 1 tablespoon each | For seasoning the meat generously before searing |
| High-smoke point oil (canola or avocado) | 2 tablespoons | For achieving a deep, caramelized sear on the beef |
| Yellow onion | 1 large, finely diced | Creates the sweet, aromatic base for the sauce |
| Carrots | 2 medium, finely diced | Adds natural sweetness to balance the rich beef flavor |
| Celery ribs | 2, finely diced | Completes the classic mirepoix vegetable base |
| Fresh garlic cloves | 4 to 5, minced | Provides a warm, savory aroma and depth of flavor |
| Tomato paste | 2 tablespoons | Concentrates the umami flavors and thickens the sauce |
| Dry red wine (Cabernet or Merlot) | 1 cup | Cuts through the fat and adds a complex, acidic backbone |
| Beef bone broth or high-quality beef stock | 1.5 cups | The rich liquid base for the braise |
| Worcestershire sauce | 1 tablespoon | Adds a savory, fermented punch of salty flavor |
| Fresh rosemary sprigs | 2 sprigs | Imparts a woody, pine-like fresh aroma |
| Fresh thyme sprigs | 4 to 5 sprigs | Adds a subtle, earthy, herbal note |
| Bay leaves | 2 dry leaves | Enhances the overall depth and complexity of the liquid |
| Cornstarch | 1.5 tablespoons | Mixed with cold water to create a slurry for thickening the sauce at the end |
The Golden Rules of Braising: Searing and Deglazing
If there is only one lesson you take away from this guide, let it be this: do not skip the sear.
I know it is tempting to just dump all your raw ingredients into the slow cooker, set the timer, and walk away. Many slow cooker recipes promise great results with this dump-and-go method. But with beef short ribs, skipping the sear is a culinary crime.
When you sear beef in a screaming hot pan, you trigger the Maillard reaction. This is a scientific process where the amino acids and sugars in the meat react under high heat to create hundreds of new flavor compounds and a beautiful brown crust. This crust is where all the deep, savory, complex beef flavor comes from. Without it, your short ribs will end up tasting boiled, gray, and flat.
The second golden rule is deglazing. After you sear the meat, you will notice a layer of dark, caramelized bits stuck to the bottom of your pan. In French cooking, this is called the fond, and it is absolute culinary gold. If you leave it in the pan and wash it down the sink, you are throwing away the best part of your dish. By pouring a liquid like red wine into the hot pan, you can scrape all those delicious bits off the bottom and incorporate them directly into your braising liquid. This simple step elevates a simple home-cooked meal into something truly extraordinary.
Step-by-Step Instructions
Let us roll up our sleeves and walk through the process of making these incredible short ribs.
First, take your short ribs out of the refrigerator about thirty minutes before you plan to cook them. Cold meat hitting a hot pan will cause the pan's temperature to drop instantly, which leads to steaming rather than searing. It also causes the muscle fibers to tense up. Allowing them to come closer to room temperature ensures an even, beautiful crust.
While the meat is resting on the counter, take a few paper towels and thoroughly pat each short rib dry. This is another crucial step for a great sear. Moisture is the enemy of browning. If there is water on the surface of the meat, that water has to evaporate first before browning can begin, which means you will end up steaming the meat instead of searing it. Once they are dry, season all sides of each rib generously with kosher salt and freshly cracked black pepper. Do not be shy here; short ribs are thick, rich cuts of meat that can handle a good amount of seasoning.
Place a heavy skillet, preferably cast iron or stainless steel, over medium-high heat and add your oil. Wait until the oil is shimmering and just starting to show a tiny wisp of smoke. Working in batches so you do not overcrowd the pan, carefully place the short ribs into the hot oil. If you crowd too many ribs into the pan at once, they will release moisture and steam instead of browning.
Let the ribs sear without moving them for about two to three minutes per side. You want to see a deep, rich, golden-brown crust develop on every single side of each rib, including the ends. Use tongs to turn them carefully. Once all sides are beautifully caramelized, transfer the short ribs to a plate and set them aside.
Once all the ribs are seared and removed from the skillet, turn the heat down to medium. You should have a good amount of rendered beef fat in the pan. If it looks like more than two tablespoons, spoon some of it out. Add your finely diced onion, carrots, and celery to the pan. This classic combination of vegetables is known as a mirepoix, and it serves as the flavor foundation for our sauce.
Cook the vegetables, stirring occasionally, for about five minutes until they start to soften and turn slightly translucent. Add the minced garlic and cook for just one more minute until you can smell its incredible aroma. Be careful not to burn the garlic, as burnt garlic will make your entire dish taste bitter.
Next, clear a small space in the center of your skillet and add the tomato paste. Let the paste cook directly on the bottom of the hot pan for about two minutes, stirring constantly, until its color deepens from a bright red to a dark brick red. This caramelizes the natural sugars in the tomato paste, removing its raw, metallic taste and unlocking a deep, rich flavor.
Now comes the fun part: deglazing. Pour your red wine into the hot skillet. It will bubble and steam instantly. Use a wooden spoon or a spatula to scrape up all those caramelized brown bits stuck to the bottom of the pan. Let the wine simmer and reduce by about half, which should take around three to four minutes. This burns off the harsh alcohol flavor, leaving behind a rich, fruity, acidic concentrate that will balance the heavy richness of the beef.
Once the wine has reduced, pour the contents of the skillet directly into your slow cooker. Arrange the seared short ribs on top of the vegetables in a single layer if possible, with the bones facing down. Pour in your beef bone broth and Worcestershire sauce. The liquid should come about halfway up the sides of the ribs. You do not want to completely submerge the ribs in liquid; we are braising them, not boiling them.
Tuck your fresh rosemary, thyme, and bay leaves into the liquid around the beef. Cover the slow cooker with its lid, set the temperature to low, and let the cooker do its thing for eight full hours. Resist the temptation to open the lid and check on them. Every time you open the lid of a slow cooker, you let out a massive amount of heat and moisture, which can add up to twenty minutes to your total cooking time.
The Secret to the Perfect Glossy Sauce
After eight hours, your house will smell absolutely incredible, and the meat on your short ribs should be so tender that it is literally falling off the bone. Carefully transfer the short ribs to a clean plate or warm serving platter. Be gentle here, as they are fragile and can easily fall apart. Cover them loosely with aluminum foil to keep them warm.
If you look inside your slow cooker, you will see a rich, dark liquid. However, you will also notice a shiny, thick layer of yellow fat floating on top. Because short ribs are a fatty cut of meat, they render out a significant amount of grease during their long cook. If you serve the sauce as-is, it will feel very heavy and greasy on the tongue.
To fix this, we need to separate the fat. The absolute best way to do this is to make the dish a day ahead, put the liquid in the refrigerator overnight, and simply lift off the solid disk of white fat that forms on top the next morning. But if you are serving this tonight, you have a couple of quick options.
You can use a fat separator cup, which allows you to pour off the rich juices from the bottom while leaving the fat behind. Alternatively, you can use a large, shallow ladle to gently skim the fat off the surface of the liquid. Another neat trick is to drag a clean paper towel lightly across the surface of the liquid; the paper towel will magically grab the oil while leaving the rich broth behind.
Once you have removed most of the excess fat, pour the remaining liquid and vegetables through a fine-mesh strainer into a saucepan, pressing down on the vegetables with a spoon to extract all their delicious juices. Place the saucepan over medium-high heat on your stove.
In a small bowl, whisk together your cornstarch and a splash of cold water until smooth. Pour this slurry into the simmering sauce, whisking constantly. Let the sauce boil for about two to three minutes. As it bubbles, the cornstarch will activate, transforming the thin liquid into a gorgeous, glossy, velvety gravy that easily coats the back of a spoon. Taste the sauce and add a pinch of salt, pepper, or a tiny splash of red wine vinegar if it needs a bit of brightness.
Pour this glossy sauce generously over your warm short ribs just before serving. The meat will absorb the sauce, creating a beautiful glaze that looks exactly like a professional chef prepared it.
Common Mistakes to Avoid
Over the years, I have made almost every mistake possible with this recipe. Here are the big ones to watch out for so your meal turns out perfectly.
- Using a cheap cooking wine. If you buy those little bottles of salty cooking wine from the supermarket grocery aisle, your sauce will taste salty, artificial, and flat. Always use a wine that you would actually enjoy drinking in a glass. It does not need to be expensive, but it should be a decent, dry red like a Cabernet Sauvignon, Merlot, or Syrah. The acidity and real fruit notes of a drinkable wine are crucial for cutting through the rich fat of the beef.
- Skipping the fat skimming step. I cannot stress this enough. If you skip skimming the fat, your sauce will separate on the plate, leaving a greasy pool of yellow oil around your food. Taking those five minutes to skim the surface makes a massive difference in the final texture and presentation of the dish.
- Rushing the cooking time. Do not try to cook these on high for four hours. While the meat will technically be cooked through, the connective tissues will not have had enough time to melt completely, leaving you with a texture that is dry and stringy rather than tender and melting. Always choose the low-and-slow eight-hour setting whenever possible.
- Crowding the pan during searing. If your ribs are packed tightly against each other in the skillet, the moisture they release will trap steam, turning the meat gray and preventing that delicious brown crust from forming. Sear them in batches, leaving at least an inch of space between each rib.
What to Serve with These Ribs
Because these short ribs are incredibly rich, savory, and tender, they pair beautifully with side dishes that can absorb that glorious, glossy gravy while offering a bit of textural contrast or clean brightness.
My absolute favorite pairing is a rustic, garlic-infused mashed potato. The creamy, buttery potatoes act like a cloud that catches every drop of the rich red wine sauce. To make them, I like to boil Yukon Gold potatoes with a few whole cloves of garlic, mash them with plenty of heavy cream, butter, and a handful of freshly grated Parmesan cheese.
Another classic Italian option is soft, creamy polenta. Polenta has a subtle corn flavor and a velvety texture that pairs naturally with braised meats. You can whisk in a bit of goat cheese or mascarpone at the very end of cooking the polenta to give it an extra layer of luxury.
To balance out the heavy richness of the meat and gravy, you definitely want to include something green or bright on the plate. Roasted asparagus with a squeeze of fresh lemon juice, simple roasted Brussels sprouts with a drizzle of balsamic glaze, or a crisp, bright green salad with a sharp French vinaigrette are all perfect choices. The acidity from these green sides helps cleanse your palate between bites of the rich, tender beef.
Leftovers and Make-Ahead Magic
Here is a wonderful secret about beef short ribs: they actually taste even better the next day.
As the cooked meat sits in the braising liquid in the refrigerator overnight, the fibers continue to absorb the complex flavors of the red wine, garlic, and herbs. Additionally, the fat will solidify into a firm, white layer on top of the container, making it incredibly easy to scrape off and discard with a spoon.
If you want to make this dish for a dinner party, I highly recommend cooking it the day before. The next day, simply remove the hardened fat, transfer the ribs and liquid to a baking dish, cover with foil, and reheat in a 350-degree Fahrenheit oven for about twenty to twenty-five minutes until hot. The meat will be perfectly tender, and your sauce will be incredibly clean and flavorful.
If you happen to have any leftovers, do not let them go to waste. The shredded meat makes an absolutely incredible ragu sauce. Simply shred the cold meat off the bones, discard any large pieces of fat, and stir the meat back into the leftover sauce. Toss this rich mixture with some hot pappardelle pasta and top with a mountain of freshly grated Pecorino Romano cheese for an effortless, restaurant-quality weekday dinner.
You can also use the shredded beef to make incredibly rich tacos, cozy shepherd's pies, or ultimate gourmet grilled cheese sandwiches. The possibilities are endless, and honestly, sometimes I find myself looking forward to the leftover creations even more than the original dinner itself.