
I remember the exact night I gave up on traditional pan lasagna. It was a chilly Sunday evening, the kind of night where you crave comfort food that hugs your soul. I had spent nearly three hours boiling noodles, simmering a rich meat sauce, whipping up a ricotta mixture, layering it all with surgical precision, and baking it to bubbly perfection. My kitchen smelled like a rustic Italian trattoria. My mouth was watering. I let the lasagna rest for what felt like an eternity but was probably only fifteen minutes. I sliced into it, lifted the first piece with my spatula, and disaster struck. It slid apart into a hot, messy swamp of pasta sheets, loose meat, and watery cheese on the plate. It still tasted good, but visually, it looked like a kitchen crime scene.
That was the moment I realized there had to be a better way to enjoy the flavors of lasagna without the structural integrity issues. Enter lasagna roll-ups. Specifically, these creamy white chicken and spinach lasagna roll-ups. They are individual, self-contained packages of pure, comforting joy. No more messy slicing. No more watery layers sliding around your plate. Every single roll is perfectly portioned, packed with rich flavor, and wrapped in its own crispy-edged noodle armor. Since that fateful Sunday, I have made this recipe dozens of times, tweaking the ratios, perfecting the sauce, and discovering the hard lessons so you do not have to.
If you are tired of the same old spaghetti night or want a dish that looks incredibly elegant but is secretly very manageable to assemble, this recipe is for you. Let us dive deep into the world of lasagna roll-ups, look at the science of why they work so well, and get you ready to make a pan of your own that looks just as glorious as the one in my kitchen.
Why Roll-Ups are a Kitchen Revelation
Let us talk about why this format is superior to the traditional block lasagna. First, it is all about the texture. When you bake a standard lasagna, only the very top layer gets that beautiful, golden-brown cheese crust. The edges are nice, but if you get a piece from the dead center of the pan, you miss out on that crispy noodle goodness. With roll-ups, the top of every single roll gets direct exposure to the oven heat. You get those caramelized, crispy cheese corners on every single portion. It is an edge-piece-lover's dream come true.
Second, it is incredibly easy to serve. Hosting a dinner party can be stressful when you are trying to plate food cleanly. You do not have to worry about the first piece of lasagna looking like a demolished building. You simply scoop up a gorgeous roll with a spatula, spoon some extra sauce over the top, and present a restaurant-quality plate to your guests. It looks deliberate, upscale, and beautiful.
Third, they freeze beautifully. You can assemble them, freeze them individually on a baking sheet, pop them into a freezer bag, and bake just one or two when you have a solo craving. It is a total game-changer for meal prep and busy weeknights when you do not want to cook a massive meal but still crave home-cooked comfort.
The Three Rules of the Perfect Filling
The key to a dish like this is quality and moisture control. Because we are using a white cream sauce instead of a robust red marinara, there is nowhere for subpar ingredients or excess water to hide. Let us break down the components of the filling and how to get them perfect.
Rule number one is the great spinach squeeze. You can use fresh spinach that has been sautéed and chopped, or you can use frozen chopped spinach. I actually prefer frozen spinach for this because it is already finely chopped and incredibly convenient. However, there is one non-negotiable rule when using frozen spinach: you must squeeze out every single drop of water. I am not exaggerating here. If you think you have squeezed it enough, squeeze it again. I wrap my thawed spinach in a clean kitchen towel or a few layers of cheesecloth and wring it out over the sink until my hands ache. If you skip this step, that excess moisture will release during baking, diluting your rich ricotta filling and turning your velvety cream sauce into a runny, watery puddle.
Rule number two is choosing the right chicken. I have tried this with poached chicken breast, baked chicken thighs, and rotisserie chicken. While poached chicken breast is fine, my absolute favorite shortcut that actually improves the overall flavor is using a store-bought rotisserie chicken. The mixture of dark and light meat adds so much richness, and the pre-seasoned chicken infuses the entire filling with savory depth. Just shred it finely so it rolls up smoothly without tearing the pasta sheets. If you prefer to cook your own, season chicken breasts with garlic powder, onion powder, salt, and black pepper, bake them until tender, and shred them finely.
Rule number three is binding the cheese. Ricotta cheese is the classic base for lasagna fillings, but on its own, it can become grainy and loose when heated. To fix this, we mix the ricotta with a whole egg, a good handful of grated parmesan, and plenty of seasoning. The egg acts as a binder, setting gently as the lasagna bakes so the filling stays creamy but holds its shape inside the roll rather than oozing out onto the bottom of the pan.
The Sauce That Makes the Dish
Many recipes will tell you to just buy a jar of Alfredo sauce to save time. Please do not do it. Jarred Alfredo sauce often has a strange, metallic tang, a gloppy texture from cornstarch thickeners, and very little actual cheese flavor. Making a real cream sauce from scratch is incredibly simple and takes less than ten minutes.
We start by melting butter in a saucepan, adding freshly minced garlic until it is intensely fragrant, and then pouring in heavy cream. We let that simmer gently to reduce and thicken naturally, then stir in a generous amount of freshly grated parmesan cheese until it melts into a silky, velvety sauce. Season it with freshly cracked black pepper and a tiny pinch of freshly grated nutmeg. That nutmeg is my secret weapon. You will not taste it as a distinct flavor, but it adds an incredible depth and warmth to the cream sauce that makes people wonder what that amazing flavor is.
If you are worried about the sauce separating or curdling, the secret is keeping the heat low. Once you add the cheese to the warm cream, turn off the burner entirely. The residual heat is more than enough to melt the cheese. Stirring it constantly off the heat prevents the fats from separating from the liquids, ensuring a smooth, emulsified sauce every single time.
Ingredients for the Ultimate Roll Ups
Here is everything you will need to create this masterpiece. This recipe makes eight large roll-ups, which comfortably feeds four to six people depending on their appetites.
| Ingredient | Amount | Notes |
|---|---|---|
| Lasagna noodles | 10 sheets | Boil 10 even if you only need 8, just in case some rip |
| Shredded chicken | 2.5 cups | Rotisserie chicken works best, finely shredded |
| Frozen chopped spinach | 10 ounces | Thawed and squeezed completely dry |
| Ricotta cheese | 15 ounces | Whole milk ricotta for the best texture and creaminess |
| Egg | 1 large | Lightly beaten to bind the filling |
| Garlic | 5 cloves | Minced; divided between filling and sauce |
| Salt | 1 teaspoon | For the filling and sauce adjustment |
| Black pepper | 1 teaspoon | Freshly cracked is highly recommended |
| Nutmeg | 1 pinch | Ground, preferably freshly grated |
| Unsalted butter | 4 tablespoons | For the garlic cream sauce |
| Heavy cream | 1.5 cups | Do not substitute with milk or half-and-half |
| Parmesan cheese | 1 cup | Freshly grated; divided between sauce and filling |
| Mozzarella cheese | 2 cups | Whole milk mozzarella, freshly shredded |
| Italian seasoning | 1 teaspoon | For seasoning the filling |
Step-by-Step Culinary Guide
Now that we have our ingredients ready, let us walk through the process step-by-step. Put on some music, pour yourself a glass of wine, and enjoy the process of building this delicious comfort food.
Step 1: Boiling the Pasta
Bring a large pot of heavily salted water to a rolling boil. When I say heavily salted, I mean it should taste like the ocean. This is your only chance to season the pasta itself. Drop the lasagna noodles in one by one to prevent them from sticking together.
Cook the noodles for about two minutes less than the package instructions suggest for al dente. We want them to be pliable enough to roll without cracking, but still quite firm. If you overcook them now, they will absorb too much liquid from the sauce and turn into mush during the baking process.
Once cooked, carefully drain them. Here is a pro-tip to keep them from sticking together as they cool: lay them out in a single layer on sheets of parchment paper or clean, dry kitchen towels. Pat the tops dry with a paper towel. This removes the surface starch and water, which prevents them from slipping and sliding when you try to spread the filling.
Step 2: Preparing the Filling
While the noodles are cooling, prepare the filling. In a large mixing bowl, combine the whole milk ricotta, the lightly beaten egg, the squeezed-dry spinach, the shredded chicken, half of the minced garlic, half of the grated parmesan cheese, the Italian seasoning, salt, and black pepper.
Use a sturdy spoon or a rubber spatula to mix this together until it is completely uniform. Take a moment to smell it; the garlic and Italian herbs should already smell incredible. Set this mixture aside.
Step 3: Making the Garlic Cream Sauce
In a medium saucepan, melt the unsalted butter over medium-low heat. Add the remaining minced garlic and sauté for about one minute. Keep a close eye on it; garlic burns very easily and turned-burnt garlic tastes bitter and ruins the sauce. You just want it to become fragrant and slightly softened.
Slowly pour in the heavy cream, stirring constantly to combine it with the garlic butter. Bring the mixture to a very gentle simmer. Do not let it boil vigorously, as high heat can cause the cream to break. Let it simmer gently for about five minutes until it has slightly thickened and coats the back of a spoon.
Remove the pan from the heat entirely. Stir in the remaining half cup of freshly grated parmesan cheese, a pinch of nutmeg, and a crack of black pepper. Stir continuously until the cheese is completely melted and the sauce is perfectly smooth. Taste the sauce and add a pinch of salt if needed, keeping in mind that parmesan is already quite salty.
Step 4: Assembling the Roll Ups
Preheat your oven to 375 degrees Fahrenheit. Take a large 9 by 13 inch baking dish and spoon about a half cup of your garlic cream sauce onto the bottom. Spread it around to coat the bottom of the dish evenly. This prevents the noodles from sticking to the glass and ensures the bottoms of the rolls stay moist and tender.
Lay out your dried lasagna noodles on a clean work surface. Spoon about three tablespoons of the chicken and spinach ricotta mixture onto each noodle. Use the back of a spoon or an offset spatula to spread the filling in a thin, even layer across the entire length of the noodle, leaving about a half-inch border at one end. This gap is important because as you roll, the filling will naturally push forward slightly.
Starting from the end with the filling all the way to the edge, gently roll the noodle up snugly. Do not squeeze too tightly, or the filling will ooze out of the sides. Just a nice, secure roll. Place the roll-up into your prepared baking dish, seam-side down. Placing them seam-side down ensures they stay rolled up during the baking process and do not unravel. Repeat this process with the remaining noodles, nesting them snugly side-by-side in the dish.
Step 5: Saucing and Cheesing
Once all eight rolls are nestled into the baking dish, pour the remaining garlic cream sauce evenly over the top of the roll-ups. Make sure every exposed bit of noodle gets a little sauce so it does not dry out and become hard in the oven.
Sprinkle the freshly shredded mozzarella cheese generously over the top of the rolls. I like to concentrate a good portion of the cheese right on top of each individual roll to create those beautiful, cheesy caps. If you have any extra parmesan cheese lying around, sprinkle that on top too for an extra hit of savory flavor.
Step 6: Baking to Golden Perfection
Cover the baking dish tightly with aluminum foil. To prevent the cheese from sticking to the foil, you can spray the underside of the foil lightly with non-stick cooking spray.
Bake in the preheated oven for 20 minutes. This initial covered bake heats everything through, melts the interior cheeses, and lets the pasta absorb the flavors of the cream sauce.
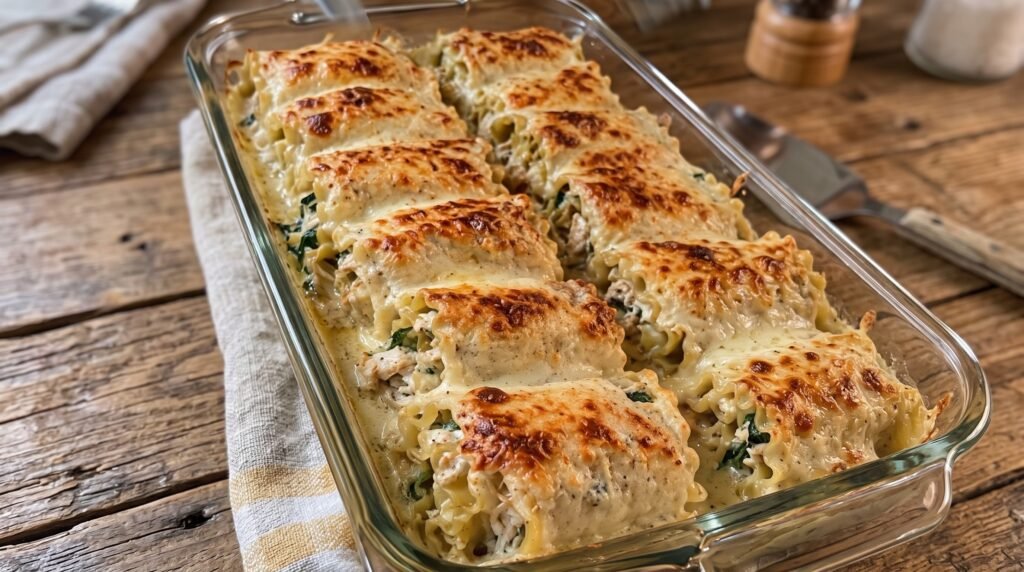
After 20 minutes, carefully remove the aluminum foil. Return the dish to the oven uncovered for another 10 to 15 minutes, or until the cheese on top is completely melted, bubbly, and starting to turn golden brown. For that picture-perfect look shown in my kitchen, turn on the oven broiler for the last 2 to 3 minutes. Watch it like a hawk during this step; the broiler can go from golden brown to burnt in a matter of seconds. You want those beautiful, deep brown spots and crispy cheese edges.
Once baked, remove the dish from the oven and let it rest for 10 minutes before serving. This resting period is crucial. It allows the cheese and filling to set slightly so they hold their shape beautifully when you lift them out of the pan. Garnish with a sprinkle of fresh chopped parsley or basil for a pop of color, and serve.
Crucial Mistakes I Learned the Hard Way
I have made plenty of mistakes while perfecting this recipe over the years. By sharing them, I hope to save you from the same kitchen frustrations.
One major mistake is using no-boil lasagna noodles. Some people swear by them for traditional lasagna, but they do not work for roll-ups. No-boil noodles are designed to absorb liquid from the sauce to soften up while baking, but you cannot roll them while they are raw and dry. If you try to soak them in warm water to soften them, they become gummy, sticky, and tear instantly. Stick to traditional, dry lasagna sheets that you boil yourself.
Another mistake is using too much sauce on the bottom of the pan. While you want enough to keep things from sticking, dumping half your sauce on the bottom before adding the rolls will make the bottoms of your roll-ups incredibly soggy. The rolls will lose their structure and turn mushy. Keep the bottom layer thin, and save the majority of the sauce for pouring over the top.
Do not skip the resting time. I know how tempting it is to dig in immediately when the cheese is bubbling and the garlic aroma is filling your entire house. But if you scoop them out straight from the oven, the hot ricotta filling will run out of the sides, and you will lose that beautiful layered look inside the rolls. Ten minutes of patience will reward you with perfect, intact, gorgeous roll-ups.
Lastly, make sure you do not buy pre-shredded cheese. I mentioned this earlier, but it bears repeating. The starch coatings on bag cheese absorb moisture and prevent a smooth melt. When you melt pre-shredded mozzarella, it often turns greasy and slightly rubbery instead of forming that creamy, stretchy blanket of cheese we want. Grate it yourself from a block of whole milk mozzarella.
Make-Ahead, Freezing, and Reheating Strategies
This is one of the best dishes for planning ahead. If you are hosting a dinner party or just want to make weeknight dinners easier, you can fully assemble these roll-ups in the baking dish a day in advance. Just cover the assembled dish tightly with plastic wrap and store it in the refrigerator. When you are ready to bake, remove the plastic wrap, cover with foil, and bake as directed. You may need to add about 5 to 10 minutes to the covered baking time since the dish will be starting cold from the fridge.
To freeze them, assemble the roll-ups but do not put them in the baking dish yet. Place the individual rolls on a baking sheet lined with parchment paper, making sure they do not touch. Place the baking sheet in the freezer for about two hours until the rolls are frozen solid. Once frozen, transfer them to a freezer-safe zip-top bag. You can also freeze the sauce separately in a jar or container.
When you want to eat them, thaw the rolls and sauce in the refrigerator overnight. Arrange the thawed rolls in a baking dish with the sauce, top with cheese, and bake as directed. If you are baking them directly from frozen, place them in a baking dish with the sauce, cover tightly with foil, and bake at 375 degrees for about 45 minutes until hot in the center, then uncover, add cheese, and bake for another 15 minutes until bubbly.
To reheat leftovers, I highly recommend using the oven rather than the microwave. Microwaving cream-based dishes can cause the fats to separate, leaving you with a oily pool. Instead, place the leftovers in a small baking dish, splash a tablespoon of water or milk over the top to keep them moist, cover with foil, and bake at 350 degrees for 15 to 20 minutes until heated through.
Flavor Variations to Try Next Time
Once you master the basic recipe, you can start experimenting with different flavor profiles to keep things interesting.
If you love mushrooms, try adding sautéed wild mushrooms to the filling. Sauté sliced cremini, shiitake, or button mushrooms in butter with a sprig of fresh thyme until they are deeply browned and caramelized. Chop them up and fold them into the chicken and spinach mixture. The earthy flavor of the mushrooms pairs beautifully with the rich garlic cream sauce.
For a smoky twist, you can add chopped crispy bacon to the filling and a touch of smoked provolone cheese mixed in with the mozzarella on top. The smoky bacon cuts through the richness of the cream sauce and adds a wonderful texture contrast.
If you like a bit of heat, stir a tablespoon of chopped calabrian chili paste or a generous pinch of red pepper flakes into your garlic cream sauce while it simmers. The spicy kick cuts through the creamy, cheesy richness and adds a whole new dimension to the dish.
For a vegetarian version, simply omit the chicken and double up on the spinach, or replace the chicken with sautéed zucchini, yellow squash, and bell peppers chopped into a very fine dice. This makes for a light, colorful, and incredibly flavorful vegetable roll-up.
No matter how you choose to customize them, these creamy garlic chicken and spinach lasagna roll-ups are bound to become a favorite in your household. They deliver all the comforting, decadent flavors of a white lasagna in a neat, beautiful package that makes every dinner feel like a special occasion. Give them a try this week, and watch your family run to the dinner table.