
We have all been there. It is six o clock on a Tuesday evening, you are standing in front of your open refrigerator, staring blankly at a pack of boneless, skinless chicken breasts. They are the ultimate blank canvas of the culinary world, but let us be honest, they can also be incredibly boring. If you cook them a minute too long, they turn into something resembling shoe leather. If you underseason them, they taste like absolute nothingness.
For years, I struggled to make chicken breasts exciting. I tried marinating them for hours, stuffing them, breading them, and smothering them in heavy sauces. Some of these methods worked okay, but they always felt like a lot of effort for a mediocre payoff. Then, a few years ago, I stumbled upon the Hasselback technique while trying to spruce up some boring old potatoes.
A lightbulb went off in my head. What if I used this same slicing method on chicken breasts? By cutting deep slits into the meat, I could create pockets to stuff with delicious ingredients, ensuring that flavor penetrated every single bite.
After weeks of experimenting in my own kitchen, making countless mistakes, and dry-testing different flavor combinations, I finally perfected the recipe that my family now begs for every single week: Garlic Butter Bacon Wrapped Hasselback Chicken.
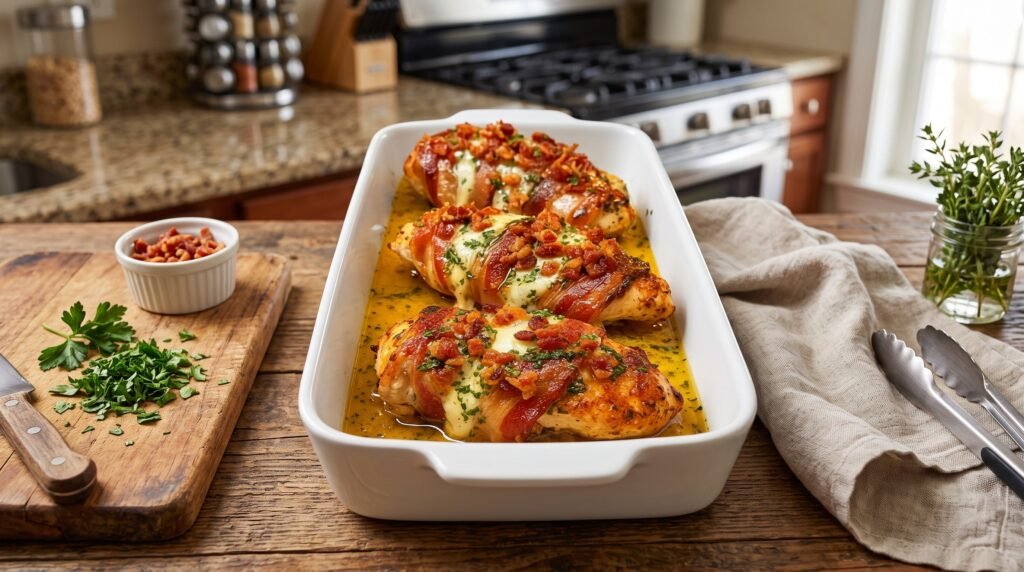
This dish is a absolute showstopper. When you pull it out of the oven, the chicken is incredibly tender, swimming in a golden pool of garlicky butter. The pockets are bursting with gooey, melted cheese, and the entire breast is wrapped in savory bacon that crisps up beautifully under the broiler. To top it all off, we throw on some extra crispy bacon bits and a handful of fresh herbs.
Let me walk you through exactly how to make this masterpiece in your own kitchen, sharing all the hard-won secrets and silly mistakes I made along the way so yours turns out perfect on the very first try.
Why the Hasselback Method is a Chicken Breast Game Changer
Before we get into the kitchen prep, let us talk about the science of why this works. The biggest problem with boneless, skinless chicken breasts is that they are incredibly lean. They lack the fat and connective tissue that keep chicken thighs so juicy. When you bake a whole breast, the thin ends overcook long before the thick center reaches a safe temperature.
By slicing the chicken Hasselback-style, you are doing two brilliant things at once. First, you are increasing the surface area of the meat. This allows heat to penetrate more evenly, reducing your overall cooking time. Second, you are creating built-in pockets for fat and moisture.
When you stuff those pockets with cheese and wrap the entire thing in bacon, you are essentially creating an insulation jacket for the lean chicken meat. As the dish bakes, the fat from the bacon renders down, baste-bathing the chicken from the outside. Meanwhile, the cheese melts inside the pockets, keeping the interior incredibly moist.
To top it all off, we bake the chicken in a shallow bath of garlic butter. This sauce bubbles up around the meat, ensuring that the bottom of the chicken stays just as juicy and flavorful as the top. It is a fool-proof way to guarantee juicy chicken every single time.
The Ingredient Lineup
To make this dish truly spectacular, you do not need fancy, hard-to-find ingredients. You just need high-quality kitchen basics. Over the years, I have learned that the quality of your ingredients directly impacts the final flavor of this dish. Here is a breakdown of what you will need.
| Ingredient | Amount | Notes |
|---|---|---|
| Boneless skinless chicken breasts | 3 large breasts | Try to find plump, evenly sized breasts |
| Bacon | 6 to 8 strips | Standard thin-cut bacon works best for wrapping |
| Mozzarella or Monterey Jack cheese | 6 ounces | Block cheese, sliced into small squares |
| Unsalted butter | 4 tablespoons | Melted, for the garlic butter sauce |
| Garlic | 4 cloves | Freshly minced, avoid the jarred stuff |
| Paprika | 1 teaspoon | Smoked or sweet, for color and warmth |
| Onion powder | 1/2 teaspoon | Adds a nice savory depth of flavor |
| Salt | 1/2 teaspoon | Adjust to taste based on bacon saltiness |
| Black pepper | 1/4 teaspoon | Freshly cracked is always best |
| Fresh parsley | 2 tablespoons | Finely chopped for a bright, fresh finish |
| Bacon bits | 1/4 cup | Extra crispy, for sprinkling on top |
Choosing Your Ingredients Wisely
Let us talk about the cheese first. I cannot stress this enough: please do not use pre-shredded cheese from a bag for the stuffing. I know it is tempting because it saves time, but pre-shredded cheese is coated in cellulose and other anti-caking agents. This prevents the cheese from sticking together in the bag, but it also prevents it from melting into that smooth, gooey pool of goodness we want inside our chicken. Buy a block of low-moisture mozzarella, Monterey Jack, or even a nice mild provolone, and slice it yourself. You will thank me later.
Now, let us discuss the bacon. My biggest mistake when I first made this recipe was using thick-cut applewood smoked bacon. I love thick-cut bacon for breakfast, but it is a disaster for wrapping chicken. Because thick bacon takes a long time to render, the chicken breast will completely overcook and dry out before the bacon even begins to get crispy. You will end up with dry meat and rubbery, flabby bacon. Stick to standard thin-cut bacon. It wraps easily, hugs the chicken tightly, and crisps up beautifully in the oven.
For the garlic butter, use fresh garlic. The pre-minced garlic in a jar has a strange, metallic, preservative-heavy taste that can ruin the delicate butter sauce. Grate or mince your own fresh cloves. It only takes a minute, and the aroma in your kitchen will be absolutely incredible.
Step-by-Step Guide to Perfect Hasselback Chicken
Grab a large baking dish, a sharp knife, and let us get cooking. Follow these steps carefully to ensure your chicken turns out looking exactly like the mouthwatering photo.
Step 1: Prep and Clean the Chicken
Start by patting your chicken breasts completely dry with paper towels. This is a crucial step that many home cooks skip. If the surface of your chicken is wet, the bacon will slip off, the seasonings will slide right off, and the chicken will steam instead of baking.
Once dry, trim away any excess fat or loose flaps of meat. Place the chicken breasts on a clean cutting board, leaving plenty of space between them.
Step 2: The Hasselback Cut (The Chopstick Trick)
Here is where people usually mess up. It is very easy to accidentally slice all the way through the chicken breast, leaving you with useless strips of meat instead of a cohesive pocketed breast.
To prevent this, use my favorite kitchen hack: the chopstick trick. Place two wooden chopsticks, or the handles of two wooden spoons, on either side of the chicken breast.
Using a very sharp chef knife, slice horizontally across the breast at half-inch intervals. The knife will cut down through the meat but will stop when it hits the chopsticks, preventing you from cutting all the way through. You want to make about six to eight cuts per breast, depending on how large they are.
Step 3: Seasoning the Pockets
In a small bowl, combine your melted butter, minced garlic, paprika, onion powder, salt, and black pepper. Stir it well until the spices are fully incorporated into the butter.
Using a small pastry brush or your fingers, gently open up each slit in the chicken breasts and brush a generous amount of this garlic butter mixture inside. Do not be shy here. We want to make sure the inside of the chicken is just as seasoned as the outside. Save about half of the garlic butter mixture for later; we will need it to create the baking bath.
Step 4: Stuffing the Cheese
Take your sliced block cheese and cut it into small squares that fit comfortably inside the slits of your chicken.
Gently stuff one piece of cheese into each pocket. You want the cheese to be tucked in snugly, but do not stuff them so full that the chicken breast starts to rip apart. It is okay if the cheese peeks out a little bit at the top, as this will create those beautiful caramelized cheese edges during baking.
Step 5: Wrapping with Bacon
Take your thin-cut bacon slices. Depending on the size of your chicken breasts, you will need about two slices per breast.
Start at one end of the chicken breast and wrap the bacon around the meat, threading it between the cheese-stuffed slits where possible, or wrapping it gently over the top of the pockets.
The bacon should hold the chicken breast together, acting like a little corset that keeps all that cheese from escaping during the bake. Tuck the loose ends of the bacon underneath the chicken breast so they stay secured while cooking.
Step 6: Setting Up the Baking Dish
Preheat your oven to 400 degrees Fahrenheit. Grab a high-sided baking dish that is large enough to hold all three chicken breasts without them being crowded together. If they are packed too tightly, they will boil in their own juices instead of roasting, and you will not get that beautiful browned color.
Pour the remaining garlic butter mixture into the bottom of the baking dish. If you have any leftover bits of garlic or spices in your bowl, scrape them all in.
Carefully lift your bacon-wrapped, stuffed chicken breasts and place them into the baking dish, right on top of the garlic butter.
Step 7: The Bake and Broil
Pop the baking dish into the preheated oven and bake for about 25 to 30 minutes.
The exact time will depend on the thickness of your chicken breasts. The safest and most accurate way to check for doneness is to use an instant-read digital meat thermometer. Insert the probe into the thickest part of the chicken meat, making sure you are not touching the hot cheese or the baking dish. You are looking for an internal temperature of 165 degrees Fahrenheit.
Once the chicken hits 160 degrees, turn your oven broiler to high. Keep a very close eye on it. Broil the chicken for 2 to 3 minutes, just until the bacon on top becomes crisp and deeply golden brown, and the cheese is bubbling and caramelized.
Step 8: The Finishing Touches
Carefully remove the hot baking dish from the oven. The chicken will be sitting in a beautiful pool of rendered bacon fat, melted cheese juices, and garlic butter.
Immediately sprinkle your crispy bacon bits and finely chopped fresh parsley over the top of the hot chicken. The heat from the chicken will release the oils in the parsley, filling your kitchen with an incredible aroma.
Let the chicken rest in the baking dish for 5 to 7 minutes before serving. This is incredibly important. If you cut into the chicken right away, all the precious juices will run out onto your plate, leaving the meat dry. Resting allows the muscle fibers to relax and reabsorb those delicious juices.
Crucial Mistakes to Avoid
Even though this recipe is straightforward, there are a few common pitfalls that can turn your culinary masterpiece into a soggy, dry, or messy disappointment. Here are the lessons I learned the hard way.
Do not skip the resting period. I know it is incredibly tempting to dive right in when you see that melted cheese and crispy bacon, but patience is a virtue here. Resting also allows the melted cheese inside the pockets to set slightly. If you cut the chicken immediately, all the hot liquid cheese will just run out like lava, leaving your chicken pockets empty.
Watch out for the salt level. Bacon is naturally very salty, and depending on the brand of cheese you use, it can also contain quite a bit of sodium. For this reason, I always recommend using unsalted butter for the garlic butter mixture. This gives you complete control over the seasoning. Only add a tiny pinch of salt to your butter mixture; you can always sprinkle a little flaky sea salt on top of the finished dish if you feel it needs it.
Do not crowd the pan. If your baking dish is too small and the chicken breasts are touching each other, the steam released during cooking will get trapped. This prevents the bacon on the sides of the chicken from cooking properly, resulting in a slimy, unappealing texture. Use a spacious dish so the hot air can circulate freely around each breast.
Avoid using super thick chicken breasts if possible. Sometimes, grocery stores sell massive chicken breasts that look like they came from a turkey. These are very difficult to cook evenly. The outer layers will dry out before the very center is fully cooked. If you can only find giant chicken breasts, consider slicing them in half horizontally to create cutlets, or gently pounding them to an even thickness before starting the Hasselback process.
Flavor Variations to Try
Once you have mastered the basic recipe, you can start getting creative with different flavor profiles. This method is incredibly versatile, and you can easily adapt it to suit whatever ingredients you have in your fridge.
For a spicy kick, try the Jalapeno Popper variation. Stuff the pockets with a mixture of cream cheese, shredded sharp cheddar, and sliced fresh jalapenos before wrapping the chicken in bacon. The creamy cheese cuts through the heat of the peppers, creating a rich, spicy flavor explosion that tastes exactly like your favorite game-day appetizer.
If you prefer Mediterranean flavors, go with the Tuscan Garden variation. Stuff the chicken slits with a mixture of crumbled feta cheese, chopped baby spinach, and oil-packed sun-dried tomatoes. Skip the bacon wrap if you want a lighter option, and instead brush the chicken generously with olive oil, dried oregano, and lemon juice before baking.
Another fantastic option is the Caprese style. Stuff the pockets with fresh mozzarella slices, thick tomato slices, and fresh basil leaves. Once baked, drizzle a sweet balsamic glaze over the top just before serving. This version is incredibly fresh and perfect for summer dinners when tomatoes and basil are in season.
For a smoky, comforting profile, try the Smoky BBQ version. Swap out the garlic butter for your favorite sweet and smoky barbecue sauce. Brush the sauce inside the pockets, stuff them with sharp cheddar cheese, wrap with bacon, and brush more barbecue sauce over the top of the bacon during the last five minutes of baking. The sauce caramelizes under the broiler, creating a sticky, sweet, and savory glaze that is absolutely irresistible.
What to Serve with Your Hasselback Chicken
Because this dish is so rich, savory, and decadent, you will want to pair it with side dishes that either complement its richness or provide a refreshing contrast.
One of my favorite things to serve alongside this chicken is a big heap of garlic mashed potatoes. The mashed potatoes act as the perfect vehicle for soaking up all that incredible garlic butter sauce left behind in the bottom of the baking dish. Spooning that warm, bacon-infused butter over creamy potatoes is pure heaven.
If you want to keep things a bit lighter, a crisp, green garden salad with a tangy vinaigrette is the perfect counterpoint. The acidity in a lemon or red wine vinaigrette cuts right through the richness of the bacon and cheese, cleansing your palate between bites.
Roasted asparagus or roasted broccoli are also fantastic green options. You can toss them in olive oil, salt, and pepper, and roast them on a separate baking sheet in the oven at the same time the chicken is cooking. The charred, crispy florets of broccoli taste incredible when dipped into the garlic butter sauce.
For a cozy, comforting meal, serve the chicken over a bed of buttered egg noodles or wild rice. The grains absorb the savory juices beautifully, making every single bite of the meal incredibly flavorful.
Meal Prep, Storage, and Reheating
If you are lucky enough to have leftovers, this chicken stores beautifully. Keep it in an airtight container in the refrigerator for up to three days. It makes for an incredible lunch the next day, sliced up cold over a salad or stuffed into a wrap.
However, reheating bacon-wrapped chicken can be a bit tricky. If you just throw it in the microwave, the chicken will dry out, the cheese will turn rubbery, and the bacon will lose all its crispiness.
The best way to reheat this dish is in the oven or an air fryer. To reheat in the oven, place the chicken in a baking dish, splash a tablespoon of water or chicken broth into the bottom of the dish to create steam, cover the dish tightly with aluminum foil, and bake at 350 degrees Fahrenheit for about 12 to 15 minutes, or until warmed through. Remove the foil for the last two minutes to help the bacon crisp back up.
If you have an air fryer, it is even easier. Place the leftover chicken breast in the air fryer basket and heat at 350 degrees Fahrenheit for about 6 to 8 minutes. The circulating hot air will heat the chicken evenly while making the bacon skin-shatteringly crispy once again.
I do not recommend freezing this dish after it has been baked, as the texture of the melted cheese and bacon can change and become slightly grainy upon thawing. However, you can prep the chicken up to the baking stage, wrap it tightly in plastic wrap and foil, and freeze it raw for up to a month. When you are ready to eat, let it thaw completely in the refrigerator overnight before baking as directed.
The Joy of Simple Comfort Food
At the end of the day, cooking should not be stressful, and it certainly should not be boring. This Garlic Butter Bacon Wrapped Hasselback Chicken is the perfect example of how a few simple techniques can elevate humble ingredients into a restaurant-quality meal.
It is a recipe born out of frustration with dry chicken, perfected through trial and error in a busy family kitchen, and enjoyed around a table filled with laughter and happy, full bellies.
The next time you find yourself staring blankly at a pack of chicken breasts on a weeknight, do not settle for another boring, dry meal. Grab some bacon, slice up some cheese, whip up a quick batch of garlic butter, and treat yourself to a dinner that is packed with flavor, texture, and pure comfort. Your family will thank you, your tastebuds will thank you, and you might just find your new favorite weeknight staple.