

It was a rainy Tuesday night, and I was staring into my fridge with that familiar feeling of utter exhaustion. I had just finished a brutal ten-hour workday, my feet were aching, and the thought of spending an hour prepping, cooking, and washing a mountain of pots and pans made me want to order delivery and call it a day. But my wallet was already hurting from a weekend of eating out, and I knew I had a bag of frozen shrimp sitting in my freezer.
I decided to throw together whatever I had in my pantry. Ten minutes of prep and five minutes of actual cooking later, I was sitting on my couch with a bowl of the most aromatic, juicy, spicy, and buttery shrimp I had ever tasted. It was better than what I usually get at my local seafood spot, and it cost a fraction of the price. Ever since that night, this recipe has been my absolute go-to for busy weeknights, last-minute date nights, or when I just want to impress my friends without breaking a sweat.
But it took me a long time to get this recipe right. Before I figured out the tricks I am going to share with you today, my home-cooked shrimp was often a sad, rubbery disappointment. If you have ever ended up with shriveled, chewy shrimp that tasted more like bouncy balls than seafood, you are not alone. Cooking seafood can be intimidating, but once you understand a few basic concepts, you will be able to nail it every single time.
Let us dive deep into how to make perfect chili garlic butter shrimp, from picking the right ingredients at the store to mastering the perfect sear in your skillet.
The Day I Ruined Twenty Dollars of Seafood
When I first started cooking for myself in my early twenties, I thought shrimp was foolproof. It cooks fast, so how hard could it be? I bought a bag of beautiful, expensive wild-caught jumbo shrimp from the seafood counter, brought them home, and tossed them into a lukewarm non-stick pan with a massive clump of raw garlic and a huge slab of butter.
The result was a total disaster. Because the pan was not hot enough, the shrimp started releasing all their water. Instead of searing, they began to boil in their own juices. The butter burned because I had it on high heat for too long trying to cook off the excess liquid. The garlic turned into bitter, black charcoal specks. The shrimp shrunk down to half their original size, turning into tough, rubbery little rings that were almost impossible to chew.
I felt incredibly defeated. I had wasted twenty dollars, ruined a great meal, and ended up eating plain toast for dinner. But that failure forced me to actually research what goes on chemically when we cook shrimp. I learned about moisture control, temperature management, and the exact order in which to add ingredients to a hot pan. Today, I am giving you the shortcut to all those years of trial and error.
The Ultimate Shrimp Buying Guide
Before you even turn on your stove, your success depends heavily on what you buy at the grocery store. Walking up to the seafood counter can be incredibly confusing with all the different labels, numbers, and price points. Here is what you need to know.
First, let us talk about the fresh versus frozen myth. Almost every food blogger and professional chef will tell you the same thing: buy frozen shrimp. Unless you live right on the coast and can see the fishing boats docking from your kitchen window, the fresh shrimp sitting on ice at your local grocery store is not actually fresh.
In almost all cases, shrimp is caught out at sea, immediately flash-frozen on the boat to preserve its quality, and shipped to stores. The seafood counter employees simply thaw those frozen blocks of shrimp and lay them out on ice in the display case. The problem is, you do not know how long those shrimp have been sitting thawed in that display case. They lose their moisture and flavor every hour they sit there.
When you buy a bag of frozen shrimp, you get to control exactly when they thaw, ensuring they are as fresh as possible when they hit your hot pan. Plus, frozen shrimp is usually significantly cheaper.
Second, pay attention to the numbers on the bag. You will often see labels like 16/20, 21/25, or 31/40. These numbers represent the count of shrimp per pound. For example, 16/20 means there are between 16 and 20 of these shrimp in a single pound.
For this chili garlic butter recipe, I highly recommend buying 16/20 (jumbo) or 21/25 (extra-large) shrimp. Larger shrimp are much more forgiving in a hot skillet. They take slightly longer to cook through, which gives you a wider window of time to get a beautiful golden-brown sear on the outside without overcooking the delicate flesh on the inside. Smaller shrimp cook so fast that they are often overdone before you can get any color on them.
Third, decide between wild-caught and farm-raised. If your budget allows, always choose wild-caught shrimp. They have a sweet, briny flavor and a firm texture that farm-raised shrimp simply cannot match. Farm-raised shrimp are often raised in crowded ponds and treated with chemicals, which can result in a muddy flavor and a mushy texture. If you must buy farm-raised, look for reputable organic certifications on the packaging.
Lastly, look for easy-peel or peeled and deveined shrimp. Deveining is the process of removing the dark digestive tract running along the back of the shrimp. While it is not harmful to eat, it can contain sand and grit, which ruins the texture of your dish. Doing this yourself is tedious and time-consuming. Buying shrimp that are already peeled and deveined saves you a massive amount of prep work, making this a true fifteen-minute meal.
The Secret Ten Minute Brine
If there is one single trick you take away from this guide, let it be this one. Before you cook your shrimp, you need to give them a quick brine. This is the secret weapon used by high-end restaurants to get that incredibly plump, juicy, and snappy texture that seems impossible to recreate at home.
When shrimp cook, their protein fibers contract and squeeze out moisture. This is why overcooked shrimp becomes dry and rubbery. By soaking them in a quick brine of salt and a tiny pinch of baking soda, you chemically alter the protein structures.
The salt helps the shrimp retain its natural juices, while the baking soda raises the pH level slightly. This alkaline environment keeps the proteins from bonding too tightly when heated, resulting in a perfectly tender, snappy bite. It also helps the shrimp brown beautifully in the pan.
To do this, simply toss your thawed, peeled, and deveined shrimp in a bowl with a teaspoon of kosher salt and a quarter teaspoon of baking soda. Let them sit at room temperature for ten to fifteen minutes while you prep your garlic and other ingredients. Once the time is up, rinse them thoroughly under cold running water to remove the excess salt and baking soda, then pat them dry with paper towels.
I cannot emphasize this enough: dry your shrimp completely. If they are wet when they hit the pan, they will steam instead of sear. You want them bone-dry so they get that gorgeous caramelized crust immediately.
Ingredients You Will Need
Now that your shrimp are prepped and ready, let us look at what else we need to bring this dish to life. This recipe relies on a small handful of high-quality ingredients, so each one plays a major role.
| Ingredient | Amount | Notes |
|---|---|---|
| Large Shrimp | 1 pound | Size 16/20 or 21/25, peeled and deveined |
| Unsalted Butter | 4 tablespoons | High-quality European butter preferred |
| Olive Oil | 1 tablespoon | For searing, helps prevent butter from burning |
| Fresh Garlic | 6 to 8 cloves | Finely minced, do not use the jarred stuff |
| Red Chili Flakes | 1 to 2 teaspoons | Adjust to your personal heat tolerance |
| Lemon Juice | 1 tablespoon | Freshly squeezed to cut through the rich butter |
| Fresh Parsley | 3 tablespoons | Finely chopped for brightness and color |
| Salt and Black Pepper | To taste | Use kosher salt and freshly cracked pepper |
| Baking Soda | 1/4 teaspoon | For the quick brine step |
Let us talk about the garlic. Please, for the love of good food, do not use the pre-minced garlic that comes in a glass jar from the store. That garlic is preserved in citric acid, which strips away its natural oils and gives it a sour, metallic taste.
For this recipe, we want that rich, sweet, and pungent garlic aroma. Buy a fresh head of garlic, smash the cloves with the flat side of your knife, peel off the skin, and mince them finely. It takes an extra two minutes, but the difference in flavor is night and day.
As for the butter, try to use unsalted butter. Different brands of salted butter have wildly different sodium levels, and using unsalted butter allows you to control the exact amount of salt in your dish. If you can find European-style butter, use it. It has a higher butterfat content and less water, which makes for a much richer, glossier pan sauce.
For the heat, standard red pepper flakes work beautifully. However, if you want a more complex flavor profile, you can experiment with different types of chilies. I love using Korean gochugaru (red pepper powder) for a mild, smoky heat and a vibrant red color, or Turkish Aleppo pepper for a subtle fruitiness. If you like extreme heat, you can even slice up a fresh bird's eye chili or jalapeño and sauté it alongside the garlic.
Step by Step Directions to Shrimp Perfection
Now that we have our ingredients prepped and our shrimp brined and dried, it is time to cook. This process moves incredibly fast, so make sure all your ingredients are measured out and sitting right next to your stove before you turn on the heat.
First, grab your heaviest skillet. Cast iron or stainless steel are the absolute best choices here. They hold heat much better than thin non-stick pans, which is crucial for getting that quick, high-heat sear on the shrimp. Put your skillet over medium-high heat and let it get hot. You will know it is ready when a drop of water flicked onto the surface sizzles and evaporates instantly.
Second, add your tablespoon of olive oil to the pan. We use oil here because it has a higher smoke point than butter. If we tried to sear our shrimp in pure butter at this temperature, the milk solids in the butter would burn and turn black before the shrimp were cooked. Swirl the oil around to coat the bottom of the pan.
Third, add your dried shrimp to the skillet in a single, even layer. You should hear a loud, satisfying sizzle the moment they touch the metal. If you do not hear that sizzle, your pan is not hot enough. Take them out and wait another minute.
Do not crowd the pan. If you have a small skillet, cook the shrimp in two separate batches. If you crowd them all in at once, they will lower the pan temperature, release their juices, and end up boiling instead of searing.
Let the shrimp cook undisturbed for about ninety seconds. Do not move them around, flip them, or poke them. You want them to stay in contact with the hot metal so they develop a beautiful golden-brown crust.
After ninety seconds, flip the shrimp over to the other side. They should already be turning pink and showing some nice color. Let them cook on the second side for another sixty seconds, then immediately transfer them out of the pan and onto a clean plate. They will not be completely cooked through yet, and that is exactly what we want. They will finish cooking in the sauce later.
Fourth, turn the heat down to medium-low. This is a critical step. If you keep the heat on high, you will burn your garlic and ruin the sauce. Let the skillet cool down for about thirty seconds, then add your four tablespoons of butter to the pan. As it melts, use a wooden spoon or spatula to scrape up all those delicious, caramelized brown bits stuck to the bottom of the pan. That is concentrated flavor right there.
Fifth, once the butter is melted and foaming, add your minced garlic and chili flakes. Stir them constantly to keep them moving in the warm butter. You do not want the garlic to brown or turn dark; you just want it to gently cook and release its aromatic oils into the butter. This should take about sixty seconds. Your kitchen will start smelling absolutely incredible at this point.
Sixth, pour in your fresh lemon juice. It will sizzle and bubble, creating a beautiful, glossy emulsion with the melted butter. This acidity is highly important because it cuts through the heavy fat of the butter and brightens up the entire dish.
Seventh, return the shrimp and any juices that accumulated on the plate back into the skillet. Toss everything together so every single shrimp is completely coated in that spicy, garlic-flecked butter. Let them simmer gently in the sauce for about one minute, just until they are heated through and curled into a loose C-shape.
Lastly, turn off the heat. Throw in your fresh, finely chopped parsley and give it one final toss. Season with a pinch of freshly cracked black pepper and a touch of salt if needed. Serve immediately while it is piping hot.
The Three Cardinal Sins of Cooking Shrimp
To ensure your dish turns out absolutely flawless, let us talk about the three most common mistakes people make when cooking shrimp, and exactly how to avoid them.
The first mistake is cooking wet shrimp. I know I mentioned this earlier, but it is worth repeating because it is the number one reason home cooks end up with rubbery seafood. Water is the enemy of a good sear. When wet shrimp hit a hot pan, that water instantly turns to steam. Steam cooks food at a much lower temperature than direct dry heat, meaning your shrimp will cook all the way through without ever developing that delicious brown crust. Take the extra thirty seconds to line a plate with paper towels, lay your shrimp out, and pat them dry thoroughly.
The second mistake is burning the garlic. Garlic contains a lot of natural sugars that burn very easily. If you toss raw, minced garlic into a ripping hot pan alongside your raw shrimp, it will turn black and bitter within thirty seconds.
By the time your shrimp are cooked, your sauce will taste like ash. Always sear your shrimp first in oil, remove them, lower the heat, and then gently cook your garlic in the butter. This keeps the garlic sweet, fragrant, and perfectly soft.
The third mistake is overcooking the shrimp. Shrimp cook incredibly fast, often in under three minutes total. A great rule of thumb to remember is the letter rule.
When shrimp are perfectly cooked, they will curve into a loose shape that looks like the letter C. If they are undercooked, they will look straight and translucent. If they are overcooked, they will curl up tightly into a closed shape that looks like the letter O. If your shrimp look like O's, they are going to be dry and tough. Keep a close eye on them and pull them off the heat the moment they hit that perfect C-shape.
Variations to Keep Things Exciting
Once you master this basic recipe, you can start experimenting and putting your own personal spin on it. Here are a few of my favorite variations that I make depending on what I have in my pantry.
For a creamy, comforting twist, you can make a Tuscan-style garlic butter shrimp. After you sauté your garlic and chili flakes, pour in a half cup of heavy cream and a handful of halved cherry tomatoes and baby spinach. Let the sauce simmer until the spinach wilts and the tomatoes start to burst, then toss your seared shrimp back in. Serve this version over a bed of fettuccine pasta for an incredibly rich, restaurant-quality meal.
If you love citrus, try making a cilantro lime version. Swap out the lemon juice for fresh lime juice, and replace the parsley with a generous handful of chopped fresh cilantro. You can also add some grated lime zest right at the end for an extra punch of bright, zesty flavor. This version pairs beautifully with warm corn tortillas and sliced avocado for the ultimate taco night.
For an Asian-inspired flavor profile, you can make spicy ginger soy shrimp. Reduce the butter to two tablespoons and add a tablespoon of toasted sesame oil. Sauté a teaspoon of freshly grated ginger alongside your garlic and chili flakes. Instead of lemon juice, splash in a tablespoon of low-sodium soy sauce and a teaspoon of honey for a touch of sweetness. Garnish with sliced green onions and toasted sesame seeds.
Finally, if you want a deeper, smokier flavor, try adding a splash of dry white wine, like Pinot Grigio or Sauvignon Blanc, to the pan right after your garlic is fragrant. Let the wine reduce by half before adding your butter and shrimp. This creates a classic shrimp scampi sauce that is incredibly elegant and sophisticated.
How to Serve and What to Pair It With
This spicy garlic butter shrimp is incredibly versatile, and there are so many ways to serve it.
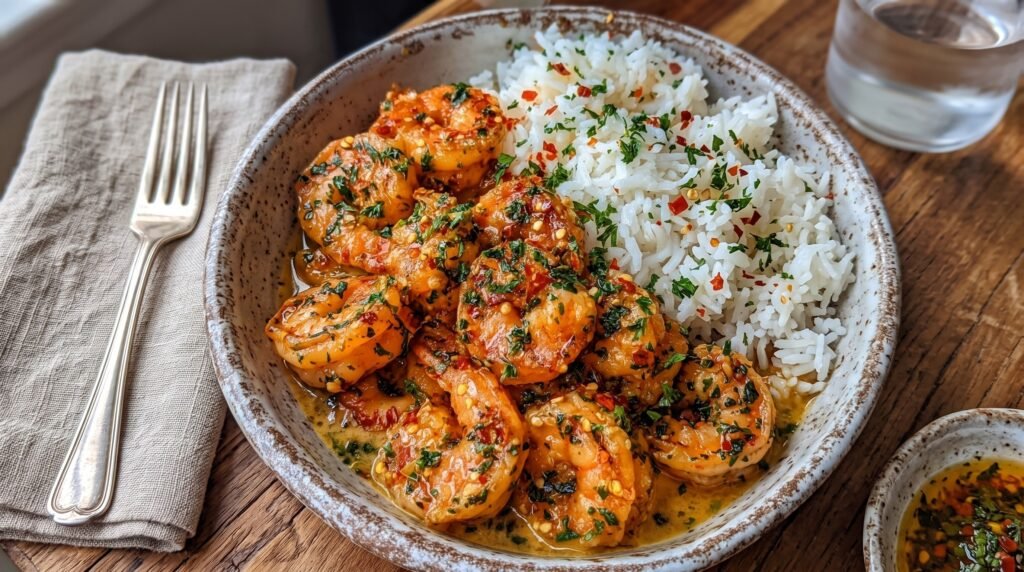
My absolute favorite way, as you can see in the picture, is over a bed of fluffy, hot jasmine rice. The rice acts like a sponge, soaking up every single drop of that spicy, garlicky butter sauce. To make the rice extra special, I like to cook it with a pinch of salt, a splash of coconut milk, and a bay leaf. Once it is cooked, I fluff it with a fork and stir in some fresh lime zest and chopped cilantro.
If you are looking for a low-carb option, this shrimp is fantastic served over a big bowl of zucchini noodles (zoodles) or spaghetti squash. The hot garlic butter melts into the vegetable noodles, making them taste incredibly decadent without all the heavy carbs. You can also serve it over a simple bed of sautéed cauliflower rice.
If you want something rustic and cozy, skip the rice and pasta altogether. Instead, grab a whole loaf of crusty sourdough bread or a French baguette. Slice it thick, brush it with olive oil, and toast it in your oven until it is crispy. Serve the hot pan of shrimp right in the middle of the table, and use the toasted bread to scoop up the shrimp and mop up that glorious butter sauce. It is a messy, fun, and deeply satisfying way to eat.
For a side dish, I love pairing this rich, buttery seafood with something green and crisp to balance out the flavors. A simple side salad with a bright lemon vinaigrette works beautifully. You can also roast up some fresh asparagus, broccoli florets, or green beans with a bit of olive oil, salt, and pepper. The char from the roasted vegetables pairs incredibly well with the spicy garlic shrimp.
Storing, Reheating, and Meal Prep Tips
If you happen to have leftovers, you can store them in an airtight container in your refrigerator for up to two days. However, reheating seafood can be tricky because you risk overcooking it and turning it rubbery.
Whatever you do, do not put your leftover shrimp in the microwave. The high, uneven heat of a microwave will instantly dry them out and make them incredibly tough.
Instead, the best way to reheat garlic butter shrimp is on your stove. Place your leftovers in a small skillet over low heat. Add a splash of water, chicken broth, or an extra little pat of butter to help loosen up the sauce. Cover the pan with a lid and let it warm through gently for about three to four minutes, stirring occasionally, just until the shrimp are warm.
If you want to use this recipe for meal prep, I recommend prepping all your ingredients ahead of time but cooking the dish fresh when you are ready to eat. You can peel, devein, and brine your shrimp, pat them dry, and store them in a container in your fridge for up to twenty-four hours. You can also mince your garlic and chop your parsley ahead of time. When you get home from work, all you have to do is turn on your stove, and you will have a fresh, hot gourmet meal on your table in under ten minutes.
Cooking at home does not have to be complicated, expensive, or time-consuming. With just a bag of frozen shrimp, some fresh garlic, a slab of butter, and a hot skillet, you can create a meal that rivals your favorite seafood restaurant. It is all about understanding the little details, like the baking soda brine, temperature control, and the order of your ingredients.
Once you try this recipe and experience that perfect, juicy snap of a correctly cooked shrimp coated in rich, spicy garlic butter, you will never want to order restaurant shrimp again. Get your skillet hot, prep your ingredients, and enjoy the process. Happy cooking!


