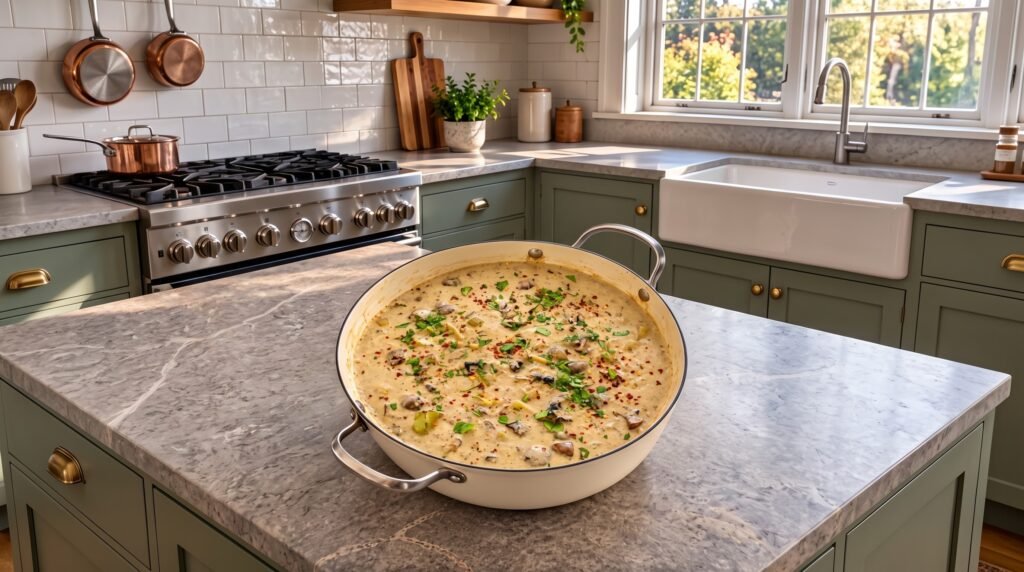

On a cold, rainy Sunday afternoon when the wind is rattling the window panes, there is only one thing that can truly soothe my soul: a big, steaming pot of soup bubbling away on the stove. For years, I was actually a massive mushroom skeptic. If you had told my younger self that I would one day write a love letter to a mushroom chowder, I would have laughed you out of the room. My only exposure to mushrooms back then was the slimy, rubbery, canned variety that sat limply on cheap delivery pizzas. They had a squeaky texture that made my teeth cringe, and they tasted like wet cardboard.
Everything changed during a trip to a tiny, wood-paneled bistro tucked away in the foggy hills of western Oregon. It was pouring outside, and the fireplace inside was crackling. The chef's special that night was a rustic wild mushroom soup served in a hollowed-out sourdough boule. With one spoonful, my culinary world shifted. The soup was rich, deeply savory, velvety, and carried an intense, earthy complexity that I did not know was possible. There was no slime, no rubberiness, just pure comfort.
Ever since that rainy evening, I have been on a personal mission to perfect the ultimate creamy wild mushroom chowder in my own kitchen. I have made every mistake in the book along the way. I have ended up with watery broths, curdled cream, mushy potatoes, and yes, those dreaded rubbery mushrooms. But through trial, error, and a lot of burnt garlic, I finally cracked the code. Today, I am sharing my tried-and-true recipe, along with all the little techniques and secrets I learned the hard way, so you can make a restaurant-quality bowl of comfort right in your own home.
Understanding Your Main Ingredient: The Anatomy of a Mushroom
Before we even turn on the stove, we need to talk about the mushrooms themselves. Mushrooms are unique creatures. They are not vegetables, but fungi, and their cellular structure is entirely different from the plants we usually cook. Unlike vegetables, which soften and break down quickly when heated, mushrooms contain a polymer called chitin in their cell walls. Chitin is highly resistant to heat, which means mushrooms can withstand long cooking times without completely disintegrating.
However, mushrooms are also like tiny, highly efficient sponges. They are made of roughly ninety percent water. This high water content is both a blessing and a curse. If you cook them correctly, that water evaporates, leaving behind concentrated, savory, umami goodness. If you cook them incorrectly, they will boil in their own trapped moisture, resulting in that rubbery, grey texture that scares so many people away.
To get the best results, I always recommend using a variety of mushrooms. While standard white button mushrooms are cheap and readily available, they are quite mild and watery on their own. For this chowder, we want a blend that brings different textures and flavor profiles to the table.
Cremini mushrooms, also known as baby bellas, are my absolute baseline. They are actually just adolescent portobello mushrooms, and they have a much deeper, earthier flavor than white button mushrooms while remaining affordable.
Shiitake mushrooms add a wonderful, woody, almost smoky depth. When buying shiitakes, make sure to remove and discard the stems, as they are incredibly woody and tough to chew. You can save the stems in a bag in your freezer to make homemade vegetable broth later.
Oyster mushrooms add a delicate, velvety texture and a mild, slightly sweet flavor that balances the heavy earthiness of the creminis.
If you want to feel like a professional chef, look for maitake (hen of the woods) or chanterelle mushrooms. They are pricier, but even a small handful will elevate your chowder to gourmet status.
The Great Washing Debate: To Submerge or Not to Submerge
If you read old cookbooks, they will tell you to never, under any circumstances, let water touch a mushroom. They instruct you to meticulously wipe every single mushroom with a damp paper towel or a special mushroom brush.
Let me be honest with you: when you are staring down a pound and a half of dirty, earthy mushrooms on a busy weeknight, the last thing you want to do is spend thirty minutes gently brushing them one by one. It is tedious, and frankly, it is unnecessary.
I learned a great trick from a professional kitchen that saves time and works perfectly. Put your mushrooms in a large colander. Fill a large bowl with cold water. Submerge the colander of mushrooms in the water, give them a quick, vigorous swish with your hands to loosen any dirt, and immediately pull the colander out. The dirt will sink to the bottom of the bowl, and the mushrooms will be clean.
The key here is speed. Do not let them sit or soak in the water. A quick five-second dunk will not allow them to absorb any measurable amount of moisture, but it will get them clean in a fraction of the time. Once washed, spread them out on a clean kitchen towel and pat them completely dry before slicing. Slicing wet mushrooms will ruin your sear, so make sure they are dry to the touch.
Why the Pot You Use Matters
When making a rustic chowder like this, the pot you choose makes a huge difference. I almost always reach for my heavy-bottomed enameled cast iron braiser or a Dutch oven.
The thick base of cast iron distributes heat incredibly evenly and holds onto that heat. This is crucial when you are trying to get a deep, golden-brown sear on your mushrooms. A thin, cheap pot will have hot spots that burn your garlic while leaving your onions raw, and it will drop in temperature the moment you add your ingredients, causing the mushrooms to steam rather than sear.
A wide, shallow pot (like the braiser shown in the photo) is ideal because it gives the mushrooms plenty of surface area to spread out. If you pile mushrooms three inches deep in a narrow, tall pot, the moisture escaping from the bottom layer will steam the top layer, preventing them from browning.
The Ingredients You Will Need
Here is a breakdown of what we will need to create this comforting pot of goodness. I prefer to keep my ingredients simple, focusing on high-quality basics that work together to create complex layers of flavor.
| Ingredient | Quantity | Purpose |
|---|---|---|
| Mixed fresh mushrooms (Cremini, Shiitake, Oyster) | 1.5 pounds | The earthy, savory star of the show, sliced medium-thick |
| Unsalted butter | 4 tablespoons | Rich base for sautéing and building the roux |
| Extra virgin olive oil | 2 tablespoons | Prevents the butter from burning at high temperatures |
| Yellow onion | 1 medium | Finely diced to provide a sweet, savory aromatic base |
| Garlic cloves | 6 cloves | Freshly minced to infuse the soup with warm aroma |
| Fresh thyme | 1 tablespoon | Finely chopped; thyme and mushrooms are a match made in heaven |
| All-purpose flour | 3 tablespoons | The thickening agent that creates a velvety body |
| Dry white wine | 0.5 cup | For deglazing the pot and cutting through the rich dairy |
| Vegetable or beef broth | 4 cups | Use low-sodium so you can control the salt levels |
| Yukon Gold potatoes | 2 medium | Peeled and diced small; they hold their shape and add creaminess |
| Heavy cream | 1 cup | For that luxurious, silky finish |
| Fresh flat-leaf parsley | 0.25 cup | Finely chopped for a bright, fresh pop of color |
| Red pepper flakes | 1 teaspoon | Adds a very subtle, warming background heat |
| Fresh lemon juice | 1 teaspoon | Added at the very end to wake up all the heavy flavors |
| Salt and freshly cracked black pepper | To taste | Essential for drawing out moisture and highlighting the umami |
The Golden Rules of Cooking Mushrooms
To get that beautiful, caramelized color on your mushrooms, you must follow three golden rules.
First, do not crowd the pan. If you have a smaller pot, cook your mushrooms in two separate batches. If you dump them all in at once, they will immediately release their water, pool at the bottom of the pan, and boil. We want them to sear.
Second, do not salt them too early. Salt draws out moisture. If you salt the mushrooms the moment they hit the hot oil, they will instantly sweat out all their liquid. Instead, let them cook in the hot butter and oil for a few minutes undisturbed until they start to develop a golden-brown crust. Only then should you sprinkle them with salt.
Third, leave them alone. It is tempting to constantly stir the pot, but mushrooms need direct, undisturbed contact with the hot surface to caramelize. Put them in the pan, spread them out into a single layer, and let them sit for two to three minutes without touching them. You will hear them sizzle and squeak. Once they get a nice brown color on one side, give them a toss and let them color on the other side.
Step-by-Step Instructions: Bringing the Chowder to Life
Now that we understand our ingredients and our tools, let us walk through the process of building this beautiful soup step-by-step. Put on some cozy music, pour yourself a glass of wine, and let us get cooking.
Step 1: The Ultimate Mushroom Sear
Place your Dutch oven or heavy braiser over medium-high heat. Add two tablespoons of the olive oil and two tablespoons of the butter. Let the butter melt and foam. Once the foaming subsides, it is hot enough.
Add half of your sliced mushrooms to the pan, spreading them out as much as possible. Let them sear undisturbed for about three minutes. You will see them start to shrink slightly and turn a gorgeous chestnut brown on the bottom. Toss them and cook for another two to three minutes.
Sprinkle with a pinch of salt and a generous grind of black pepper. Remove this first batch of mushrooms from the pot and place them in a bowl. Repeat the process with the remaining two tablespoons of butter, the remaining mushrooms, and another pinch of salt and pepper.
Once the second batch is browned, transfer them to the bowl with the first batch. Yes, we are taking them out of the pot for now. If we leave them in the pot while we build the soup base, they will overcook and lose their lovely, meaty texture.
Step 2: Building the Aromatic Base
Turn the heat down to medium. In the same pot (which should now have lots of delicious, caramelized brown bits stuck to the bottom), add the remaining two tablespoons of olive oil.
Add your finely diced yellow onion. Cook the onion, stirring occasionally, for about five minutes. We want them to become soft, translucent, and slightly sweet, but not browned.
Once the onions are soft, add the minced garlic and the fresh chopped thyme. Stir constantly for about one minute. You will immediately smell the incredible aroma of garlic and herbs filling your kitchen. Be careful not to let the garlic burn; if it turns dark brown or black, it will become bitter and ruin the soup. If your pan seems too hot, turn the heat down to low.
Step 3: Creating the Roux and Deglazing
Sprinkle the three tablespoons of all-purpose flour over the onions and garlic. Stir well to coat everything. Cook this mixture for about two minutes, stirring constantly. This step is crucial because it cooks out the raw flour taste, turning the flour into a pale golden paste that smells slightly nutty.
Now, pour in the half cup of dry white wine. It will sizzle and steam instantly. Use a sturdy wooden spoon or spatula to scrape up all those browned bits stuck to the bottom of the pot. Those bits are called fond, and they are packed with concentrated mushroom and butter flavor. Keep stirring until the wine has mostly evaporated and the mixture has thickened into a paste.
If you prefer not to cook with alcohol, you can easily substitute the white wine with an equal amount of vegetable broth mixed with a squeeze of fresh lemon juice. However, the alcohol in the wine cooks off completely, leaving behind a wonderful, bright acidity that cuts through the rich dairy we will add later.
Step 4: The Simmer
Slowly pour in your vegetable or beef broth, whisking or stirring constantly to prevent any flour lumps from forming.
Once the broth is fully incorporated, add your diced Yukon Gold potatoes. Bring the liquid to a boil over medium-high heat. Once it reaches a boil, immediately reduce the heat to low, cover the pot with a lid, and let it simmer gently for about fifteen minutes.
You will know it is ready when the potatoes are fork-tender. If you poke a piece of potato with a fork, it should slide in easily without resistance.
Step 5: Returning the Mushrooms and Adding the Cream
Remove the lid from your pot. Stir in the cooked mushrooms that we set aside earlier, along with any juices that have accumulated at the bottom of their bowl.
Pour in the heavy cream. Stir gently to combine. Let the soup simmer uncovered for another five minutes to allow all the flavors to marry together and to let the soup thicken slightly. Do not let the soup come to a rolling boil after adding the cream, as high heat can cause dairy to split or curdle.
Step 6: The Finishing Touches
This is where we transform a good soup into an extraordinary one. Turn off the heat.
Stir in the chopped fresh parsley and the red pepper flakes. The red pepper flakes do not make the soup spicy; rather, they provide a subtle, warming back-of-the-throat heat that cuts through the rich cream.
Now, add one teaspoon of fresh lemon juice. Taste the soup. If it tastes a bit flat, do not just throw in more salt. Often, what a heavy, creamy soup needs is not salt, but acid. The fresh lemon juice acts like a volume knob for flavor, making the earthy mushrooms and creamy broth sing.
Adjust the seasoning with more salt and freshly cracked black pepper to your liking. Ladle the hot chowder into bowls, garnish with a few extra parsley leaves and a pinch of red pepper flakes, and serve immediately.
Common Mistakes to Avoid
Even with a straightforward recipe, things can sometimes go sideways in the kitchen. Here are three common pitfalls I have encountered over the years and how you can easily avoid them.
The first mistake is rushing the mushroom sear. If you get impatient and dump all your mushrooms, onions, and garlic into the pot at the same time, you will end up with a pale, grey, watery soup that lacks depth. Searing the mushrooms first is the single most important step for building flavor. Take your time and get that golden color.
The second mistake is using the wrong potatoes. Avoid using Russet potatoes for this chowder. Russets are very high in starch and tend to break down and fall apart when simmered, which will turn your beautiful chowder into a grainy, mushy mess. Yukon Gold potatoes are waxy enough to hold their shape perfectly, yet they release just enough starch to give the broth a lovely, velvety body.
The third mistake is boiling the soup after adding the cream. I cannot stress this enough. Heavy cream is relatively stable, but if you let it boil vigorously, the fat can separate from the liquid, leaving you with an oily layer on top of your soup. Keep the heat low and gentle once the dairy goes in.
Dietary Swaps and Variations
I love this recipe because it is incredibly adaptable. Whether you are cooking for someone with dietary restrictions or simply want to use up what you have in your pantry, here are a few easy swaps.
To make this recipe gluten-free, you can easily substitute the all-purpose flour with a high-quality gluten-free measure-for-measure flour blend. Alternatively, you can omit the flour entirely and let the potatoes do the thickening. Simply mash a few of the cooked potato cubes against the side of the pot with your wooden spoon to release their natural starches into the broth.
To make it vegan or dairy-free, swap the butter for a good quality vegan butter or increase the olive oil. Instead of heavy cream, use full-fat canned coconut milk or raw cashews soaked in hot water and blended until completely smooth. Coconut milk will add a very subtle coconut flavor, which actually pairs beautifully with wild mushrooms, while cashew cream is completely neutral and incredibly rich.
If you want to add some extra protein, shredded leftover rotisserie chicken or cooked wild rice make fantastic additions. Simply stir them in along with the potatoes during the simmer stage.
How to Store and Reheat Leftovers
If you happen to have any leftover chowder, you are in luck. Like many stews and soups, this chowder actually tastes even better the next day. As it sits in the refrigerator overnight, the mushrooms continue to infuse the cream with their earthy flavor, and the starches settle, making the broth incredibly rich.
To store, let the soup cool completely to room temperature before transferring it to an airtight container. Store it in the refrigerator for up to four days.
When you are ready to reheat, do not use the microwave if you can avoid it. Microwaves heat food unevenly and can easily cause dairy-based soups to separate. Instead, pour the chowder into a small saucepan and place it over medium-low heat. Stir frequently, heating it gently until it is warmed through. If the soup has thickened up too much in the fridge, simply stir in a splash of broth or water to loosen it up.
I do not recommend freezing this chowder. Potatoes tend to become mealy and spongy when frozen and thawed, and the cream broth can easily separate and turn grainy. This is a soup that is best enjoyed fresh or within a few days of making.
What to Serve with Your Chowder
While this creamy chowder is hearty enough to stand alone as a main meal, it becomes truly magical when paired with the right sides.
My number one recommendation is a thick slice of warm, crusty sourdough bread slathered with salted butter. The tangy crunch of sourdough is the perfect contrast to the rich, earthy, velvety chowder. It is also essential for wiping your bowl completely clean at the end of the meal.
If you want a lighter pairing, a simple green salad tossed with a bright, zesty lemon vinaigrette is wonderful. The sharp acidity of the vinaigrette cleanses your palate between rich spoonfuls of soup.
For a wine pairing, look for a medium-bodied, lightly oaked Chardonnay. The buttery notes in the wine will mirror the richness of the cream, while its natural acidity will keep your palate feeling fresh. If you prefer red wine, a light, earthy Pinot Noir is an absolute dream with mushrooms.
Cooking is not just about following steps on a page; it is about using your senses. Listen to the sizzle of the mushrooms in the pan, watch the color of the roux change from pale white to golden, and smell the garlic as it meets the hot oil. Taking your time to enjoy the process makes the final bowl taste that much sweeter. Pull up a chair, grab a spoon, and enjoy a little taste of cozy comfort.