We have all been there. It is six o'clock on a Tuesday evening, you are standing in front of the open refrigerator, and you are staring blankly at a package of ground chicken. Ground beef gets all the glory with burgers, tacos, and meatloaves, while ground chicken often gets relegated to dry, sad, tasteless health foods. For the longest time, I avoided ground chicken entirely because every time I cooked it, the results resembled cardboard. But one rainy evening, desperate to avoid another takeout delivery fee, I decided to treat ground chicken with the respect it deserves.
I wanted something that felt luxurious, deeply comforting, and restaurant-quality, but without requiring me to spend two hours scrubbing pots and pans afterward. I wanted a dish with crispy, golden-brown edges, an incredibly juicy interior, and a velvety, garlic-infused white sauce draped over the top. After several attempts, some rather crumbly failures, and a few broken sauces, I finally perfected this recipe.
These smothered creamy garlic parmesan chicken patties have become a legend in my household. They are rich, savory, and shockingly easy to make once you know a few simple kitchen secrets. Whether you are cooking for picky kids, trying to impress dinner guests, or just want a cozy meal to enjoy on the couch, this recipe delivers. Let me take you through the entire process, sharing all the lessons I learned the hard way so your first batch turns out absolutely perfect.
The Secret to Juicy Ground Chicken Patties
The biggest hurdle with ground chicken is the fat content. Unlike ground beef, which easily comes in flavorful eighty-twenty blends, ground chicken is often sold incredibly lean, sometimes up to ninety-nine percent fat-free if it is made entirely from breast meat. If you try to cook ninety-nine percent lean ground chicken like a burger, it will dry out before the center even reaches a safe cooking temperature.
To combat this, we need to build moisture and texture directly into the meat mixture. This is where our binder and seasonings come into play. Instead of using plain dried breadcrumbs, which can absorb all the natural juices of the meat and leave it dry, I prefer using panko breadcrumbs soaked in a splash of heavy cream or milk. This technique, known in classical cooking as a panade, keeps the meat fibers lubricated during the cooking process.
Additionally, we add grated parmesan cheese directly into the patty mixture. As the patties cook, the cheese melts, creating tiny pockets of savory fat and moisture throughout the meat. A single egg acts as our binder, holding everything together so the patties do not disintegrate when you flip them in the pan.
Finding the Right Kitchen Tools
Before we jump into the ingredients, let us talk about the gear that will make your life a lot easier. You do not need a professional kitchen, but a few specific tools will completely change your cooking experience.
First, a seasoned cast-iron skillet or a heavy-bottomed stainless steel pan is essential. These pans hold heat exceptionally well, which is crucial for getting that gorgeous, deep golden-brown crust on the chicken patties. Thin, cheap non-stick pans often hot-spot and burn the exterior of the chicken before the inside is cooked through.
Second, buy a digital meat thermometer. This is the single most important tool in any home cook's drawer, especially when dealing with poultry. Chicken must reach an internal temperature of one hundred sixty-five degrees Fahrenheit to be safe to eat. If you guess, you will almost always overcook it just to be safe, resulting in dry patties. With a thermometer, you can pull them off the heat the exact second they are done.
Lastly, use a microplane grater for your garlic and parmesan cheese. Grating the garlic instead of chopping it ensures that the garlic flavor is evenly distributed throughout the meat and the sauce, preventing any unpleasant bites of raw garlic chunks.
Ingredients for the Ultimate Smothered Chicken Patties
Here is a breakdown of what you will need. I always recommend gathering all your ingredients on the counter before you start cooking. This French culinary concept, called mise en place, prevents you from burning your garlic while frantically searching for the black pepper in the pantry.
| Ingredient | Amount | Notes |
|---|---|---|
| Ground chicken | 1.5 pounds | Look for a chicken thigh blend or 90/10 ratio |
| Panko breadcrumbs | 0.5 cups | Gives a lighter texture than regular breadcrumbs |
| Heavy cream | 0.25 cups | Divided; some for the patties, some for the sauce |
| Egg | 1 large | Whisked, acts as the primary binder |
| Fresh garlic | 6 cloves | Finely grated or minced; divided |
| Fresh parsley | 0.5 cups | Finely chopped; divided |
| Parmesan cheese | 1 cup | Freshly grated from a block; divided |
| Onion powder | 1 teaspoon | Adds depth to the chicken mixture |
| Kosher salt | 1.5 teaspoons | Divided between patties and sauce |
| Black pepper | 1 teaspoon | Freshly cracked is highly recommended |
| Unsalted butter | 3 tablespoons | For searing the patties and making the sauce |
| Olive oil | 1 tablespoon | Helps raise the smoke point of the butter |
| Chicken broth | 1 cup | Low sodium, used to deglaze the pan |
| Cream cheese | 2 ounces | Softened; helps stabilize the cream sauce |
| Mozzarella cheese | 0.5 cups | Shredded; melts beautifully over the top |
Step-by-Step Instructions
Now that your ingredients are prepped, let us walk through the cooking process step-by-step. Follow these stages closely to ensure your patties are juicy and your sauce is velvety smooth.
Step 1: Making the Panade and Mixing the Meat
Start by grabbing a large mixing bowl. Pour in your panko breadcrumbs and add two tablespoons of the heavy cream. Stir them together with a fork and let them sit for about five minutes. You will notice the breadcrumbs absorb the cream and turn into a paste. This is your panade, the secret weapon against dry chicken.
Once the panade is ready, add your ground chicken to the bowl. To this, add your whisked egg, half of the grated garlic, half of the chopped parsley, half of the grated parmesan cheese, the onion powder, one teaspoon of kosher salt, and half a teaspoon of black pepper.
Now, here is a crucial tip: use your hands to mix this, but do so gently. If you overwork the meat by squeezing it tightly through your fingers, you will compress the proteins, leading to tough, dense patties. Mix just until the ingredients are evenly distributed, then stop.
Step 2: Shaping the Patties
Divide the chicken mixture into four equal portions. If you want to be precise, you can use a kitchen scale, but eyeballing it is perfectly fine.
Lightly wet your hands with a bit of cold water. This prevents the sticky chicken mixture from sticking to your skin. Shape each portion into a round ball, then gently flatten it into a patty that is about three-quarters of an inch thick.
Use your thumb to make a slight indentation in the center of each patty. Because meat shrinks and domes up as it cooks, this little indentation ensures your patties stay flat and cook evenly, rather than swelling up into round footballs in the skillet. Place the shaped patties on a plate lined with parchment paper and let them chill in the refrigerator for ten to fifteen minutes. Chilling helps the fats solidify, ensuring the patties hold their shape when they hit the hot pan.
Step 3: Searing the Patties to Golden Perfection
Place your cast-iron skillet over medium-high heat. Add one tablespoon of unsalted butter and one tablespoon of olive oil. The oil prevents the butter from burning too quickly, while the butter provides that beautiful, nutty flavor and aids in browning.
Once the butter is melted and foaming, gently lay your chilled chicken patties into the skillet. You should hear a loud, satisfying sizzle. If you do not hear that sizzle, your pan is not hot enough; pull the patty out and wait another minute.
Do not crowd the pan. If your skillet is small, cook the patties in batches. Crowding the pan lowers the temperature and causes the chicken to steam in its own juices rather than sear, robbing you of that delicious golden crust.
Let the patties cook undisturbed for about five to six minutes. Resist the temptation to move them around or press down on them with a spatula. Pressing them flat squeeze out all those precious juices we worked so hard to preserve.
When the bottom is deeply golden-brown and releases easily from the pan, flip them over. Cook for another four to five minutes on the second side. Use your digital meat thermometer to check the thickest part of the patties. Once they reach one hundred sixty degrees Fahrenheit, transfer them to a clean plate and tent them loosely with aluminum foil. They will continue to cook slightly while resting, bringing them up to the safe target of one hundred sixty-five degrees.
Step 4: Building the Garlic Parmesan Sauce
Do not wash out that skillet! Those browned bits stuck to the bottom of the pan are called fond, and they are packed with concentrated chicken and garlic flavor.
Lower the heat to medium. Add the remaining two tablespoons of butter to the skillet. Once melted, add the remaining grated garlic. Stir constantly for about thirty seconds to one minute. You want the garlic to become fragrant and slightly softened, but be incredibly careful not to let it burn. Burnt garlic turns bitter and will completely ruin the sauce.
Pour in the chicken broth. Use a wooden spoon or a silicone spatula to scrape up all those delicious browned bits from the bottom of the pan as the broth simmers. Let the broth reduce by half, which should take about three to four minutes. This concentrates the flavor and builds a rich base for our sauce.
Reduce the heat to low. Whisk in the softened cream cheese until it is completely melted and incorporated. The cream cheese acts as an emulsifier, preventing our sauce from separating later on.
Next, pour in the remaining heavy cream, the rest of the parmesan cheese, a pinch of salt, and some freshly cracked black pepper. Stir gently until the parmesan melts completely into a silky, smooth sauce.
Step 5: Smothering and Assembling
Return the chicken patties and any juices that accumulated on the plate back into the skillet, nesting them gently into the bubbling sauce.
Spoon generous amounts of the creamy garlic sauce over the top of each patty. Sprinkle the shredded mozzarella cheese evenly over the top of the patties.
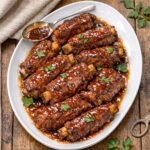
Cover the skillet with a lid for two to three minutes, keeping the heat on low, until the mozzarella is completely melted and gooey. If you are using an oven-safe skillet like cast iron, you can also pop the pan under your oven's broiler for one to two minutes to get the cheese bubbly and lightly browned, just like in the picture.
Garnish the entire dish with the remaining fresh chopped parsley. The bright, grassy flavor of the fresh parsley cuts through the rich, decadent sauce beautifully. Serve immediately while the cheese is hot and stretchy.
Mistakes I Made So You Do Not Have To
My journey to mastering this recipe was paved with a few notable kitchen disasters. To save you the frustration, keep these common pitfalls in mind:
Using Pre-Shredded Cheese for the Sauce:
In my early cooking days, I grabbed a bag of pre-shredded parmesan and mozzarella cheese because it saved time. The sauce ended up grainy, clumpy, and greasy. Pre-shredded cheeses are coated in potato starch or cellulose to keep the shreds from sticking together in the bag. This coating prevents the cheese from melting smoothly into sauces. Always buy a block of cheese and grate it yourself. It takes an extra two minutes, but the texture of your sauce will be night and day.
Not Chilling the Patties:
One night, I was in a rush and skipped the fifteen-minute refrigerator rest. The moment the patties hit the skillet, they began to warp and stick, and when I went to flip them, two of them broke completely apart. That short chilling time allows the proteins to bond and the fats to firm up, acting as an insurance policy for your patties.
Rushing the Sauce:
If you add your dairy to a boiling hot pan, the proteins in the cream and cheese can coagulate, causing the sauce to curdle and break. Always lower the heat to a gentle simmer before adding your cream cheese, heavy cream, and grated parmesan. Patience is key to achieving that restaurant-style glossy finish.
Overworking the Ground Meat:
Treat ground poultry like delicate pastry dough. The more you work it, the tougher it gets. Use a light hand when mixing in your bowl, and do not pack the patties too tightly when shaping them. You want a tender, melt-in-your-mouth bite.
Exciting Recipe Variations to Try
Once you have mastered the classic garlic parmesan version, you can start experimenting with different flavors to suit your mood or dietary needs. Here are a few variations that work wonderfully with this base recipe:
The Mushroom Swiss Variation
If you love Salisbury steak, this twist is for you. Skip the cream cheese and heavy cream. Instead, after searing the patties, sauté eight ounces of sliced cremini mushrooms in the butter until they are deeply browned. Stir in a tablespoon of all-purpose flour to create a roux, then slowly whisk in two cups of beef broth and a splash of Worcestershire sauce. Simmer until thickened, nestle your patties back in, and top them with slices of Swiss cheese. It is a rich, earthy, deeply savory alternative that feels incredibly cozy.
The Spicy Cajun Variation
For those who love a bit of heat, add a teaspoon of Cajun seasoning directly into the ground chicken mixture. For the sauce, swap the chicken broth for a light beer or add a splash of hot sauce to the cream. Top the patties with pepper jack cheese instead of mozzarella. The spicy, smoky undertones pair beautifully with the rich, creamy sauce.
The Tuscan Spinach and Sun-Dried Tomato Variation
Bring a taste of Italy to your dinner table by adding half a cup of chopped fresh baby spinach and a quarter cup of chopped sun-dried tomatoes directly into the cream sauce during the final minutes of cooking. The sweet, tart sun-dried tomatoes and the earthy spinach break up the richness of the cream and add a gorgeous pop of color to the dish.
Low-Carb and Keto Adjustments
If you are following a low-carb lifestyle, this recipe is incredibly easy to adapt. Simply swap the panko breadcrumbs for an equal amount of crushed pork rinds or almond flour. Both options act as excellent binders that keep the patties moist without adding unwanted carbohydrates. The sauce itself is already naturally low-carb, making this an ideal keto-friendly comfort meal.
How to Serve Your Smothered Chicken Patties
Because these patties are incredibly rich and savory, you want to pair them with sides that can either soak up that glorious sauce or provide a bright, refreshing contrast.
On a chilly winter evening, nothing beats serving these over a mountain of garlic mashed potatoes. The cream sauce acts as the ultimate gravy, running down the sides of the potatoes in the most satisfying way. If you want a slightly lighter option that still absorbs the sauce, serve them over a bed of buttered egg noodles or your favorite pasta.
For a low-carb dinner, cauliflower mash or roasted spaghetti squash makes a fantastic base. I also love serving these alongside a simple roasted vegetable, like charred broccoli, roasted asparagus, or Brussels sprouts. The slight bitterness of roasted green vegetables cuts through the decadent cheese and cream beautifully.
If you want to keep things incredibly simple, serve the patties alongside a crisp, bright green salad dressed with a simple lemon vinaigrette. The sharp acidity of the lemon dressing cleanses your palate between bites of the rich, savory chicken.
Storing, Reheating, and Make-Ahead Tips
This recipe makes fantastic leftovers, which is a rare feat for ground chicken dishes. If you have leftovers, store them in an airtight container in the refrigerator for up to three days.
When it comes to reheating, avoid the microwave if possible. Microwaving cream-based sauces often causes them to separate, leaving you with a puddle of oil and a dry, rubbery chicken patty.
Instead, place the patties and sauce back into a small skillet over low heat. Add a tablespoon of milk or water to help loosen the sauce. Cover the skillet with a lid and heat gently, stirring the sauce occasionally, until the chicken is warmed through and the cheese is melted. This slow, gentle reheating process preserves the silky texture of the sauce and keeps the chicken incredibly juicy.
If you want to prep this meal ahead of time, you can shape the raw patties, place them on a parchment-lined baking sheet, wrap them tightly with plastic wrap, and store them in the refrigerator for up to twenty-four hours before cooking.
You can also freeze the raw patties. Shape them, freeze them flat on a baking sheet for an hour, then transfer them to a freezer-safe zip-top bag with parchment paper separating each patty. They will keep well in the freezer for up to three months. When you are ready to cook, thaw them completely in the refrigerator overnight before proceeding with the recipe. I do not recommend freezing the cooked dish with the cream sauce, as dairy sauces do not freeze and thaw well, often curdling upon reheating.
Final Thoughts from My Kitchen to Yours
Cooking should not feel like a chore, and dinner should never be boring. This recipe taught me that with a little bit of technique and a few high-quality ingredients, even the most humble packages of ground chicken can be transformed into a meal that feels like a celebration.
The first time you make this, take your time. Enjoy the process of browning the meat, smelling the garlic as it hits the warm butter, and watching the cheese melt into a bubbly, golden blanket. Cooking is as much about the sensory experience in the kitchen as it is about the final plate.
I hope these smothered creamy garlic parmesan chicken patties find a permanent home in your recipe rotation, just as they have in mine. Gather your ingredients, fire up your skillet, and enjoy a truly comforting, homemade meal tonight.