
We have all been there. It is late on a Friday night, the kitchen is quiet, and your stomach is demanding something deeply satisfying. You do not want a standard burger with a flimsy bun that disintegrates under the weight of the juices. You do not want a simple grilled cheese that leaves you feeling like you just ate a kids meal. You want the heavy hitter of the diner world. You want a patty melt.
My obsession with this culinary masterpiece started at a tiny, neon lit diner in New Jersey. The flat top grill was seasoned by decades of bacon grease, and the cook worked with the precision of a surgeon. I watched him press the rye bread onto the grill, layer on caramelized onions that looked like liquid gold, and press a heavy iron weight on top of the sandwich. When he slid that plate across the counter, and I took my first bite, I was changed forever. The crunch of the buttered bread, the sweetness of the onions, the savory beef, and the gooey cheese created a perfect harmony.
Naturally, I went home and tried to recreate it the very next day. My first attempt was a complete disaster. I used cheap, thin white bread that turned into a soggy, greasy mush. I rushed the onions, burning them on high heat so they were bitter and crunchy instead of sweet and soft. The cheese did not melt because I bought pre-shredded bag cheese coated in anti-caking cellulose. It was a sad, grey sandwich that ended up in the trash.
But I did not give up. Over the years, through trial, error, and dozens of smoke alarm warnings, I perfected the formula. Today, I am sharing everything I have learned about creating the ultimate, restaurant quality double patty melt right in your home kitchen. We are talking about thick, crusty sourdough or rye, perfectly seasoned double beef patties, slow-cooked onions, and a dipping sauce that will make your taste buds sing.
Why the Patty Melt Rules Supreme
Before we jump into the kitchen, let us talk about why the patty melt deserves its crown. A standard burger is great, but it has structural flaws. The bun is often too soft, absorbing juices until the bottom disintegrates. Lettuce and tomato can slide around, creating a chaotic eating experience.
The patty melt solves all of these problems through engineering. By using sturdy sliced bread and griddling it like a grilled cheese, you create a structural shell. The cheese acts as a culinary glue, holding the caramelized onions and the beef patties securely in place. Every single bite contains the perfect ratio of crispy bread, rich meat, sweet onions, and melted cheese.
Furthermore, the cooking method of a patty melt allows for maximum flavor development. When you griddle the bread in butter or mayonnaise, you trigger the Maillard reaction across the entire surface of the slice, not just the edges. You are essentially eating a burger encased in two perfect garlic butter croutons.
The Four Pillars of Patty Melt Perfection
To make a truly great patty melt, you must treat each component with respect. If one element fails, the entire sandwich suffers. Let us break down the four essential pillars.
The first pillar is the bread. Do not even think about using standard sandwich bread. It cannot handle the weight of double patties and the moisture of caramelized onions. You need a sturdy, thick-cut bread. Sourdough and rye are the traditional champions. Rye offers a distinct, earthy caraway flavor that cuts through the richness of the beef and cheese. Sourdough provides a beautiful tang and an incredibly crispy, bubbly crust when griddled. Whichever you choose, ensure the slices are about half an inch thick.
The second pillar is the beef. You want ground beef with an 80/20 fat-to-lean ratio. Lean beef will dry out quickly on the griddle, leaving you with a crumbly, sad texture. The fat is crucial for flavor and moisture, especially since we want to cook these patties thin and get a beautiful sear. Since our bread is oval or rectangular, we need to shape our patties to match. Do not make round patties for oval bread, or you will end up with bites of plain bread and cheese at the ends. Shape your patties into ovals that are slightly larger than your bread slices, as they will shrink during cooking.
The third pillar is the onions. This is where most home cooks fail. You cannot rush caramelized onions. If you try to cook them on high heat to save time, you will burn the exterior and leave the interior raw and pungent. You want to cook them low and slow in a mixture of butter and oil. This process takes at least forty minutes. The natural sugars in the onions need time to break down, turn golden brown, and become incredibly sweet and jammy.
The fourth pillar is the cheese. You need a cheese that melts beautifully while offering enough flavor to stand up to the beef. Classic Swiss cheese is the traditional choice, offering a nutty, slightly sweet profile. However, I love combining Swiss with a sharp white cheddar or high-quality provolone. This blend gives you the perfect cheese pull along with a deep, savory flavor. Avoid pre-shredded cheeses at all costs. Grate your own from a block, or buy deli-sliced cheese that melts smoothly.
The Secret Dipping Sauce
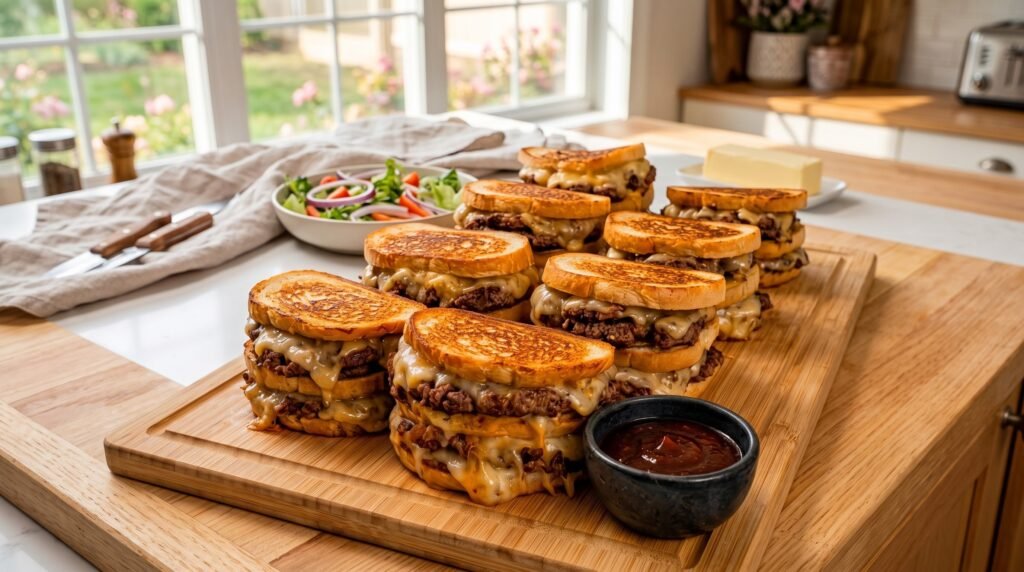
While a great patty melt can stand on its own, a signature dipping sauce elevates it to another level. The reference photo shows a beautiful, dark, rich dipping sauce. Many diners serve patty melts with a side of Russian dressing or thousand island, but I prefer a smoky, tangy barbecue-infused burger sauce.
This sauce combines the creamy richness of mayonnaise, the tang of yellow mustard, the sweetness of barbecue sauce, a splash of pickle juice, and a pinch of smoked paprika. It cuts through the heavy fat of the beef and cheese, refreshing your palate between bites.
Now, let us look at the exact ingredients you will need to create this masterpiece for your family and friends.
| Ingredient | Amount | Notes |
|---|---|---|
| Ground Beef (80/20 blend) | 2 pounds | Divided into eight 4-ounce oval patties |
| Sourdough or Rye Bread | 8 thick slices | Sliced about half an inch thick |
| Yellow Onions | 3 large | Thinly sliced from root to stem |
| Swiss Cheese | 8 slices | Deli-cut, thin slices |
| Provolone or White Cheddar | 8 slices | Deli-cut, thin slices |
| Unsalted Butter | 1 stick | Softened, for spreading on bread |
| Olive Oil | 2 tablespoons | For cooking the onions |
| Kosher Salt | 2 tablespoons | For seasoning meat and onions |
| Coarse Black Pepper | 1 tablespoon | For seasoning meat |
| Worcestershire Sauce | 1 tablespoon | For deglazing the onion pan |
| Mayonnaise | 1/2 cup | For the dipping sauce base |
| Smoky Barbecue Sauce | 1/4 cup | For dipping sauce sweetness |
| Yellow Mustard | 1 tablespoon | For dipping sauce tang |
| Dill Pickle Juice | 1 teaspoon | For acidity in the sauce |
| Smoked Paprika | 1/2 teaspoon | For a warm, smoky depth |
Step by Step Culinary Walkthrough
Now that we have our ingredients ready, let us walk through the cooking process step by step. Put on an apron, open a window to let the steam out, and let us get started.
Step 1: Caramelize the Onions
We start with the onions because they take the longest. Set a large skillet over medium-low heat. Add two tablespoons of olive oil and one tablespoon of butter. Once the butter is melted and bubbling, add your thinly sliced yellow onions.
Sprinkle a pinch of kosher salt over the onions. This helps draw out their moisture, speeding up the breakdown process. Stir the onions to coat them thoroughly in the oil and butter.
Now, practice patience. Stir the onions every five minutes. For the first fifteen minutes, they will soften and turn translucent. By thirty minutes, they will start to take on a light golden hue. If you notice them browning too quickly or scorching at the edges, turn your heat down to low.
At the forty-minute mark, your onions should be deep brown, jammy, and sweet. Pour in one tablespoon of Worcestershire sauce to deglace the pan, scraping up all the delicious browned bits from the bottom. Stir for another minute until the liquid is absorbed. Transfer the onions to a bowl and set them aside. Do not wash the skillet; those leftover onion juices will add incredible flavor to our beef.
Step 2: Mix the Dipping Sauce
While your onions are cooking, you can easily whip up the dipping sauce. In a medium bowl, combine the mayonnaise, smoky barbecue sauce, yellow mustard, dill pickle juice, and smoked paprika.
Whisk the mixture until it is completely smooth and uniform in color. Taste the sauce. If you want more tang, add another splash of pickle juice. If you want more heat, a dash of hot sauce or cayenne pepper works beautifully. Cover the bowl and place it in the refrigerator to let the flavors marry while you cook the rest of the meal.
Step 3: Prep and Sear the Beef
Divide your ground beef into eight equal portions, roughly four ounces each. Roll them into balls, then press them flat on a piece of parchment paper. Use your hands to shape them into ovals that match the shape of your bread slices. Remember to make them slightly larger than the bread, as they will shrink in the pan.
Season both sides of the patties generously with kosher salt and coarse black pepper. Do not be shy with the seasoning; beef needs a good amount of salt to bring out its natural flavors.
Heat a large cast-iron skillet or flat-top griddle over medium-high heat. You want the pan to be smoking hot. Working in batches to avoid crowding the pan, place your patties onto the hot surface.
Press down on the patties with a heavy spatula to ensure maximum contact with the hot metal. This is how you get that gorgeous, flavorful crust. Cook the patties for about three minutes on the first side. You should see the edges turning brown and crispy.
Flip the patties over. Immediately place a slice of Swiss cheese on four of the patties, and a slice of provolone or cheddar on the other four. Cook for another two minutes until the cheese begins to melt and the beef is cooked through. Remove the patties from the heat and set them aside on a plate.
Step 4: Assemble the Patty Melts
Now comes the fun part: construction. Clean your skillet or griddle of any excess grease, leaving just a thin film to help toast the bread. Keep the heat on medium-low.
Take your slices of sourdough or rye bread. Spread a generous layer of softened unsalted butter on one side of each slice. If you want an even crispier, diner-style crust, you can use mayonnaise instead of butter on the outside of the bread. Mayo has a higher smoke point and creates an incredibly even golden crust.
Lay four slices of bread, buttered-side down, onto a clean work surface. Layer a slice of Swiss cheese onto each piece of bread. This acts as a barrier, protecting the bread from the moist ingredients we are about to add.
Next, add a generous scoop of your caramelized onions, spreading them evenly across the cheese.
Stack two beef patties on top of the onions. I like to pair a Swiss-topped patty with a provolone-topped patty for the ultimate cheesy experience, just like the double-decker masterpieces in our reference photo.
Add another layer of caramelized onions on top of the beef. Finally, top each sandwich with a slice of provolone or cheddar cheese, and place the remaining slices of bread on top, buttered-side up.
Step 5: Griddle to Golden Perfection
Carefully place your assembled sandwiches onto the warm skillet or griddle over medium-low heat. You want to cook them slowly so the bread toasts to a perfect golden brown at the exact moment the cheese inside melts completely.
To help the process along, place a heavy pan or a clean brick wrapped in foil on top of the sandwiches. This presses the ingredients together, ensuring the cheese fuses everything into one cohesive unit.
Griddle for about four to five minutes on the first side. Carefully lift the edge of a sandwich with a spatula to check the color. Once it is beautifully golden brown and crispy, remove the weight, flip the sandwiches over, and apply the weight again.
Cook for another four minutes on the second side. You should hear a satisfying sizzle as the cheese melts down the sides of the bread, creating crispy, lacy cheese edges on the hot pan.
Once both sides are toasted to perfection and the cheese is oozing out of the sides, remove the patty melts from the heat. Let them rest on a wooden cutting board for two minutes before slicing. This short rest allows the juices in the beef to redistribute, ensuring your first bite is incredibly juicy rather than dry.
Keeping Them Crispy for a Crowd
If you look at the reference photo, you will see a massive stack of double-decker patty melts served on a wooden board. If you are hosting a gathering or feeding a large family, cooking these in batches can be stressful. How do you keep the first batch warm and crispy while you cook the rest?
The secret is your oven. Before you start cooking, preheat your oven to 200 degrees Fahrenheit. Place a wire baking rack inside a large rimmed baking sheet and put it in the oven.
As you finish griddling each patty melt, transfer it directly onto the wire rack in the warm oven. The hot air circulating around the sandwich will keep it warm, while the wire rack prevents the bottom piece of bread from getting soggy.
Do not stack them on top of each other in the oven, as the steam from the hot sandwiches will ruin the crispy crust. Only stack them up on your serving board right before you are ready to bring them to the table.
Common Mistakes to Avoid
Even with a detailed guide, things can go wrong in the kitchen. Here are the most common mistakes people make when cooking patty melts, and how to avoid them.
The first mistake is using cold ingredients. If you pull your cheese and leftover caramelized onions straight from the refrigerator and put them into the sandwich, they will not heat through by the time your bread is toasted. You will end up with burnt bread and cold, solid cheese in the middle. Always let your onions and cheese come to room temperature before assembling your sandwiches.
The second mistake is using too much heat during the griddling process. It is tempting to crank up the heat to speed things up, but this will burn the butter on the outside of your bread long before the heat penetrates to the center of the sandwich. Keep your heat on medium-low and let the gentle heat do its magic.
The third mistake is skipping the weight. Pressing the sandwich is not just for show. It forces the melting cheese into the crevices of the bread and the beef patties, acting as the glue that holds this massive double-decker sandwich together. If you do not press it, your sandwich will slide apart as soon as you try to cut or eat it.
The fourth mistake is under-seasoning the beef. Because we are using rich bread, sweet onions, and flavorful cheese, your beef needs to be highly seasoned to stand out. Do not be afraid of salt and black pepper. Season your patties immediately before they hit the hot pan.
Fun Variations to Try
Once you have mastered the classic double patty melt, you can start experimenting with fun flavor profiles. Here are a few of my favorite twists on this classic diner staple.
If you love spicy food, try the Jalapeno Popper Patty Melt. Swap out the Swiss cheese for pepper jack, and add sliced pickled jalapeños along with a smear of cream cheese to the inside of your bread slices. The creamy, spicy contrast to the rich beef is absolutely incredible.
For a rustic, earthy flavor, try the Mushroom Swiss Patty Melt. Sauté sliced cremini mushrooms in butter with garlic and fresh thyme, then layer them onto the sandwich alongside your caramelized onions. The umami-rich mushrooms pair beautifully with the nutty Swiss cheese.
If you want the ultimate breakfast hybrid, try the Breakfast Patty Melt. Add a crispy fried egg with a runny yolk to the center of the sandwich before griddling. When you cut the sandwich in half, the rich yolk will cascade over the beef and onions, creating a decadent sauce that is out of this world.
A Natural Ending to a Delicious Journey
Cooking is all about creating memories and sharing delicious food with the people you love. The patty melt is more than just a sandwich; it is a labor of love that brings the comfort of a classic American diner straight to your home dining table.
As you stack your freshly griddled, golden-brown double-decker patty melts onto a wooden board next to a bowl of smoky dipping sauce and a fresh garden salad, take a moment to appreciate the aromas filling your kitchen. The sweet scent of caramelized onions, the savory note of seared beef, and the rich aroma of toasted buttered bread are the ultimate reward for your patience and effort.
Gather your family around, slice those sandwiches in half to reveal the gorgeous, cheesy layers, and dive in. Do not worry about the napkins; a truly great patty melt is supposed to be a little messy. Enjoy every single bite of your hard work.