
It was a chilly Sunday afternoon during peak football season when I first came up with this recipe. My living room was packed with hungry friends, the game was intense, and my usual party trick of chips, salsa, and frozen pizza rolls just felt a bit sad. I wanted to make something that had all the comforting, savory, greasy glory of a classic cheeseburger but in a finger-food format that did not require me to stand outside in the freezing cold flipping patties on a grill.
That was the day the cheeseburger pinwheel was born in my kitchen. Over the years, I have tinkered with the dough, the seasoning, the cheese ratios, and the baking method to perfect this recipe. If you have ever tried making pinwheels before, you might have run into the dreaded soggy bottom syndrome, or maybe your filling exploded all over the baking dish, leaving you with empty pastry shells and a burnt pool of cheese. Trust me, I have been there, done that, and cleaned the burnt cheese off my baking pans more times than I care to admit.
Today, I am going to share every single tip, trick, and hard-learned lesson I have gathered from making these dozens of times. We will talk about why the temperature of your ingredients is your secret weapon, how to choose the right dough, and how to whip up a dipping sauce that will have your guests licking their fingers and asking for the recipe.
The Puff Pastry versus Crescent Dough Battle
When you start looking up pinwheel recipes, you will find a split camp. Half the internet swears by crescent roll dough, and the other half insists on puff pastry. When I first started out, I used crescent dough because it is cheap, easy to find, and comes in those satisfying pop-open cans.
But here is the honest truth from someone who has baked hundreds of these: crescent dough is too soft and contains too much yeast and sugar. As it bakes, it puffs up in a soft, bready way that can easily trap steam inside, leading to a doughy, wet interior. It tastes good, but it lacks that shatteringly crisp, premium bakery feel.
Puff pastry, on the other hand, is a laminated dough. This means it has dozens of paper-thin layers of dough separated by layers of butter. When cold butter hits a hot oven, the water in the butter evaporates, creating steam that puffs the layers apart. The result is an incredibly light, flaky, crispy crust that contrasts beautifully with the rich, savory beef and gooey cheese inside.
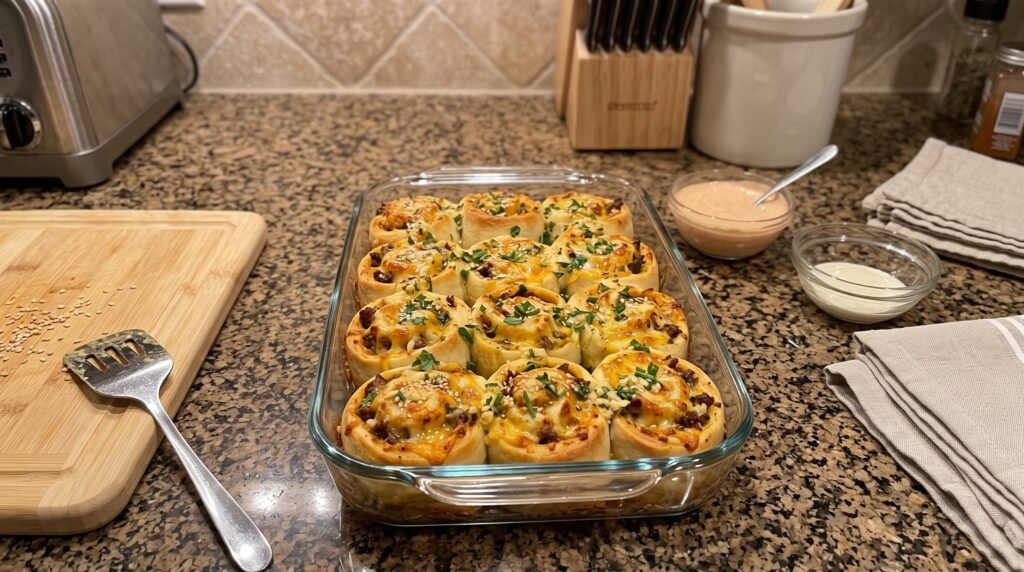
If you want your pinwheels to look like the ones in the picture, with those beautiful, defined, golden swirls, you must use puff pastry. It is slightly more expensive, but the texture is night and day. Just make sure to buy the sheets, not the shells, and keep them in the freezer until you are ready to start prepping.
The Most Critical Lesson: Temperature Control
If you take only one thing away from this article, let it be this: hot filling is the absolute enemy of cold pastry dough.
The very first time I made these, I was in a rush. I browned my ground beef with onions, drained the grease, and immediately dumped the steaming hot meat onto my thawed sheet of puff pastry. I sprinkled the cheese on top and tried to roll it up.
It was an absolute disaster. The heat from the beef instantly melted the butter inside the puff pastry sheets. The dough turned into a warm, sticky, stretchy glue that tore apart the second I tried to roll it. When I finally managed to push it into a messy log and cut it, the filling squished out of the sides like toothpaste. When I baked them, they did not puff up at all. They just melted into a sad, greasy puddle of flat dough and dried meat.
I almost gave up on the recipe entirely that day. But I realized that puff pastry is all about science. For those flaky layers to form, the butter inside the dough must stay solid until it hits the hot oven.
To prevent this tragedy in your kitchen, you must let your cooked beef mixture cool down completely. I mean cold. Once I cook my beef and onions, I transfer the mixture to a bowl and put it in the refrigerator for at least thirty minutes. It should feel chilly to the touch before it ever comes near your pastry.
Additionally, once you have rolled up your pastry log with the cold filling inside, wrap it in plastic wrap and stick it in the freezer for ten to fifteen minutes before you slice it. This firms up the dough and the cheese, allowing you to slice clean, beautiful pinwheels without squishing them flat.
Choosing the Right Ingredients
To make these taste like an actual, high-quality cheeseburger, every component needs to bring flavor to the table. Let us break down the ingredients you will need.
| Ingredient | Amount | Purpose |
|---|---|---|
| Puff pastry sheets | 2 sheets | The flaky, buttery wrapper for our fillings |
| Ground beef | 1 pound | Choose 85/15 or 90/10 lean ratio for flavor without excess grease |
| Yellow onion | 1 medium | Finely diced to blend seamlessly into the meat mixture |
| Garlic powder | 1 teaspoon | Adds depth of flavor to the beef seasoning |
| Salt and black pepper | To taste | Essential seasoning for the ground beef |
| Worcestershire sauce | 1 tablespoon | The secret weapon that adds deep umami, savory burger flavor |
| Sharp cheddar cheese | 2 cups | Shredded from a block for the best melting texture |
| Egg | 1 large | Whisked with a splash of water for the egg wash |
| Sesame seeds | 2 tablespoons | Sprinkled on top to mimic a classic burger bun |
| Fresh chives | 3 tablespoons | Finely chopped for a bright, fresh garnish after baking |
Now, let us dive deep into some of these ingredients so you know exactly why they are there and how to handle them.
For the ground beef, do not go too lean. If you use 93/7 or 95/5 super-lean beef, the filling will turn out dry and crumbly, lacking that juicy cheeseburger flavor. On the flip side, do not use 80/20 ground chuck unless you are prepared to drain and blot the meat incredibly well. Excess fat will pool at the bottom of your baking dish and turn your pastry soggy. I find that 85/15 is the sweet spot. It has enough fat to stay juicy but is easy to drain.
When it comes to the cheese, please avoid the pre-shredded bags if you can. I know they are convenient, but those bags are packed with potato starch and cellulose to keep the cheese from sticking together. That starch prevents the cheese from melting into that perfectly smooth, gooey, cohesive layer. Grate a block of sharp cheddar yourself. The flavor is stronger, and it melts beautifully into the meat, acting like a delicious glue that holds the pinwheels together.
The Worcestershire sauce is another non-negotiable for me. It adds a complex, savory depth that instantly makes ground beef taste like an expensive steakhouse burger. Do not skip it.
Step-by-Step Guide to Perfect Pinwheels
Let us walk through the process step-by-step so your pinwheels turn out absolutely flawless.
Step 1: Prep and Thaw your Pastry
Take your puff pastry out of the freezer. It usually takes about forty minutes to thaw on the counter, or overnight in the refrigerator. You want it pliable enough to unfold without cracking, but still cold to the touch. If it gets too warm, wrap it up and put it back in the fridge for ten minutes.
Step 2: Brown the Beef and Aromatics
Heat a large skillet over medium-high heat. Add your ground beef and finely diced yellow onion. Use a wooden spoon or a potato masher to break the beef up into very fine crumbles. You do not want large chunks of meat here, because large chunks will fall out of your pinwheels when you try to slice and roll them.
Once the beef is fully browned and the onions are soft and translucent, drain off all the excess grease. I like to tilt my skillet and use a spoon to scoop the fat out, or even transfer the beef to a colander lined with paper towels to press out the moisture.
Step 3: Season the Beef
Return the drained beef to the skillet over low heat. Stir in your salt, black pepper, garlic powder, and Worcestershire sauce. Let it cook for another two minutes so the meat absorbs all those beautiful flavors.
Step 4: Cool the Filling
Transfer the seasoned beef to a shallow bowl or a baking sheet. Spreading it out helps it cool down much faster. Put it in the refrigerator for thirty minutes. It needs to be completely cold.
Step 5: Roll and Fill
On a lightly floured surface, gently unfold one sheet of puff pastry. Use a rolling pin to lightly roll it out into a slightly larger rectangle, about ten by twelve inches.
Spread half of your cooled beef mixture evenly across the pastry sheet, leaving about a half-inch border along the edges. Sprinkle one cup of your freshly grated cheddar cheese evenly over the beef.
Step 6: The Tight Roll
Starting from the long edge closest to you, begin rolling the pastry sheet away from you into a tight log. Think of rolling a sleeping bag; you want it snug so there are no air pockets, but do not pull so hard that you tear the dough.
Once you reach the far edge, pinch the seam closed to seal the roll. Repeat this entire process with the second sheet of pastry and the remaining beef and cheese.
Step 7: The Chill Phase
Wrap both dough logs tightly in plastic wrap. Place them in your freezer for fifteen minutes. While they are chilling, preheat your oven to 400 degrees Fahrenheit. If you have a glass baking dish like the one in the photo, grease it lightly with baking spray or line it with parchment paper.
Step 8: Slice with Care
Remove one log from the freezer. Using a very sharp serrated knife, slice the log into rounds about one inch thick. Using a sawing motion rather than pressing straight down will prevent you from flattening the rolls.
If you do not have a sharp knife, you can use the dental floss trick. Slide a piece of unflavored, unscented dental floss under the log, cross the ends over the top, and pull them quickly in opposite directions. It cuts through the dough and filling like butter without squishing the round.
Step 9: Arrange and Garnish
Place the sliced pinwheels into your prepared glass baking dish, leaving a little bit of space between them as they will expand significantly in the oven.
In a small bowl, whisk your egg with a tablespoon of water. Use a pastry brush to lightly coat the tops and sides of each pinwheel with the egg wash. This is what gives them that gorgeous, glossy, golden-brown finish. Sprinkle the tops generously with toasted sesame seeds.
Step 10: Bake to Perfection
Bake in your preheated oven at 400 degrees Fahrenheit for twenty-five to thirty minutes. You are looking for the pastry to be puffed up, deeply golden, and the cheese to be bubbly and melted.
If the tops are browning too fast but the pastry inside still looks doughy, tent a piece of aluminum foil loosely over the baking dish and let them cook for another five minutes.
Step 11: Final Flourish
Remove the dish from the oven and let it cool for about five to ten minutes. Do not try to eat them immediately, as the hot cheese inside will burn your mouth. Garnish the warm pinwheels generously with your finely chopped fresh chives or green onions. The heat from the pastries will slightly wilt the herbs, releasing their oils and adding a lovely, fresh aroma.
The Secret Dipping Sauce
While your cheeseburger pinwheels are baking and filling your house with an aroma that will make everyone flock to the kitchen, it is time to make the secret sauce.
A classic cheeseburger is not complete without that tangy, creamy, slightly sweet special sauce. Because puff pastry is naturally rich and buttery, a tangy dipping sauce is essential to balance out the flavors. It cuts through the richness and keeps you coming back for bite after bite.
This sauce is incredibly simple to whip up, and you likely already have all the ingredients in your fridge and pantry.
In a medium bowl, combine half a cup of real mayonnaise (do not use salad dressing spread, you want high-quality mayo), three tablespoons of ketchup, and one tablespoon of sweet pickle relish. To add a bit of tang and brightness, stir in a teaspoon of yellow mustard and half a teaspoon of white vinegar or apple cider vinegar.
To round out the flavors, add a pinch of garlic powder, onion powder, and a dash of smoked paprika. The smoked paprika gives it a subtle, smoky backyard-grill flavor that makes you feel like you are eating a burger straight off the charcoal.
Whisk everything together until it is completely smooth. Taste it and adjust to your liking. If you want it sweeter, add a tiny bit of relish juice. If you want it spicier, a dash of hot sauce or a pinch of cayenne pepper does wonders. Keep it in the fridge until you are ready to serve. The cold, creamy sauce paired with the hot, flaky pinwheels is an absolute match made in culinary heaven.
Variations on the Theme
Once you have mastered the basic cheeseburger pinwheel, the sky is the limit. Here are a few variations that have been huge hits in my household.
The Bacon Cheeseburger Pinwheel
Because everything is better with bacon. Simply fry up six strips of bacon until they are extra crispy. Drain them on paper towels and crumble them into tiny pieces. Mix the crumbled bacon directly into your cooled ground beef mixture before spreading it onto the pastry. The added crunch and smoky saltiness are incredible.
The Spicy Jalapeno Popper Cheeseburger
If you like a bit of heat, this version is for you. Finely dice one or two fresh jalapenos and cook them right along with your onions and ground beef. Instead of using only cheddar cheese, spread a thin layer of softened, room-temperature cream cheese onto your puff pastry sheet before adding the meat. Top with cheddar and sliced pickled jalapenos, then roll and bake as usual. It is creamy, spicy, and absolutely addictive.
The Vegetarian Burger Roll-Up
You can easily make this recipe vegetarian-friendly without losing any of that comfort-food appeal. Substitute the ground beef with your favorite plant-based meat crumbles. Cook them in a skillet with the onions and seasonings just like you would with real beef. Since plant-based meats tend to be drier, you may want to add an extra splash of Worcestershire sauce (make sure to use a vegan brand, as traditional Worcestershire contains anchovies) or a spoonful of tomato paste to keep the filling juicy.
The Philly Cheesesteak Style
Trade the ground beef for shaved ribeye steak or high-quality roast beef sliced into thin ribbons. Sauté onions and green bell peppers until caramelized. Cool the mixture completely. Spread it onto the puff pastry and top with sliced provolone or Swiss cheese. Skip the sesame seeds on top and opt for a sprinkle of sea salt and cracked black pepper instead. Serve with a warm au jus or a garlic aioli for dipping.
Troubleshooting Common Pinwheel Disasters
Even with the best instructions, baking can sometimes be unpredictable. Here are some of the most common issues people run into and exactly how to fix them.
My pinwheels are completely flat and didn't puff up.
This is almost always a temperature issue. If your puff pastry got too warm before going into the oven, the butter layers melted and merged into the dough instead of creating steam. Next time, make sure your filling is completely cold, and do not skip the freezer chill step before slicing. Also, ensure your oven is fully preheated to 400 degrees Fahrenheit. If your oven temperature is too low, the pastry will slow-bake instead of puffing.
The filling fell out of the pinwheels during baking.
This usually happens for two reasons: either your beef crumbles were too large, or you did not roll the pastry tightly enough. When browning your meat, make sure to break it up as finely as possible. When rolling the dough, keep it snug. Another tip is to make sure you do not overstuff the pastry. It is tempting to pile on the meat and cheese, but leaving a little breathing room allows the dough to wrap around the filling and lock it in place as it bakes.
The bottom of my pastry is wet and doughy, but the top is burnt.
This is caused by too much moisture in the filling. If you do not drain your beef grease thoroughly, or if your onions released too much liquid, that moisture will sink to the bottom of the pan and steam the pastry instead of letting it crisp up. Make sure to press your cooked beef with paper towels to remove excess fat. Also, if you are baking in a dark metal pan, it can cook the tops too fast while the bottom stays doughy. I highly recommend using a glass baking dish or a light-colored ceramic dish, which distributes heat more evenly and allows you to look through the glass to see if the bottoms are beautifully browned.
I can't slice the roll without squishing it flat.
If your dough is too soft, slicing it will turn your beautiful round rolls into sad, flat ovals. Make sure the rolled log goes into the freezer for fifteen minutes before you slice. This semi-freezes the butter in the pastry and the fat in the cheese, making the log firm and easy to cut. Also, make sure your knife is incredibly sharp. A dull knife will drag and tear the dough rather than cutting cleanly through it.
Making Ahead, Storing, and Reheating
One of the reasons this recipe is such a staple in my entertaining arsenal is that it is incredibly freezer-friendly and easy to prepare ahead of time.
If you are hosting a party and want to minimize your stress on the day of the event, you can fully assemble, roll, and wrap the pastry logs the day before. Keep them wrapped in plastic wrap in the refrigerator overnight. When your guests arrive, simply slice them, brush with egg wash, sprinkle with sesame seeds, and pop them into the oven. You will have hot, fresh, homemade appetizers ready in under thirty minutes with zero kitchen mess to clean up.
You can also freeze the sliced, unbaked pinwheels. Place the sliced rounds on a baking sheet lined with parchment paper, making sure they are not touching, and freeze them until solid. Once frozen, transfer them to a zip-top freezer bag. They will keep beautifully for up to three months. When you are ready to bake, place them directly from the freezer onto your baking dish. Add your egg wash and sesame seeds, and bake them at 400 degrees Fahrenheit. You will just need to add about five to eight minutes to the baking time to ensure they cook through completely.
If you happen to have leftovers (though in my house, that is a rare occurrence), they store wonderfully in an airtight container in the refrigerator for up to four days.
When it comes to reheating, please step away from the microwave. Microwaving puff pastry will instantly turn that beautiful, flaky, crispy crust into a rubbery, chewy, sad mess.
Instead, reheat them in your oven or toaster oven at 350 degrees Fahrenheit for about eight to ten minutes. If you have an air fryer, it is the ultimate tool for reheating these. Pop them in at 350 degrees for four to five minutes, and they will taste exactly as crisp, buttery, and fresh as the moment they came out of the oven for the first time.
Why This Recipe Works
At the end of the day, food is about sharing joy and comfort with the people you care about. These cheeseburger pinwheels do exactly that. They take a familiar, beloved flavor profile and repackage it into an elegant, easy-to-eat format that turns any gathering into a celebration.
The contrast between the flaky, salty, buttery puff pastry, the rich, savory, umami-packed ground beef, and the sharp, gooey melted cheddar is a texture and flavor journey that never gets old. Add in the cool, tangy, slightly smoky dipping sauce, and you have a dish that is guaranteed to be the star of the show.
So next time you are hosting a game night, planning a birthday party, or just looking for a fun, comforting weekend dinner for your family, skip the freezer aisle and give these a try. Take your time, let your filling cool, roll it up tight, and watch your kitchen transform into the best burger joint in town. Your friends and family will thank you, and your only problem will be making sure you grab one for yourself before they all disappear.